Crochet Hanging Wall Organizer Pattern: Three Boho Storage Pockets
This crochet hanging wall organizer pattern combines three soft storage pockets, natural wooden dowels, and an airy mesh texture. It is a lovely way to give lightweight everyday items a place while adding handmade warmth to a room.
Use your organizer for folded napkins, yarn accessories, small empty containers, or other light essentials. The cream cotton and wood combination works especially well in a cozy kitchen, craft room, or entryway.
This original Cute Stitch Studio design is a crochet interpretation of a boho hanging organizer. Each pocket starts as a simple rectangle, so you can practice the construction on one pocket before making the full set.
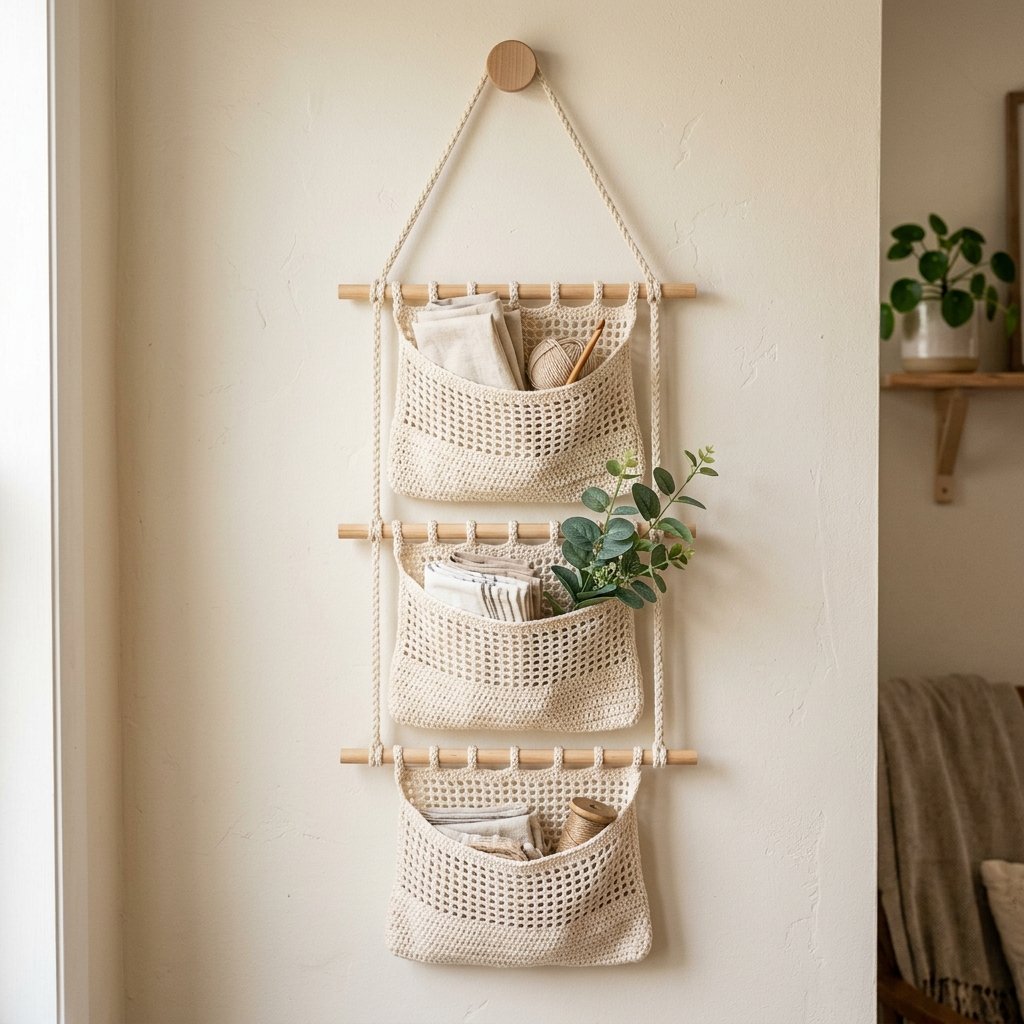
Table of Contents
Crochet Hanging Wall Organizer Pattern: Three Boho Storage Pockets Instructions
Project Details
- Skill level: Confident beginner, with careful assembly.
- Estimated time: Approximately 10–15 hours for three pockets and assembly.
- Finished pocket size: Approximately 16 inches wide when flat, with a 7-inch front and a 10-inch back.
- Finished organizer size: Approximately 18 inches wide and 45–48 inches tall, including the hanging section.
- Crochet terminology: US terms.
- Construction: Three folded rectangular panels with sewn sides, gently gathered front openings, and crochet loops around wooden dowels.
This pattern is an untested design draft. Measurements and yarn quantities are estimates; make and assess one pocket before completing the matching set.
Materials
- Approximately 900–1,100 yards of sturdy category 4 cotton yarn.
- 5 mm crochet hook, or the size needed to meet gauge.
- Yarn needle.
- Scissors.
- Measuring tape.
- Stitch markers.
- Three smooth wooden dowels, each approximately 18 inches long and ¾ inch in diameter.
- Approximately 8 yards of separate, firmly braided 4–5 mm hanging cord.
- One closed hanging ring and wall hardware suitable for the intended display.
The separate hanging cord supports the dowels. The cotton crochet forms the storage pockets.
Hook Size
Use a 5 mm crochet hook as your starting point.
Your double crochet fabric should be flexible but reasonably firm. If the stitches are very loose, try a smaller hook and check the gauge again.
Yarn
Choose category 4, worsted-weight cotton with a firm twist. A smooth yarn makes the mesh easier to count and gives the solid sections a tidy finish.
Natural cream creates the soft appearance shown in this project. Oatmeal, warm taupe, and light caramel are other lovely options.
Make all three pockets with the same yarn and hook. Differences in thickness or tension can make the tiers hang unevenly.

Abbreviations
- ch: chain.
- sc: single crochet.
- dc: double crochet.
- st / sts: stitch / stitches.
Before You Start
Gauge
Approximately 12 dc and 7 rows = 4 inches.
For the mesh, approximately 12 stitch positions and 7 rows = 4 inches. Each double crochet and each chain space counts as one position when measuring the mesh width.
Make a swatch that includes both solid double crochet and the mesh repeat. The two fabrics should have similar widths.
How the Pockets Are Shaped
Each panel has 49 stitch positions across and 29 rows. The first 17 rows form the taller back. The final 12 rows fold upward to form the shorter front.
The front has a solid lower section and a mesh upper section. Its opening is lightly gathered after assembly, creating a soft pouch shape.
These are flexible fabric pockets, not rigid baskets. Their rounded appearance develops when lightweight contents gently open them out.
Turning Chains and Counts
- At the beginning of a dc or mesh row, ch 3 counts as the first dc.
- At the beginning of a sc row, ch 1 does not count as a stitch.
- Turn after every panel row.
- Work the final stitch of a dc or mesh row into the top of the previous turning chain.
- A mesh row contains 25 dc and 24 ch-1 spaces: 49 positions total.
Display Notes
The load capacity of this handmade organizer has not been established. Begin with lightweight, nonbreakable contents. Do not assume it can support a full load of fruit, glass containers, or planted pots.
Check the assembled organizer over a padded surface before hanging it. Use appropriate wall hardware and keep the display away from beds, seating, and places where children could pull on the cords.
Crochet Hanging Wall Organizer Pattern
Part 1 — Begin the Back Panel
Make three identical panels. Complete one pocket first to confirm your preferred size and construction.
Foundation: Ch 51.
Row 1: Dc in the fourth chain from the hook and in each remaining chain. The three skipped chains count as the first dc. Turn. (49 dc)
Row 2: Ch 3. Repeat [ch 1, skip the next stitch, dc in the next stitch] 24 times. Turn. (25 dc and 24 ch-1 spaces)
Row 3: Ch 3. Repeat [ch 1, skip the next chain space, dc in the next dc] 24 times. Work the final dc into the top of the previous turning chain. Turn. (25 dc and 24 ch-1 spaces)
Rows 4–12: Repeat Row 3.
The back now has a narrow solid top edge followed by open mesh.
Part 2 — Crochet the Solid Lower Section
Row 13: Ch 3. Repeat [dc around the next ch-1 space, dc in the next dc] 24 times. Turn. (49 dc)
Rows 14–17: Ch 3, skip the first stitch beneath the turning chain, and dc in each remaining stitch. Turn. (49 dc)
Place a marker at both ends of Row 17. The fold will sit between Rows 17 and 18.
Rows 18–24: Ch 3, skip the first stitch beneath the turning chain, and dc in each remaining stitch. Turn. (49 dc)
This continuous solid section forms the bottom of the pocket and the lower part of its front.

Part 3 — Add the Front Mesh
Row 25: Ch 3. Repeat [ch 1, skip the next stitch, dc in the next stitch] 24 times. Turn. (25 dc and 24 ch-1 spaces)
Rows 26–29: Repeat Row 3. (25 dc and 24 ch-1 spaces)
Fasten off.
Your finished panel should measure approximately 16 inches wide and 16½ inches long before seaming. Small differences are fine if all three panels match.
Part 4 — Fold and Sew the Pocket
Lay the panel flat with Row 1 at the top and Row 29 at the bottom.
Bring the lower section upward, folding between Rows 17 and 18. Row 29 becomes the front opening. The taller back remains visible above it.
Match the side edges using the following row pairs:
- Front Row 18 meets Back Row 17 at the bottom.
- Front Row 19 meets Back Row 16.
- Continue matching one row end from the front to one row end from the back.
- Front Row 29 meets Back Row 6 at the opening.
Use stitch markers to hold both sides together.
With matching yarn, whipstitch one side from the bottom fold to the front opening. Make two small sewing passes through each pair of row ends, catching the actual crochet stitches rather than only an open mesh space.
Repeat along the other side. Leave the front opening and the upper back completely unsewn.
Turn the pocket so the side seams sit inside. Gently open out the bottom with your hand.
Part 5 — Finish the Front Opening
Join yarn at one front corner of Row 29. Ch 1.
Sc in the first dc. Repeat [sc around the next chain space, sc in the next dc] 24 times. (49 sc)
Fasten off and weave in the ends.
Cut a strand of the separate braided cord approximately 24 inches long. Weave it through the mesh spaces immediately below this new sc edge, running from one front corner to the other.
Gently gather the front opening until the corded edge measures approximately 14 inches along its curve. Spread the gathers evenly; do not bunch them all at the corners.
Secure each cord end around the corresponding side seam with two half hitches. Leave a short tail, tuck it inside, and stitch the tail down with matching yarn so it cannot work loose easily.
This cord adds definition to the curved opening. It is not a handle.
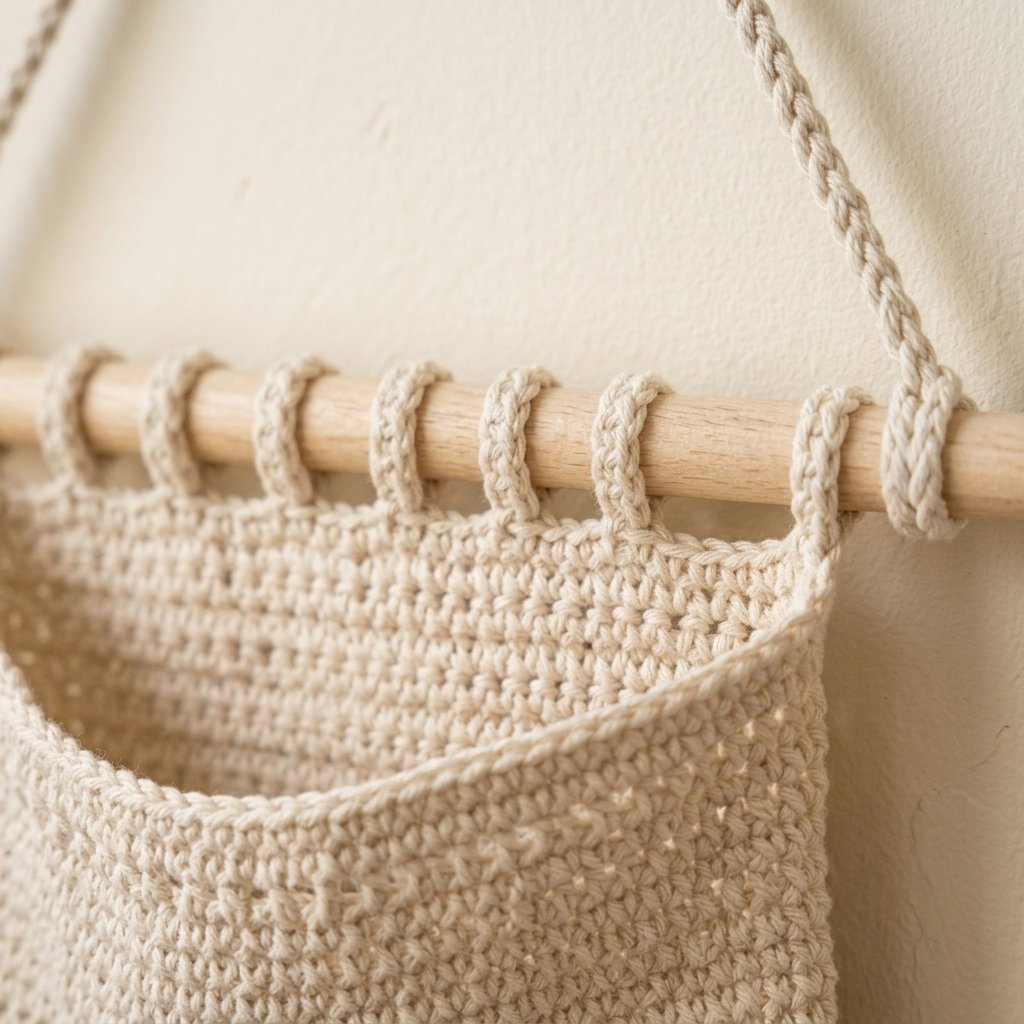
Part 6 — Make the Dowel Loops
Make seven loops for each pocket: 21 loops for the full organizer.
Leave an 8-inch starting tail.
Row 1: Ch 15. Sc in the second chain from the hook and in each remaining chain. (14 sc)
Fasten off, leaving an 8-inch finishing tail.
Each strip should be long enough to pass around your dowel with both ends overlapping the top of the pocket by approximately ½ inch. Check the first strip against your actual dowel before making the others.
If needed, adjust the starting chain. Use the same chain count for every loop.
Part 7 — Attach the Loops to the Back
Along the solid top edge of the back, mark stitches 1, 9, 17, 25, 33, 41, and 49.
Center one end of a loop strip on the first marker, against the front-facing side of the back panel. Overlap it with the top edge by approximately ½ inch.
Sew it securely through several nearby stitches in Row 1. Pass the strip over the dowel, then place the other end against the reverse side of the same attachment area.
Sew this second end firmly in place. The dowel should be enclosed by the loop, with enough room to slide through it.
Repeat at the remaining six markers. At the outermost markers, keep the sewing within the fabric rather than extending beyond the side edge.
Slide the dowel out while finishing your sewing, then reinsert it to check that the loops hang evenly.

Part 8 — Complete the Other Two Pockets
Repeat Parts 1–7 twice more.
Lay the completed pockets side by side. Check their panel widths, seam heights, gathered openings, and loop lengths.
Correct noticeable differences before assembling the tiers. Matching pockets make the final display much easier to level.
Assemble the Three-Tier Hanging Frame
Prepare the Support Cords
Cut two pieces of braided cord approximately 100 inches long each. Keep the remaining cord for adjustments if needed.
Attach the top end of each cord independently to the closed hanging ring using a round turn and two half hitches.
To make this attachment, pass the cord around the ring twice. Then wrap the short end around the standing cord, pass it through the small loop you have formed, and tighten. Repeat that half hitch once more in the same direction.
Leave at least a 4-inch tail beyond the completed knot.
Attach the Top Dowel
Place the first pocket on its dowel. Center it so approximately 1 inch of wood remains visible at each end.
Allow approximately 15 inches of cord between the hanging ring and each top-dowel attachment. This creates the triangular hanging section.
At the left exposed end, wrap the left cord around the dowel twice. Secure it with two half hitches around the standing cord above the dowel. Keep the knot snug and leave the long remaining cord hanging downward.
Repeat on the right side. Check that the dowel is level.
Add the Middle and Lower Dowels
Position the second dowel approximately 12 inches below the first, measuring from the center of one dowel to the center of the next.
Use the remaining left and right cords to attach its exposed ends with the same two-wrap and two-half-hitch arrangement.
Add the third dowel another 12 inches below the second.
Keep every attachment outside the pocket loops and approximately 1 inch from the dowel end. Tighten and inspect all knots before trimming any extra cord.
The cords and dowels should remain level when the organizer is lifted. If a knot shifts along a smooth dowel or fails to hold its position, do not load the organizer; use hardware with positive cord stops or a suitable ready-made hanging frame.
Finishing
Weave in all remaining crochet ends. Check that every dowel loop is securely sewn and that the gathering cords are tucked inside.
Gently shape the pockets by hand. Avoid stretching them aggressively during blocking; the weight of contents will already encourage the fabric to relax.
If washing is needed, remove the dowels and hanging cords where practical, follow the yarn care instructions, and dry the crochet pieces flat.
Check the organizer over a padded surface with its intended lightweight contents before installing it on the wall. Recheck the knots, seams, and wall attachment after the first display period.
Finished Size
- Flat pocket width: Approximately 16 inches.
- Back height: Approximately 10 inches, excluding loops.
- Front height: Approximately 7 inches.
- Gathered front edge: Approximately 14 inches along the curve.
- Dowel width: 18 inches.
- Space between dowels: Approximately 12 inches.
- Total organizer height: Approximately 45–48 inches, depending on loop length and knot placement.
Tips and Customization
Make a Single-Pocket Organizer
Complete one pocket and mount it on one dowel. Attach a separate hanging cord to both exposed dowel ends, leaving enough length for a triangular hanging section.
This smaller version is a useful first project before making all three tiers.
Try a Two-Tone Color Scheme
Work Rows 13–24 in warm taupe for a contrasting solid lower section. Keep the mesh, edging, and loops cream for a coordinated finish.
Choose Lightweight Contents
Folded cloth napkins, fabric scraps, small yarn balls, and lightweight craft accessories are good starting points for styling. Keep sharp tools in a separate protective container so they cannot catch the mesh.
Protect the Crochet from Moisture
Keep damp items out of the pockets. For a leafy decorative accent, choose an artificial trailing stem or a very lightweight empty decorative pot rather than a watered plant.
Check the Display Occasionally
Cotton fabric can relax with use. Redistribute the contents if a pocket begins to sag, and stop using the organizer if you notice worn yarn, loose stitching, shifting knots, or damaged hardware.
Frequently Asked Questions
Is this a crochet pattern or a macrame pattern?
This is a crochet pattern. The storage pockets are made with a hook using single crochet, double crochet, and chain spaces. Separate cord knots connect the wooden dowels.
Can a beginner make this organizer?
A beginner who can maintain a steady stitch count can make the panels. The assembly needs extra care, so start with one pocket and check each seam and loop before continuing.
Why does the front sit lower than the back?
The panel folds with 17 rows at the back and 12 at the front. This creates an accessible opening while leaving a taller section available for the dowel loops.
Can I use it as a hanging fruit basket?
This draft has no tested weight rating. Several pieces of fruit can create a substantial load, so the pattern does not establish suitability for that use. Use a holder with a suitable load rating if fruit storage is your main goal.
Why does one tier hang unevenly?
Check the cord lengths between dowels, the knot positions, and the crochet loop lengths. Also make sure that heavier contents are not concentrated on one side.
Save This Pattern for Your Next Home Project
Save this crochet hanging wall organizer pattern to your crochet home decor board on Pinterest. You can begin with one pocket and return to the instructions when you are ready to build the full set.
Looking for Your Next Crochet Project?
Love this project? Explore Cute Stitch Studio’s premium crochet patterns for more cute, cozy, gift-worthy, and beginner-friendly handmade ideas.