Free Slouchy Crochet Witch Hat Pattern for Halloween
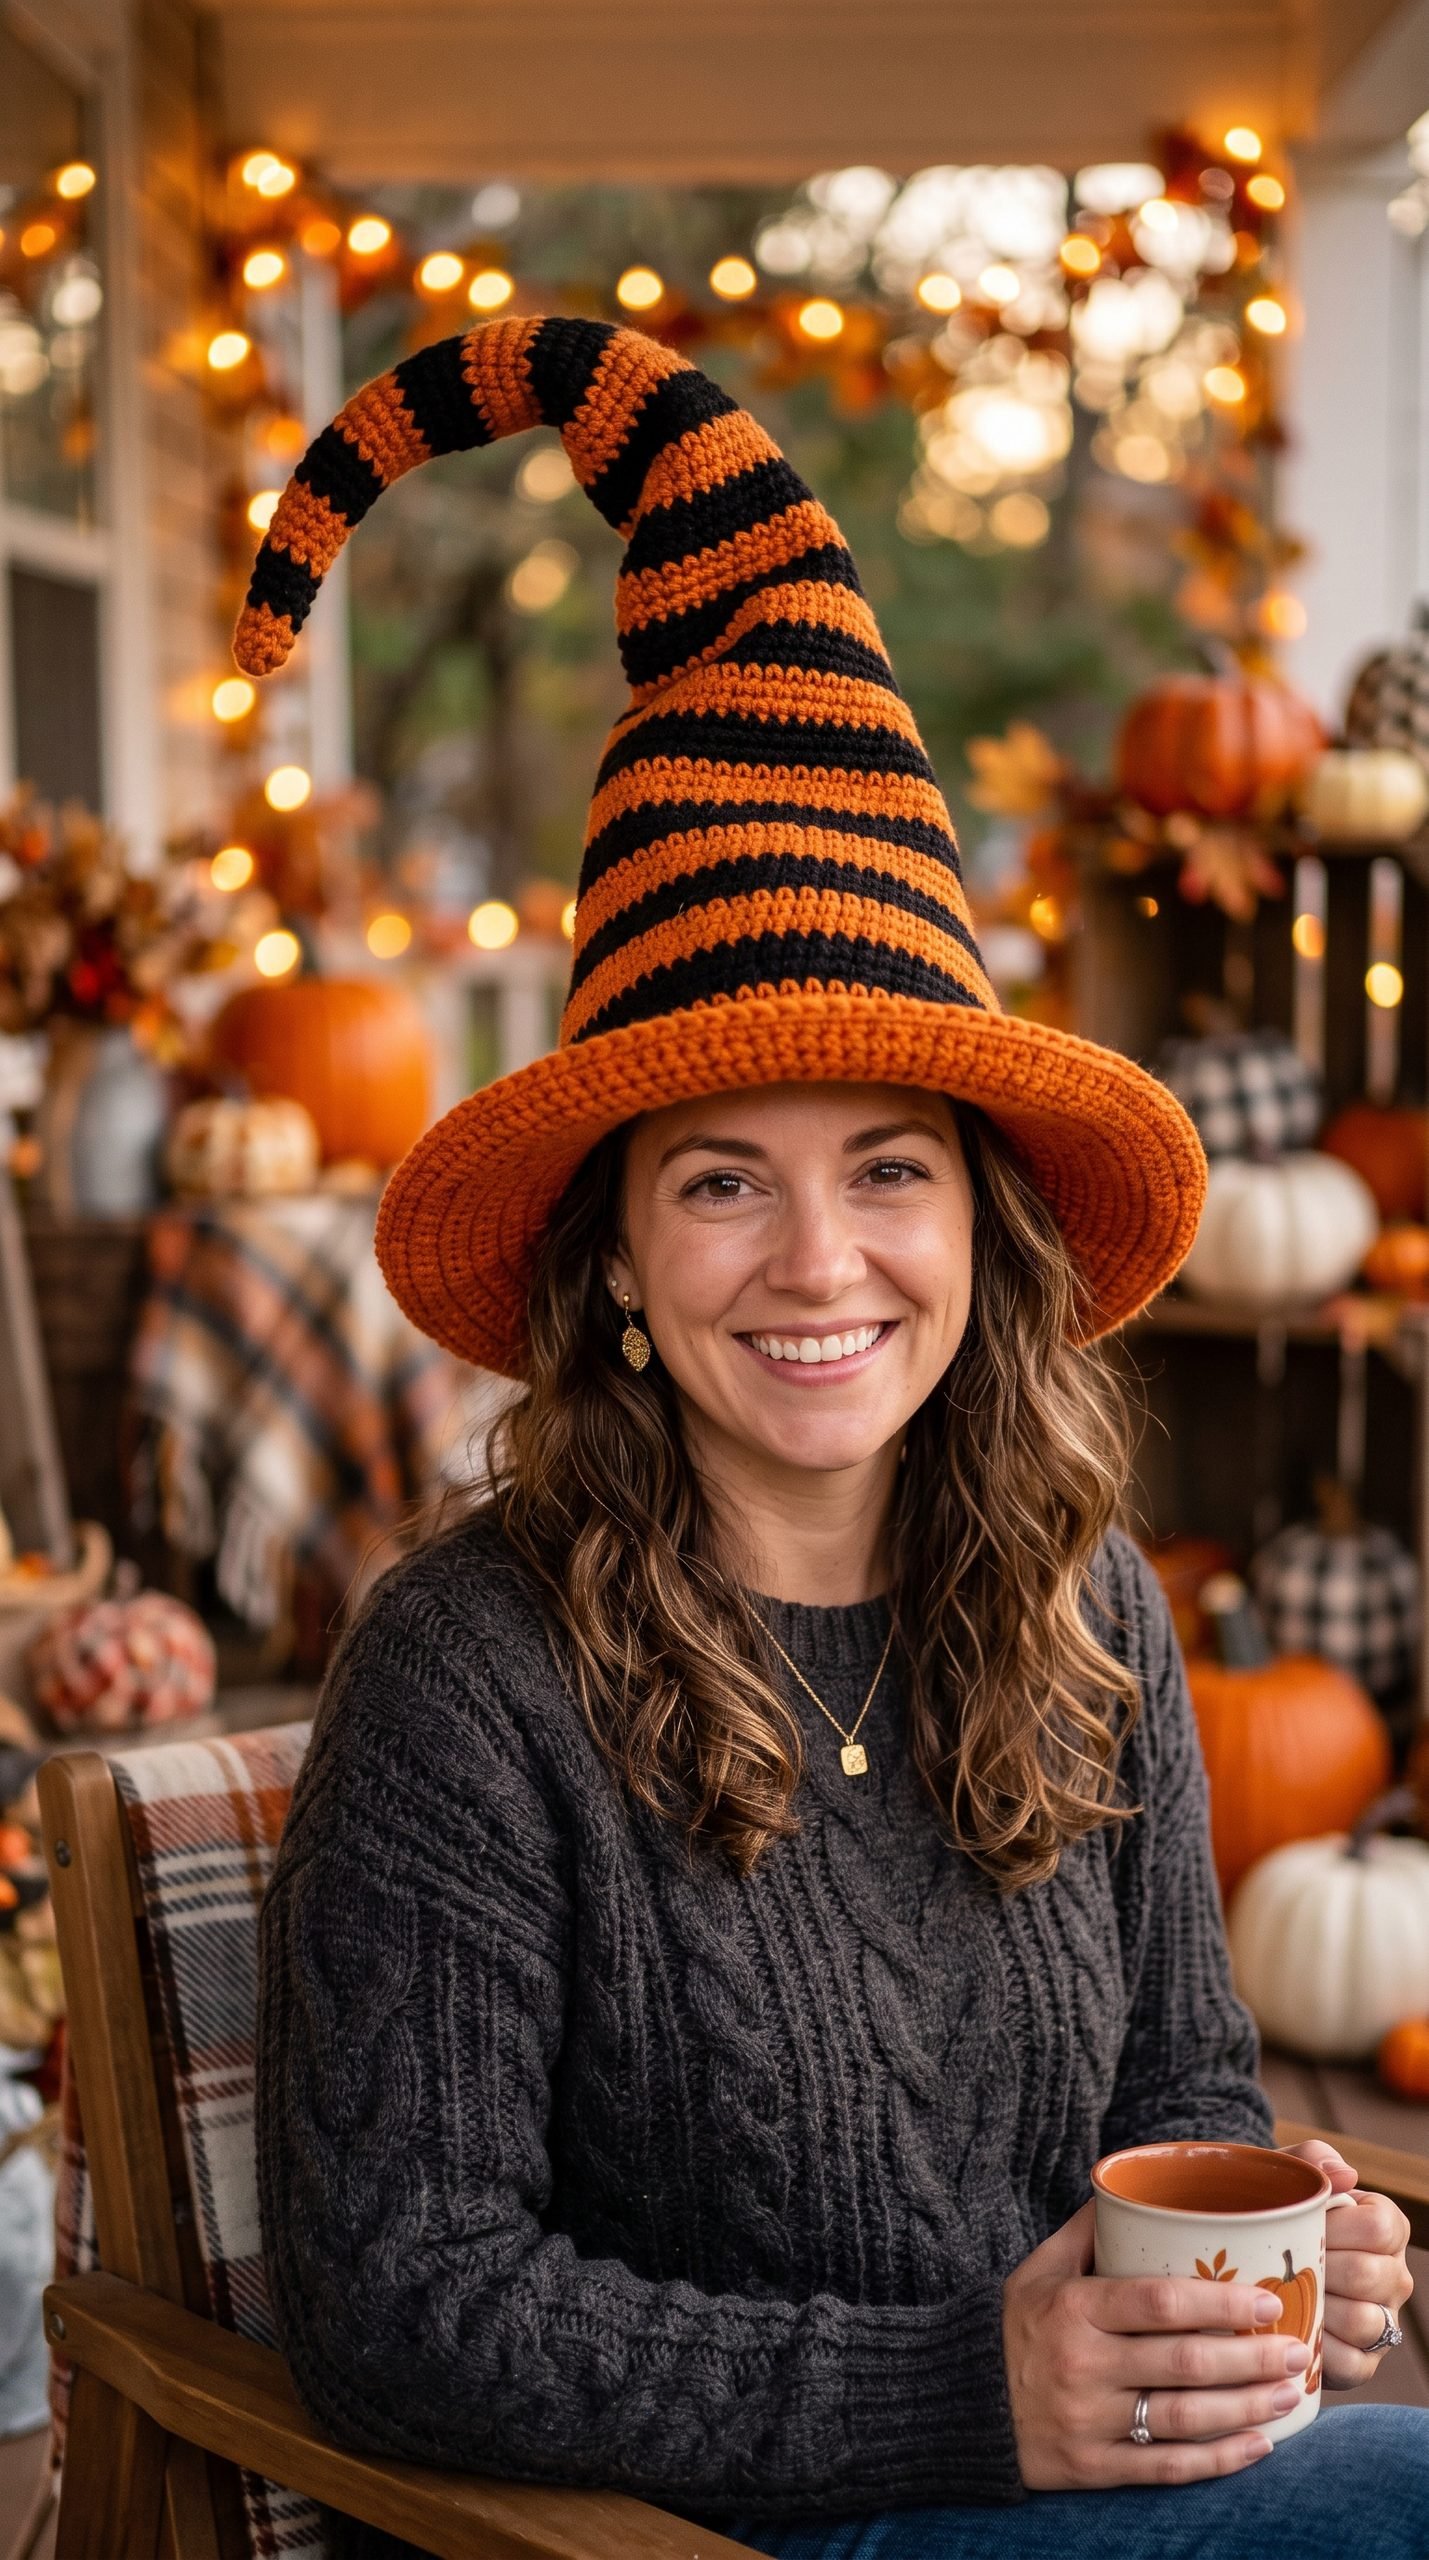
Looking for a fun wearable project for spooky season? This slouchy crochet witch hat pattern creates a tall, floppy witch hat with bold orange and black stripes and a wide brim that is perfect for Halloween.
The hat is worked from the pointed tip downward, gradually increasing to fit an adult head before finishing with a wide crochet brim. The long cone naturally bends and slouches to one side, giving the finished hat a playful handmade look.
This project is suitable for confident beginners who know basic half double crochet, increases, working in rounds, and changing yarn colors.

Project Details
- Skill Level: Confident Beginner
- Estimated Time: 4–6 hours
- Finished Size: Fits approximately 21–23 inch adult head circumference
- Hat Height: Approximately 14–15 inches from tip to brim
- Brim Width: Approximately 3–4 inches
- Crochet Terminology: US terms
- Construction: Worked from the top down in joined rounds
Materials
- Worsted weight #4 yarn in orange
- Worsted weight #4 yarn in black
- 5 mm (H/8) crochet hook
- Yarn needle
- Scissors
- Stitch marker, optional

Hook Size
Use a 5 mm (H/8) crochet hook.
If you crochet very tightly, you may prefer a 5.5 mm hook. If your stitches are loose, try a 4.5 mm hook.
Yarn
Use worsted weight #4 yarn.
Acrylic yarn is a practical choice because it is lightweight, affordable, and flexible enough to create the floppy witch-hat shape.
Approximate yarn amounts:
- Orange: 180–220 yards
- Black: 120–160 yards
The classic version uses bright pumpkin orange and black, but you can easily customize the colors for your Halloween costume or seasonal style.
Abbreviations
- MR = magic ring
- ch = chain
- hdc = half double crochet
- sc = single crochet
- sl st = slip stitch
- st(s) = stitch(es)
- inc = work 2 hdc in the same stitch
- FLO = front loop only
Before You Start / Pattern Notes
The hat is worked from the pointed tip downward in joined rounds.
At the end of each round, join to the first stitch with a slip stitch. Chain 1 before beginning the next round. The chain 1 does not count as a stitch.
Keep the joining seam toward the back of the hat.
Gauge is approximately 14 hdc and 10 rounds = 4 inches. Exact gauge is less important at the pointed top, but the lower section should fit comfortably around your head.
Try the hat on before beginning the brim. If you need a smaller size, stop increasing earlier. For a larger size, add another increase round.
Color Stripe Guide
For the classic orange-and-black Halloween version, use this color sequence:
- Rounds 1–6: Orange
- Rounds 7–9: Black
- Rounds 10–12: Orange
- Rounds 13–15: Black
- Rounds 16–18: Orange
- Rounds 19–21: Black
- Rounds 22–24: Orange
- Rounds 25–27: Black
- Rounds 28–30: Orange
- Rounds 31–33: Black
- Rounds 34–38: Orange
- Brim: Orange
Fasten off or carry the unused color neatly along the inside of the hat when changing stripes.

Free Slouchy Crochet Witch Hat Pattern
Part 1 — Pointed Top
Using orange yarn:
Round 1: Work 6 hdc into MR. Join. (6 sts)
Round 2: Hdc in each st around. (6 sts)
Round 3: Hdc in each st around. (6 sts)
Round 4: Inc in each st around. (12 sts)
Round 5: Hdc in each st around. (12 sts)
Round 6: Hdc in each st around. (12 sts)
Change to black yarn.
Part 2 — Building the Witch Hat Cone
Round 7: *Hdc in next st, inc in next st.* Repeat around. (18 sts)
Rounds 8–9: Hdc in each st around. (18 sts)
Change to orange.
Round 10: *Hdc in next 2 sts, inc.* Repeat around. (24 sts)
Rounds 11–12: Hdc around. (24 sts)
Change to black.
Round 13: *Hdc in next 3 sts, inc.* Repeat around. (30 sts)
Rounds 14–15: Hdc around. (30 sts)
Change to orange.
Round 16: *Hdc in next 4 sts, inc.* Repeat around. (36 sts)
Rounds 17–18: Hdc around. (36 sts)
Change to black.
Round 19: *Hdc in next 5 sts, inc.* Repeat around. (42 sts)
Rounds 20–21: Hdc around. (42 sts)
Change to orange.
Round 22: *Hdc in next 6 sts, inc.* Repeat around. (48 sts)
Rounds 23–24: Hdc around. (48 sts)
Change to black.
Round 25: *Hdc in next 7 sts, inc.* Repeat around. (54 sts)
Rounds 26–27: Hdc around. (54 sts)
Change to orange.
Round 28: *Hdc in next 8 sts, inc.* Repeat around. (60 sts)
Rounds 29–30: Hdc around. (60 sts)
Change to black.
Round 31: *Hdc in next 9 sts, inc.* Repeat around. (66 sts)
Rounds 32–33: Hdc around. (66 sts)
Change to orange.
Round 34: *Hdc in next 10 sts, inc.* Repeat around. (72 sts)
Rounds 35–38: Hdc in each st around. (72 sts)
At this point, try the hat on.
The lower edge should sit comfortably around your head without feeling too tight.
How to Adjust the Hat Size
Smaller Adult Size
If the hat already fits comfortably at 66 stitches, skip Round 34 and work several plain rounds at 66 stitches before beginning the brim.
Larger Adult Size
If you need more room, work one additional increase round:
Optional Increase Round: *Hdc in next 11 sts, inc.* Repeat around. (78 sts)
Work 2–3 plain rounds before starting the brim.
Part 3 — Wide Crochet Brim
Continue with orange yarn.
Round 39: Working in FLO, *hdc in next 5 sts, inc.* Repeat around. (84 sts)
Round 40: Hdc in each st around. (84 sts)
Round 41: *Hdc in next 6 sts, inc.* Repeat around. (96 sts)
Round 42: Hdc around. (96 sts)
Round 43: *Hdc in next 7 sts, inc.* Repeat around. (108 sts)
Round 44: Hdc around. (108 sts)
Brim Edging
Round 45: Sc in each st around. (108 sts)
Join with a sl st and fasten off.
Weave in the remaining yarn end.
How to Create the Slouchy Witch Hat Shape
The tall cone will naturally bend because of its length.
Place the hat on your head and gently bend the upper cone toward one side.
For a relaxed slouchy look, allow the top several inches to fold naturally.
If you want the bend to stay in a specific position, use a short strand of matching yarn to make one or two hidden stitches between the folded sections.
Do not pull the stitches too tightly. The goal is to keep the curved silhouette while allowing the hat to remain soft and flexible.
Finishing
Weave in every remaining yarn end securely.
Gently stretch and shape the brim with your hands.
If the brim curls slightly, lightly dampen it and lay it flat on a towel until completely dry.
Shape the pointed top and decide how much slouch you want.
Check the inside of the hat and trim any unnecessary loose yarn ends.
Finished Size
The finished adult witch hat measures approximately:
- Head Circumference: 21–23 inches (53–58 cm)
- Cone Height: Approximately 14–15 inches (35–38 cm)
- Brim Width: Approximately 3–4 inches (7.5–10 cm)
Measurements can vary depending on yarn, hook size, tension, and the amount of slouch you create at the top.

Tips and Customization Ideas
Try Purple and Black
Swap orange for deep purple to create a darker classic witch look.
Make a Green Witch Hat
Use lime green and black stripes for a bright Halloween version.
Use Solid Black
Skip the stripes and work the entire cone in black for a simple traditional witch hat.
Add a Crochet Hat Band
Crochet a long chain or narrow strip and wrap it around the base of the cone just above the brim.
Add a Buckle
Make a small rectangle using yellow or gold yarn and sew it onto the hat band for a classic Halloween detail.
Add Crochet Flowers
For a softer witchy style, decorate the brim with small crochet flowers, leaves, or vines.
Make It More Slouchy
Add several extra plain rounds before reaching the full head circumference. This creates an even longer cone that bends more dramatically.
How to Wear Your Crochet Witch Hat
This handmade hat is perfect for Halloween costumes, fall festivals, Halloween parties, witch-themed photo shoots, costume events, or simply adding a playful handmade accessory to your spooky-season wardrobe.
You can also make one as a handmade Halloween gift for a friend who loves crochet, costumes, or witchy fall decor.
Looking for Your Next Crochet Project?
Love this Halloween project? Explore Cute Stitch Studio‘s premium crochet patterns for more cute, cozy, seasonal, and gift-worthy handmade ideas.