Chunky Crochet Basket Pattern: A Cozy Burgundy Storage Basket
This free chunky crochet basket pattern makes a small round basket with a rich burgundy color, textured sides, and a neatly finished rim. It is a useful place to collect yarn scraps, wrapped treats, or everyday items that need a home.
The deep red shade works beautifully with fall colors and Christmas decorations, but the simple shape feels at home on a shelf all year. There are no handles, separate lining pieces, or decorations to attach.
You will start with a single crochet circle, turn the corner at the base, and build the sides with waistcoat stitch. This stitch creates compact vertical columns and makes a satisfying next step for a beginner who already knows single crochet.

Table of Contents
Chunky Crochet Basket Pattern: A Cozy Burgundy Storage Basket Instructions
Why You’ll Love This Chunky Crochet Basket Pattern: A Cozy Burgundy Storage Basket
- Clear step-by-step sections make the project easier to follow.
- Materials, sizing, finishing, and customization notes are easy to find.
- The pattern includes practical tips for a neat handmade result.
Project Details
- Skill level: Confident beginner; includes a waistcoat stitch explanation.
- Estimated time: Approximately 3–5 hours, depending on your yarn and experience.
- Finished size: Approximately 7.5 inches (19 cm) across and 5 inches (12.5 cm) tall.
- Crochet terminology: US terms.
- Construction: One piece, worked from the center of the base upward in continuous rounds.
- Shape: Round base, upright sides, open top, and no handles.
This is an original Cute Stitch Studio interpretation of a simple textured storage basket. It has not been physically sample-tested. Dimensions and yarn quantities are estimates and will vary with the cord and tension you use.
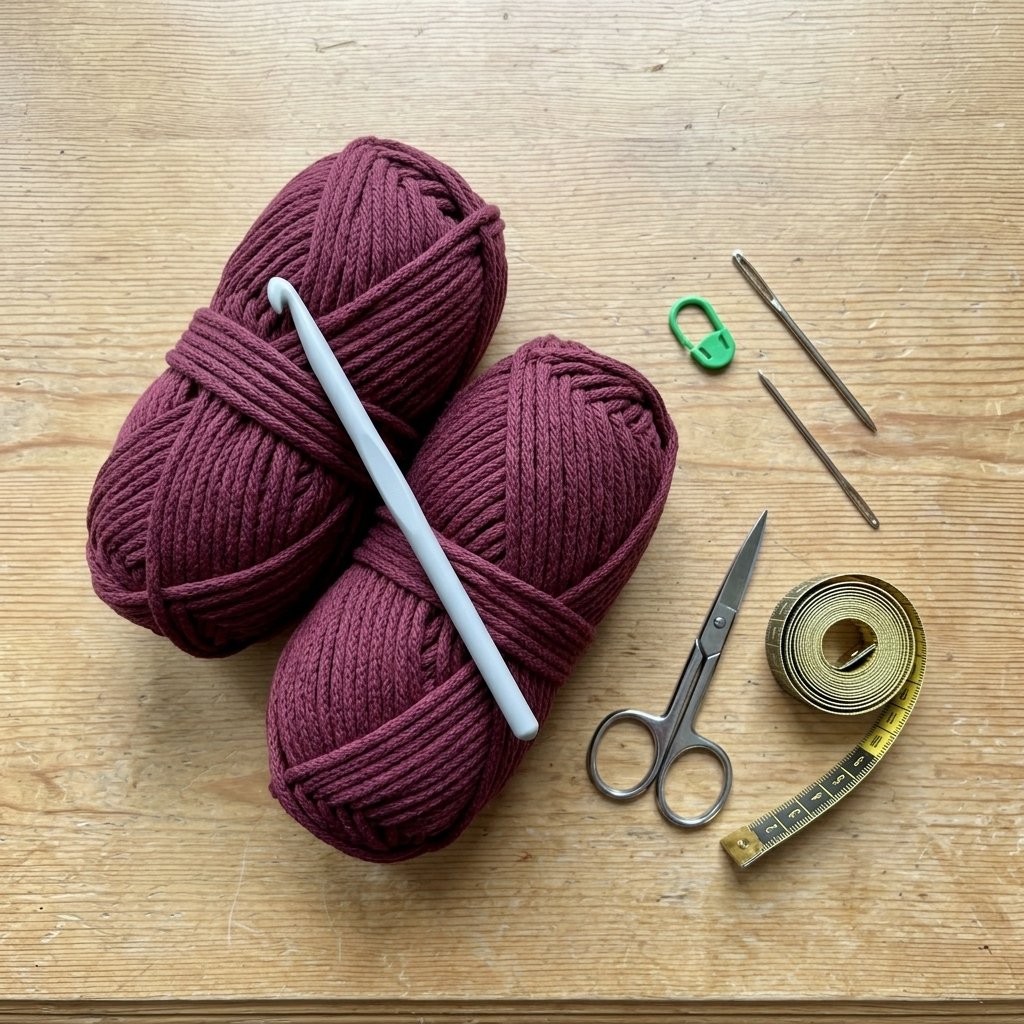
Materials
- Approximately 120–160 yards (110–146 m) of chunky cotton cord or structured tubular yarn in burgundy.
- 8 mm crochet hook, or the size needed for a firm but workable fabric.
- One locking stitch marker.
- Large-eye yarn needle that fits your yarn.
- Scissors.
- Measuring tape.
No stuffing, wire, wooden base, glue, or lining is required.
Hook Size
Start with an 8 mm crochet hook. The best size depends on the thickness and firmness of your cord.
Your stitches should sit close together, but you still need enough room to insert the hook into the center of each waistcoat stitch. If you have to force the hook through, loosen your tension or try the next hook size up.
If the fabric feels loose and collapses immediately, try a smaller hook or a more structured yarn. Do not rely on painfully tight tension to make soft yarn rigid.
Yarn
For the version shown in the image plan, use smooth burgundy cotton cord or tubular yarn approximately 4–5 mm thick. Many suitable products fall within Category 6, super bulky, although cord labels vary.
Choose a yarn with enough body to support the sides. A smooth surface also makes it easier to see where your hook enters the waistcoat stitches.
Plan for approximately 120–160 yards (110–146 m). This is an estimated range rather than measured sample usage; unusually heavy cord or a taller basket may require more.
Burgundy, cranberry, rust, forest green, and warm cream all work well for seasonal decorating.
Can You Use Velvet Yarn?
You can experiment with velvet or chenille yarn, but expect a softer basket with less defined stitches. It will not have the same corded texture or upright structure as this version.
If you are learning waistcoat stitch, start with smooth cord. Fuzzy yarn can hide the center of the stitch and make counting more difficult.
Gauge and Size
Suggested side-wall gauge: Approximately 8 waistcoat stitches and 10 rounds = 4 inches (10 cm), measured without stretching.
Gauge is less critical than it would be for clothing. For this project, the most useful checks are a flat base and sides that hold their shape.
After Base Round 8, aim for a circle approximately 7.5 inches (19 cm) in diameter. The 48-stitch circumference should then support a small basket of roughly the stated size.
If your base is significantly smaller or larger, your basket will be too. You can keep that size if you like the fabric, or restart with a different hook.
Abbreviations
- ch: chain.
- sc: single crochet.
- sl st: slip stitch.
- st(s): stitch(es).
- BLO: back loop only.
- wc: waistcoat stitch.
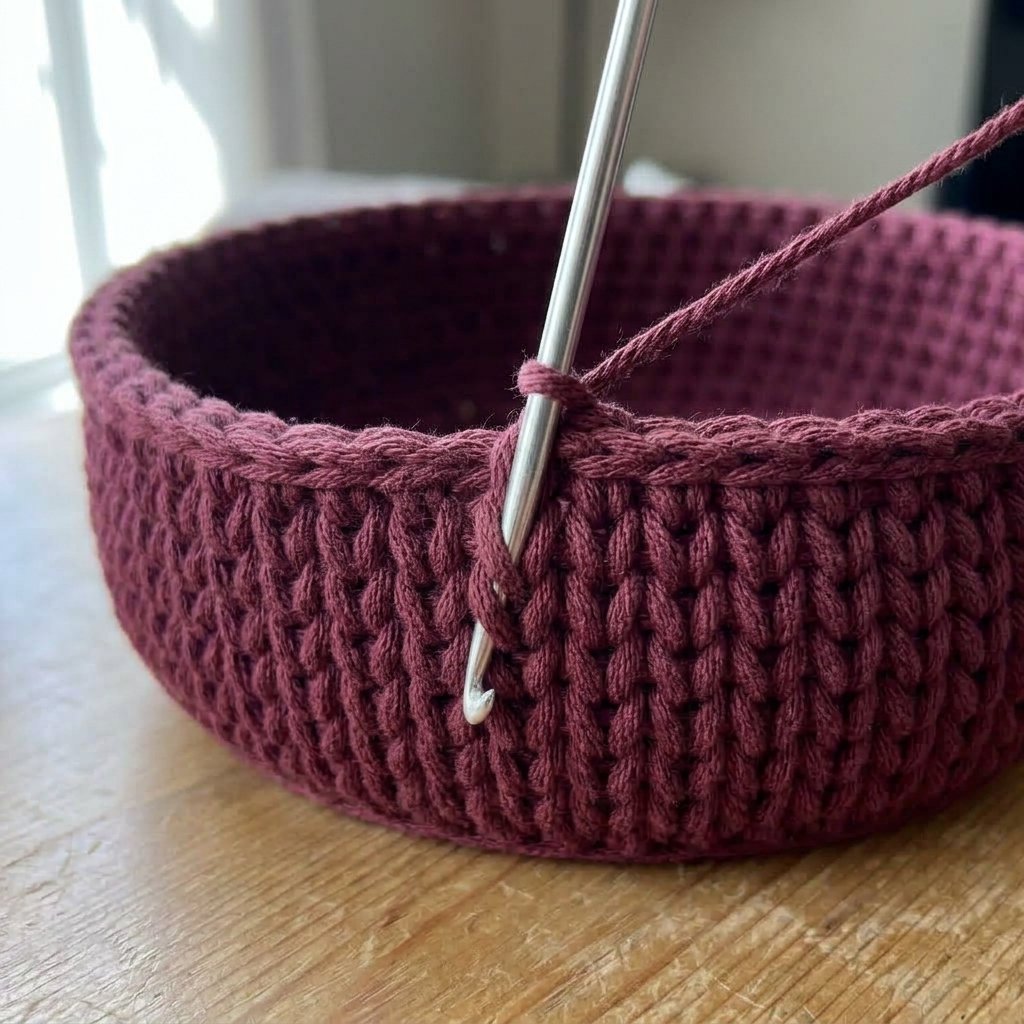
How to Work Waistcoat Stitch
Look at the front of the next stitch. Find the two upright strands that form a small V.
Insert your hook through the center of that V, between its two strands, rather than under the two loops along the top edge. Yarn over and pull up a loop. Yarn over again and pull through both loops on the hook.
That completes one waistcoat stitch. It is worked like single crochet, but the hook enters a different place.
Keep the pulled-up loop relaxed enough to reach the height of the round. Tight, short loops can make the following round difficult to work.
Before You Start
- Work in continuous rounds. Do not join or turn unless instructed.
- Place the stitch marker in the first stitch of each round and move it up as you work.
- Beginning chains do not count as stitches.
- Work through both top loops for ordinary single crochet unless BLO is specified.
- Each base increase means working 2 sc into one stitch.
- The base and sides have separate round numbering.
- Keep the outside of the basket facing you while working the sides.
The base increases are slightly staggered to soften the corners that can appear when increases stack directly above one another.
Chunky Crochet Basket Pattern: Step-by-Step Instructions
Part 1 — Make the Round Base
Start: Ch 2, leaving a tail approximately 8 inches (20 cm) long. Keep the first chain loose enough to receive six stitches.
Base Round 1: Work 6 sc into the second chain from the hook. Place the marker in the first sc. 6 sts.
Base Round 2: Work 2 sc in each stitch around. 12 sts.
Base Round 3: Repeat [sc in the next stitch, 2 sc in the next stitch] 6 times. 18 sts.
Base Round 4: Sc in the next stitch, 2 sc in the next stitch. Repeat [sc in the next 2 stitches, 2 sc in the next stitch] 5 times. Sc in the last stitch. 24 sts.
Base Round 5: Repeat [sc in the next 3 stitches, 2 sc in the next stitch] 6 times. 30 sts.
Base Round 6: Sc in the next 2 stitches, 2 sc in the next stitch. Repeat [sc in the next 4 stitches, 2 sc in the next stitch] 5 times. Sc in the last 2 stitches. 36 sts.
Base Round 7: Repeat [sc in the next 5 stitches, 2 sc in the next stitch] 6 times. 42 sts.
Base Round 8: Sc in the next 3 stitches, 2 sc in the next stitch. Repeat [sc in the next 6 stitches, 2 sc in the next stitch] 5 times. Sc in the last 3 stitches. 48 sts.
Set the circle on a flat surface. It should rest mostly flat without deep cupping or noticeable waves. Measure across the center before continuing.
Thread the starting tail through the stitches around the center opening and draw it closed gently. Weave the tail through the underside of the base, changing direction before trimming.

Part 2 — Turn the Corner
Side Round 1: Sc in the BLO of each stitch around. 48 sts.
Working into the back loops leaves a small ridge around the bottom edge and helps the fabric begin turning upward.
Side Round 2: Sc through both top loops of each stitch around. 48 sts.
Do not add increases. The unchanged stitch count is what allows the sides to rise instead of continuing outward.
Part 3 — Work the Textured Sides
Side Round 3: Work 1 wc into each stitch around. 48 sts.
For this first waistcoat round, insert the hook into the front V of each single crochet from Side Round 2. Count carefully so that every stitch receives one waistcoat stitch.
Side Rounds 4–12: Work 1 wc into each stitch around. 48 sts in every round.
After a few rounds, the vertical stitch columns will become easier to recognize. Keep checking the marker and count; accidentally working twice into one stitch will widen the basket.
The sides should now measure approximately 4.75–5 inches (12–12.5 cm) from the base turn, depending on your gauge.
For a slightly taller basket, add waistcoat rounds before finishing the rim. Each additional round adds approximately 0.4 inch (1 cm) at the suggested gauge. Extra height may make a softer yarn less stable.
Part 4 — Finish the Rim
Rim Round 1: Work 1 sl st under both top loops of each stitch around. 48 sl sts.
Keep these slip stitches relaxed. They should finish the edge without pulling the opening inward.
Cut the yarn, leaving an 8-inch (20 cm) tail. Pull the tail completely through the last loop.
Thread the tail onto the yarn needle. Pass the needle under both top loops of the first slip stitch, then back down through the center of the final slip stitch. Adjust the strand to blend with the surrounding rim.
Weave the remaining tail down through the inside wall, changing direction before trimming.
Tips for the Best Crochet Result
Keep your tension consistent throughout this chunky crochet basket pattern: a cozy burgundy storage basket. Small tension changes can affect the finished size, shaping, and how neatly the pieces line up during assembly.
Pause at the end of important sections to compare your stitch count with the pattern. Correcting a missed increase or decrease early is much easier than adjusting the finished piece later.
When you reach the finishing stage, take a little extra time with seams, shaping, and yarn ends. These small details can make the finished crochet project look cleaner and more polished.
Finishing and Shaping
Place the basket on a table and gently shape the base into a circle. Smooth the walls upward with your hands and adjust the rim so the opening looks even.
Check that the bottom sits flat and that the center opening is closed. Make sure both yarn tails are secure and hidden inside the fabric.
Heavy blocking is usually unnecessary. If your yarn needs washing or damp shaping, follow its care label and let the basket dry fully before using it.
A towel placed loosely inside can help support the shape while drying. Do not pack it tightly enough to stretch the sides.

Finished Size
The finished basket measures approximately 7.5 inches (19 cm) across the outside and 5 inches (12.5 cm) tall.
The usable inside space is slightly smaller because of the thick walls. Your measurements may vary with the cord diameter, hook, and stitch tension.
Tips and Customization
Style It for Fall
Pair burgundy with rust, mustard, and warm wood. Use the basket to hold small yarn balls, fabric scraps, or lightweight decorative pumpkins.
Turn It into a Christmas Gift Basket
Add wrapped chocolates, packaged tea, or a small handmade gift. Keep food wrapped, and use the basket as part of the gift rather than disposable packaging.
Choose an Everyday Color
Oatmeal, charcoal, or muted green gives this chunky crochet basket pattern a different mood without changing any instructions.
Make a Shorter Catchall
For a shallow basket, finish after Side Round 8 and then work the rim. Keep all 48 stitches in each round. This version is useful for smaller items on a desk or entryway shelf.
Try a Simpler Stitch
If waistcoat stitch feels uncomfortable with your cord, replace Side Rounds 3–12 with ordinary single crochet. Keep 48 stitches per round and work to the desired height. The texture and firmness will differ from the version pictured.
Troubleshooting
My Base Is Cupping
First check your counts. Missing an increase can make the circle pull upward too early. If the counts are correct, your yarn and tension may need a different hook size. Correct the base before starting the sides.
My Base Has Wavy Edges
Count the final round to check for extra increases. A little unevenness may settle with gentle shaping, but deep ripples are a sign to revisit your tension or hook size.
My Basket Sides Feel Floppy
The yarn may be too soft for a freestanding basket. A shorter wall can help, but smooth structured cord is a better starting point than loose, plush yarn. Make a small swatch before remaking the whole basket.
My Hook Will Not Go Through the Waistcoat Stitch
Check that you are entering between the two front strands of the V. Relax the loop height and avoid pulling each completed stitch tight. If needed, undo the tight round and rework it with a slightly larger hook.
Frequently Asked Questions
Is This Chunky Crochet Basket Pattern Beginner-Friendly?
It suits beginners who already know single crochet and can follow round counts. Waistcoat stitch takes a little practice, so work slowly during the first textured round.
Does the Basket Need a Lining?
No. The pattern is designed as an unlined basket for lightweight household items. The close stitches and thick yarn provide the fabric structure.
Can I Use It as a Plant Basket?
You can use it as a decorative cover around a smaller plant pot with its own watertight saucer. Remove the plant for watering and keep the crochet dry. Do not place soil or pour water directly into the basket.
Can I Make It Wider?
A wider version needs additional base increase rounds and more stitches in every side round. For your first basket, follow the stated diameter so you can get comfortable with the construction before redesigning the size.
Save This Pattern for Later
Save this chunky crochet basket pattern to your crochet home decor or handmade gift board on Pinterest. It is an easy project to revisit when you want practical storage in a new seasonal color.
Project Checklist
- Confirm your yarn weight, hook size, and gauge before beginning.
- Read through the full Chunky Crochet Basket Pattern: A Cozy Burgundy Storage Basket instructions once before you start.
- Check stitch counts at the end of each row or round before continuing.
- Review the finishing and sizing notes before weaving in the final ends.
Looking for Your Next Crochet Project?
Love this project? Explore Cute Stitch Studio’s premium crochet patterns for more cute, cozy, gift-worthy, and beginner-friendly handmade ideas.