Crochet Baby Sneakers Pattern: Cute Personalized Booties
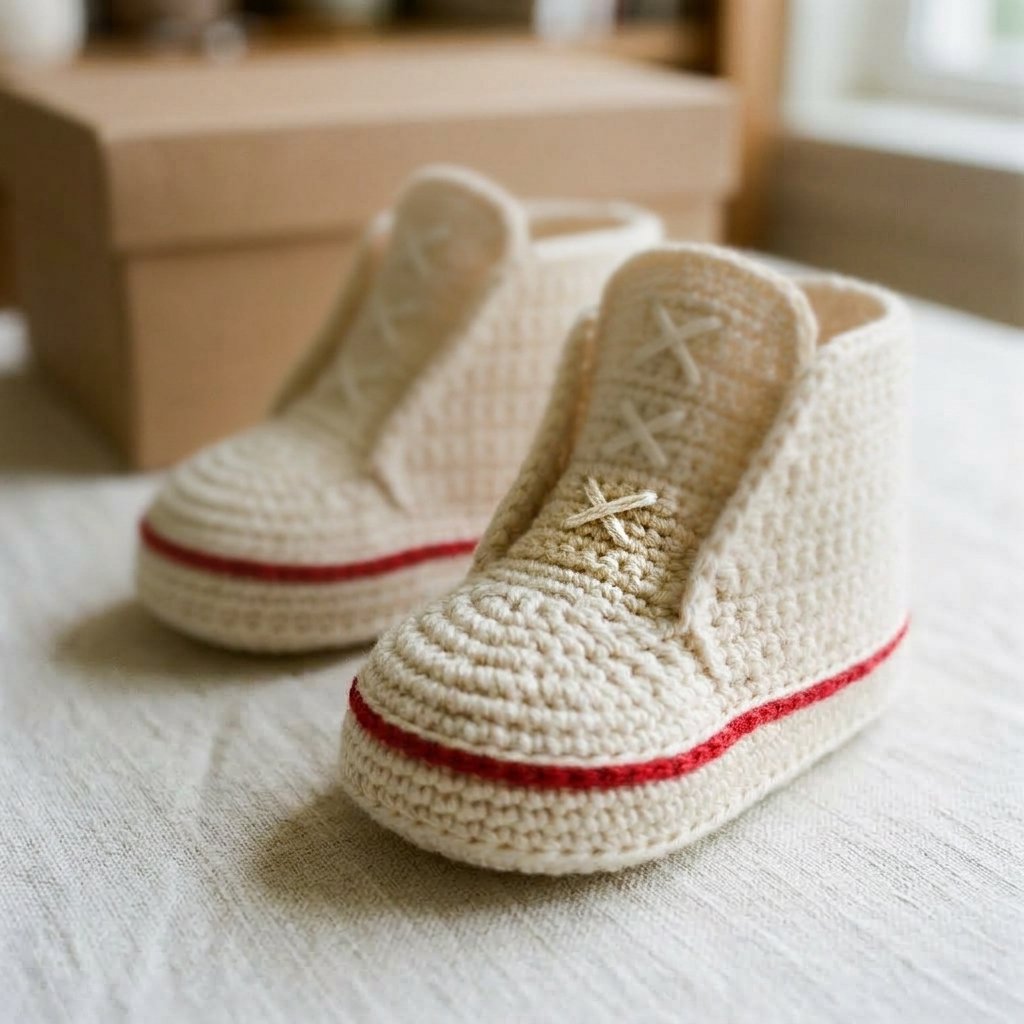
This crochet baby sneakers pattern turns cream yarn, a little red trim, and simple embroidery into a sweet pair of miniature high-top booties. Make them for a baby shower, a supervised photo session, or a personalized keepsake.
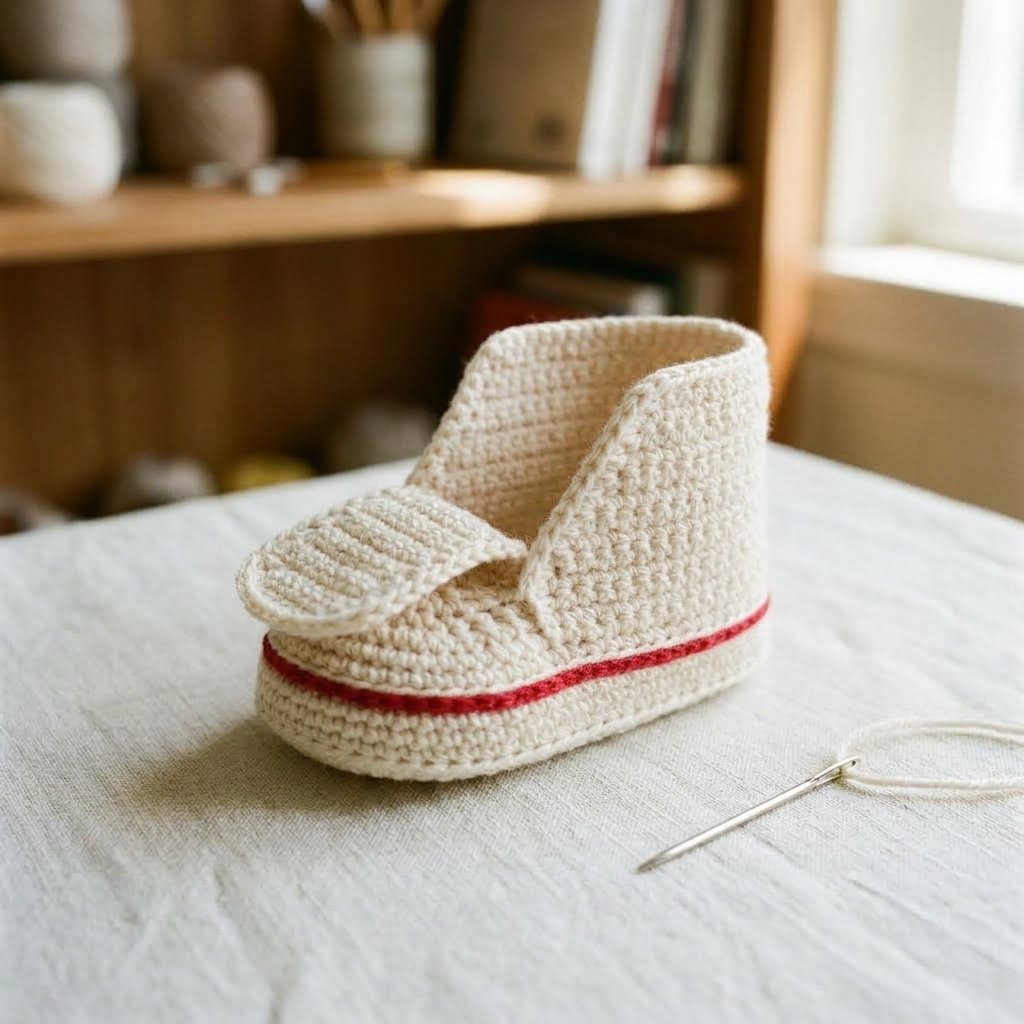
The design features an oval sole, a shaped toe, a separate tongue, and a soft ankle upper. Short embroidered stitches create the look of laces without adding a long removable cord.
This is an adventurous beginner project. You will practice working around a foundation chain, decreasing, and sewing small sections together. The instructions create an original Cute Stitch Studio design inspired by classic sneakers.

Table of Contents
Crochet Baby Sneakers Pattern: Cute Personalized Booties Instructions
Project Details
- Skill level: Adventurous beginner.
- Estimated time: Approximately 5–7 hours per pair, plus embroidery.
- Size: One small baby size; choose by actual foot measurements.
- Target finished sole: Approximately 3.75 inches long and 1.75 inches wide (9.5 × 4.4 cm).
- Target height: Approximately 2.75–3 inches (7–7.6 cm), depending on gauge and shaping.
- Crochet terminology: US terms.
- Construction: Oval sole worked in joined rounds, raised sole walls, toe and tongue worked in rows, and a back-and-side upper.
This original pattern has not been physically tested. Measurements and yarn amounts are estimates; check the first sole and complete one bootie before making its partner.
Sizing and Fit
Baby shoe sizes vary, so use foot length and width instead of relying on an age label. Measure from the back of the heel to the longest toe, then across the widest part of the foot.
| Measurement | Target |
|---|---|
| Finished sole length | Approximately 3.75 inches (9.5 cm) |
| Finished sole width | Approximately 1.75 inches (4.4 cm) |
| Suggested maximum foot length | Approximately 3.25–3.5 inches (8.3–8.9 cm), subject to the finished interior fit |
| Toe allowance | Approximately 0.25–0.5 inch (0.6–1.3 cm) |
The exterior sole measurement does not equal the usable interior space. Check width, instep room, and ankle comfort as well as length. The opening should slip over the foot without pulling or forcing.
These are soft decorative booties, not walking shoes. For a baby photo session, use them only with close adult supervision and remove them afterward.
Materials
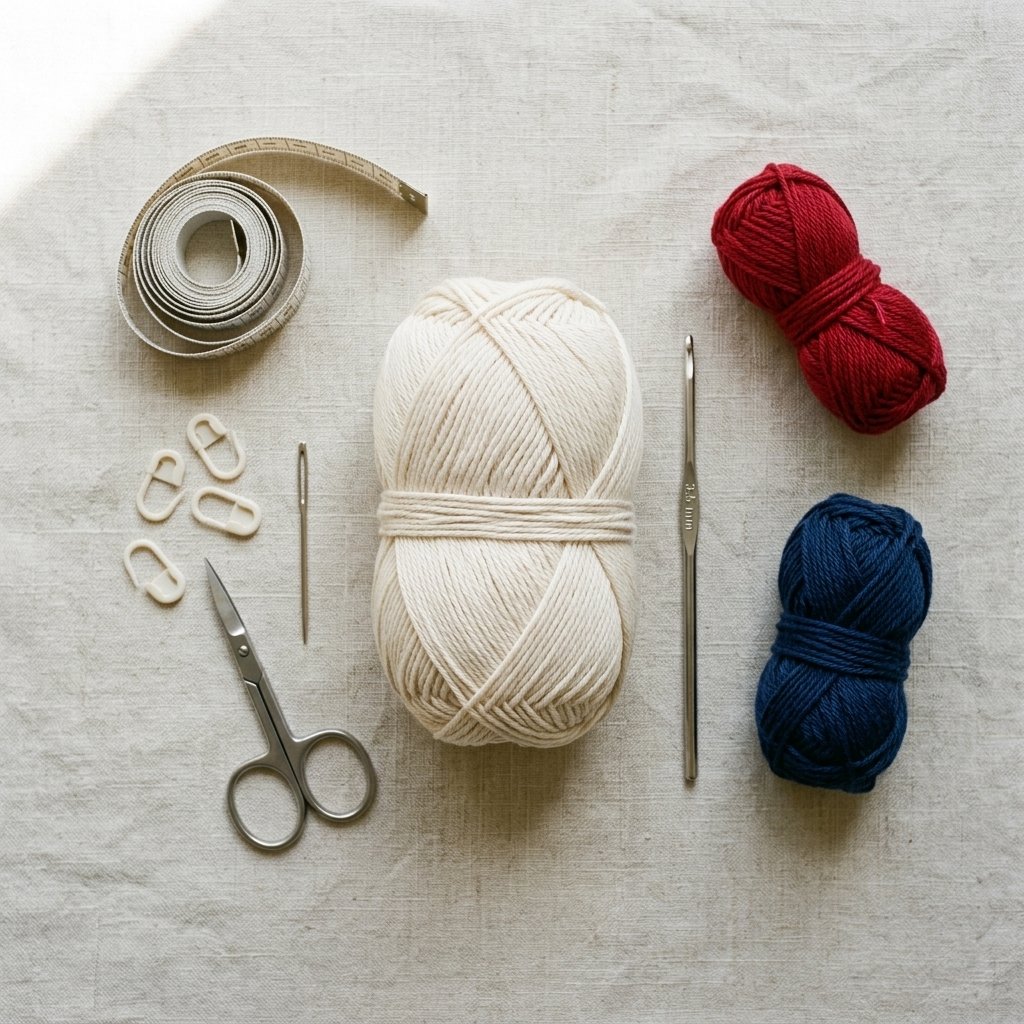
- Approximately 120–150 yards of cream DK-weight yarn for the pair.
- Approximately 5–10 yards of red yarn in the same weight.
- A small amount of navy yarn for optional personalization.
- 3.5 mm crochet hook, or the size needed to obtain gauge.
- Yarn needle suitable for sewing and embroidery.
- Scissors.
- Four removable stitch markers.
- Measuring tape.
No buttons, beads, separate patches, or removable shoelaces are needed.
Hook Size
Start with a 3.5 mm crochet hook.
If your swatch has more stitches per inch than the gauge below, try a slightly larger hook. If it has fewer stitches per inch, try a smaller hook. The finished fabric should feel soft and flexible while keeping its shape.
Yarn
Use DK-weight yarn, category 3, with a smooth surface and clearly visible stitches. A soft, washable cotton-acrylic blend is a practical choice for this project.
The pictured color idea uses cream for the shoes, red for the narrow sole stripe, and navy for optional embroidery. Cream with sage trim or pale pink with white soles also works well.
Avoid substituting bulky yarn without rewriting the sizing. It changes the sole dimensions, toe depth, and ankle opening together.
Gauge
22 single crochet stitches and 24 rows = 4 inches (10 cm), measured flat after washing and drying according to the yarn label.
For a swatch, chain 29. Single crochet in the second chain from the hook and across for 28 stitches. Continue in single crochet for 30 rows, chaining 1 and turning between rows. Measure the center of the swatch.
The oval sole is a second gauge checkpoint. After Sole Round 5, compare its actual dimensions with the target size before continuing.
Abbreviations
- ch: chain.
- sc: single crochet.
- sl st: slip stitch.
- st(s): stitch(es).
- inc: work 2 single crochet stitches in the same stitch.
- sc2tog: single crochet 2 stitches together.
- BLO: back loop only.
Before You Start
- Make two identical booties. Place optional name embroidery on opposite outer sides.
- Join each sole and sole-wall round with a slip stitch to its first single crochet. Do not turn these rounds.
- Chain 1 at the beginning of each round. This chain and the joining slip stitch do not count as stitches.
- For rows, chain 1 and turn before the next row. Work into the first stitch immediately below the turning chain.
- Work through both loops unless BLO is specified.
- Instructions in parentheses followed by a number are repeated that many times.
- Keep joining slip stitches loose enough that they do not pull the sole out of shape.
How to Work a Decrease
To work sc2tog, insert the hook into the next stitch, yarn over, and pull up a loop. Repeat in the following stitch. Yarn over and pull through all three loops on the hook. Two stitches become one.
Crochet Baby Sneakers Pattern: Step-by-Step Instructions
Part 1 — Oval Sole
Use cream yarn. Chain 13.
Round 1: Work 2 sc in the second chain from the hook, sc in the next 10 chains, and 3 sc in the last chain. Rotate the foundation chain to work along its unused underside. Sc in the next 10 chains, then work 1 sc in the same chain that holds the first 2 sc. Join. 26 sts.
The first and last foundation chains each contain three stitches in total. The two straight sides each contain ten stitches.
Round 2: Ch 1. Inc in each of the first 2 sts, sc in the next 10 sts, inc in each of the next 3 sts, sc in the next 10 sts, and inc in the last st. Join. 32 sts.
Round 3: Ch 1. (Sc in the next st, inc in the next st) twice, sc in the next 10 sts, (sc in the next st, inc in the next st) three times, sc in the next 10 sts, then sc in the next st and inc in the last st. Join. 38 sts.
Round 4: Ch 1. (Sc in the next 2 sts, inc in the next st) twice, sc in the next 10 sts, (sc in the next 2 sts, inc in the next st) three times, sc in the next 10 sts, then sc in the next 2 sts and inc in the last st. Join. 44 sts.
Round 5: Ch 1. (Sc in the next 3 sts, inc in the next st) twice, sc in the next 10 sts, (sc in the next 3 sts, inc in the next st) three times, sc in the next 10 sts, then sc in the next 3 sts and inc in the last st. Join. 50 sts.
The sole should lie reasonably flat without being stretched. A pronounced bowl or ruffled edge is a reason to recheck the stitch counts and tension.
Size checkpoint: Aim for approximately 3.75 × 1.75 inches. If the sole is noticeably different, adjust the hook and remake it before continuing. Do not add random rounds: the upper is written for a 50-stitch sole.
Part 2 — Raised Sole Walls
Round 1: Ch 1. Sc BLO in each st around. Join. 50 sts.
Round 2: Ch 1. Sc through both loops in each st around. Join. 50 sts.
Fasten off cream and join red at the back of the heel.
Round 3: Ch 1. Sc in each st around with red. Join. 50 sts.
Fasten off red and join cream at the back of the heel.
Round 4: Ch 1. Sc in each st around. Join. 50 sts.
Fasten off. Weave in the color-change ends on the inside without leaving bulky knots.
Part 3 — Mark the Toe Section
Place the sole on a flat surface with the heel join at the back. Identify the center of the opposite rounded end; this is the toe.
Mark a group of 14 consecutive stitches centered around the toe. The halfway point of this group should line up with the long centerline of the sole. Put a marker in its first and last stitches.
The remaining 36 stitches run along one side, around the heel, and back along the other side. They will form the ankle upper.
Part 4 — Toe Flap and Tongue
Join cream in the first marked toe stitch, with the outside of the shoe facing you. Work across the 14 marked stitches.
Row 1: Sc in each marked toe st. 14 sts.
Row 2: Ch 1, turn. Sc2tog, sc in the next 10 sts, sc2tog. 12 sts.
Row 3: Ch 1, turn. Sc2tog, sc in the next 8 sts, sc2tog. 10 sts.
Row 4: Ch 1, turn. Sc2tog, sc in the next 6 sts, sc2tog. 8 sts.
Row 5: Ch 1, turn. Sc across. 8 sts.
The decreasing section folds inward over the front of the foot. Gently curve it toward the heel without creasing or stretching it.
Rows 6–11: Ch 1, turn. Sc across. 8 sts in each row.
Rows 6–11 form the tongue. Fasten off and weave in the end.
Part 5 — Back and Side Upper
With the outside facing you, join cream in the first unused stitch immediately beside the toe section. Work around the heel over the 36 unused stitches.
Row 1: Sc in each unused st around the back of the shoe. 36 sts.
Row 2: Ch 1, turn. Sc2tog, sc in the next 32 sts, sc2tog. 34 sts.
Row 3: Ch 1, turn. Sc across. 34 sts.
Row 4: Ch 1, turn. Sc2tog, sc in the next 30 sts, sc2tog. 32 sts.
Row 5: Ch 1, turn. Sc across. 32 sts.
Row 6: Ch 1, turn. Sc2tog, sc in the next 28 sts, sc2tog. 30 sts.
Rows 7–10: Ch 1, turn. Sc across. 30 sts in each row.
Fasten off, leaving approximately 16 inches of yarn for finishing. The two front edges should angle gently inward, with the tongue sitting behind them.
Part 6 — Join the Toe Sides
Thread a yarn needle with cream yarn. On one side of the shoe, match the side edge of Toe Rows 1–4 with the front edge of Upper Rows 1–4.
Whipstitch these four pairs of row ends together, working from the sole upward. Keep the seam flexible and avoid pulling the toe flat. Secure and weave in the yarn.
Repeat on the other side. These short seams close the lower sides of the toe while leaving the ankle opening accessible.
The remaining tongue should sit inside the front opening. Its top may extend slightly above the side upper.
Part 7 — Add Stitched Lace Details
Use cream yarn to embroider three small X shapes down the center of the tongue. Place them across Tongue Rows 6–10, with each X approximately 0.5 inch wide.
Make each diagonal as a short backstitched line instead of one long floating strand. Catch only the tongue fabric; do not stitch across the opening or join the two side edges together.
These stitches give a sneaker-inspired detail while keeping the tongue free to move. Secure the ends on the reverse and weave them through several stitches in different directions.
Do not add a dangling bow or a removable lace to this version.
Part 8 — Optional Name Embroidery
A short name or initials can be embroidered on the outer ankle panel. This area gives you more room than the narrow sole wall.
Before stitching, decide which bootie will be the left and which will be the right. Mark the outside-facing panel on each one so the names face outward when the pair is worn.
Use navy yarn and small backstitches to form simple letters. Keep the lettering low enough to remain below the collar and clear of the front opening.
For a long name, use initials or place the full name on the gift card instead. Avoid crowding the letters or pulling the panel inward with tight embroidery.
Weave in every embroidery tail securely. There should be no long loose strands inside the bootie.
Finishing
Check all joining points, especially the two toe-side seams. Close any small gaps with a few matching stitches.
Turn the bootie partly inside out to check for loose ends and bulky joins. Weave tails through several stitches, reverse direction, and trim only after they are secure.
Gently shape the toe with your fingers. If needed, wash and reshape according to the yarn label. Let the booties dry completely before measuring or gifting them.
Make the second bootie using the same hook, tension, and row counts. Set the pair side by side to compare sole length, tongue height, and collar shape.
Finished Size
At the intended gauge, each bootie targets an exterior sole approximately 3.75 inches long by 1.75 inches wide (9.5 × 4.4 cm), with an overall height of approximately 2.75–3 inches (7–7.6 cm).
Confirm the finished interior fit before use. If the foot does not slide in comfortably or the upper presses into the skin, use the pair as a keepsake instead.
Tips and Customization
- Keep the first pair simple: Finish the cream-and-red version before experimenting with extra color changes.
- Use initials: One or two embroidered letters are easier to keep readable on a small panel.
- Change the stripe: Navy, sage, dusty blue, or rose gives the same design a different personality.
- Match a gift set: Use the same colors for a separate baby hat or blanket.
- Check both soles early: Make the two soles first and compare them before adding the uppers.
- Keep embellishments flat: Simple embroidery suits this design without introducing detachable decorations.
For substantially larger feet, use a separately graded pattern. Adding length to the starting chain alone changes the toe and upper proportions and is not a complete size adjustment.
Use and Care
Use these decorative booties for supervised, awake wear or photography. Remove them for sleep, and check the stitching and embroidered details before each use.
Follow the yarn manufacturer’s washing directions. Reshape the soles and tongues while damp, then dry fully. Include the fiber content and care instructions when giving the pair as a gift.
Frequently Asked Questions
Is this crochet baby sneakers pattern suitable for beginners?
It suits beginners who already know single crochet and are ready to practice increases, decreases, and basic sewing. The toe and ankle upper require more shaping than a simple rectangular bootie.
Are the laces functional?
No. The three small X shapes are embroidered onto the tongue. They do not tighten the shoe or connect the sides of the opening.
Can I make these in cotton?
Yes, provided the yarn matches the gauge and produces a soft, flexible fabric. Cotton can feel different from a blend, so check the finished opening and interior fit carefully.
Can I put the name on the sole?
The sole wall is narrow in this version. The outer ankle panel is easier to embroider without crowding the letters or distorting the shoe.
Are these an official branded sneaker pattern?
No. This is an independent Cute Stitch Studio design with classic sneaker-inspired details. It does not include a branded logo or badge.
Why do my two booties look different?
Small tension changes are noticeable on tiny projects. Check both sole measurements and stitch counts, then compare the toe decreases and upper rows. Matching the sole dimensions before continuing makes the rest easier.
Save This Pattern for Your Next Baby Gift
Save this pattern to your baby crochet or handmade gift board on Pinterest so you can find it when you are ready to make a personalized pair.
Looking for Your Next Crochet Project?
Love this project? Explore Cute Stitch Studio’s premium crochet patterns for more cute, cozy, gift-worthy, and beginner-friendly handmade ideas.