Crochet Phone Crossbody Bag Pattern: A Pretty Everyday Pouch
This crochet phone crossbody bag pattern makes a small, lightweight pouch for keeping your phone close. Dusty rose cotton, an airy stitch pattern, and a little heart-shaped button give it a simple handmade finish.
The bag has two rectangular panels, a button-loop closure, and a narrow removable crochet strap. Small metal rings and swivel clips connect the strap to the upper corners.
This original Cute Stitch Studio version is suitable for confident beginners. You will practice a simple double crochet mesh, work a single crochet border, and sew a few small attachments. Measure your phone with its case on before choosing your finished dimensions.
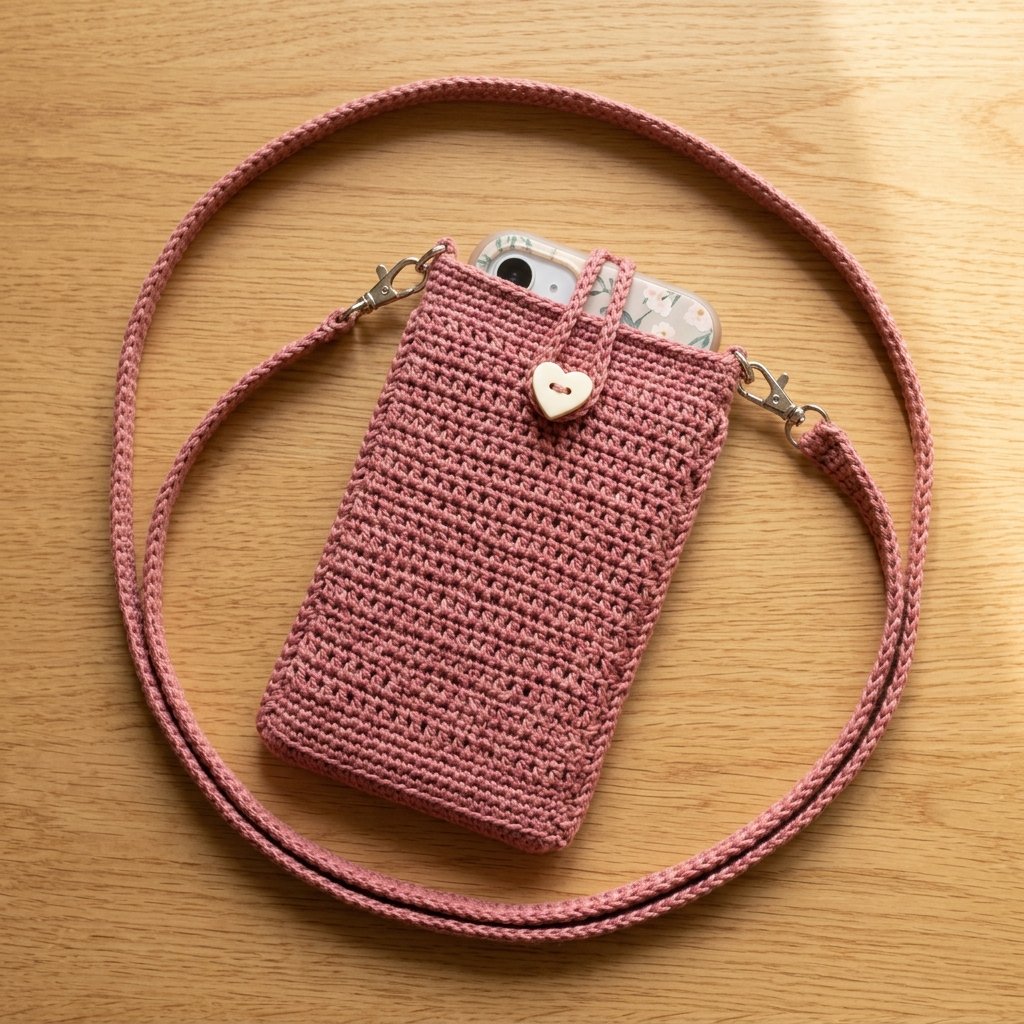
Table of Contents
Crochet Phone Crossbody Bag Pattern: A Pretty Everyday Pouch Instructions
Project Details
- Skill level: Confident beginner.
- Estimated time: Approximately 5–7 hours, depending on experience and strap length.
- Finished bag size: Target approximately 4 inches wide by 8–8.5 inches tall after assembly.
- Strap: Approximately 44 inches of crochet, plus clips; adjustable during construction.
- Crochet terminology: US terms.
- Construction: Two flat mesh panels joined along the sides and bottom, with a separate strap and two ring tabs.
This original pattern has not been physically tested. Dimensions are targets based on the stated gauge. Check your sample, phone fit, and attachment points as you work.
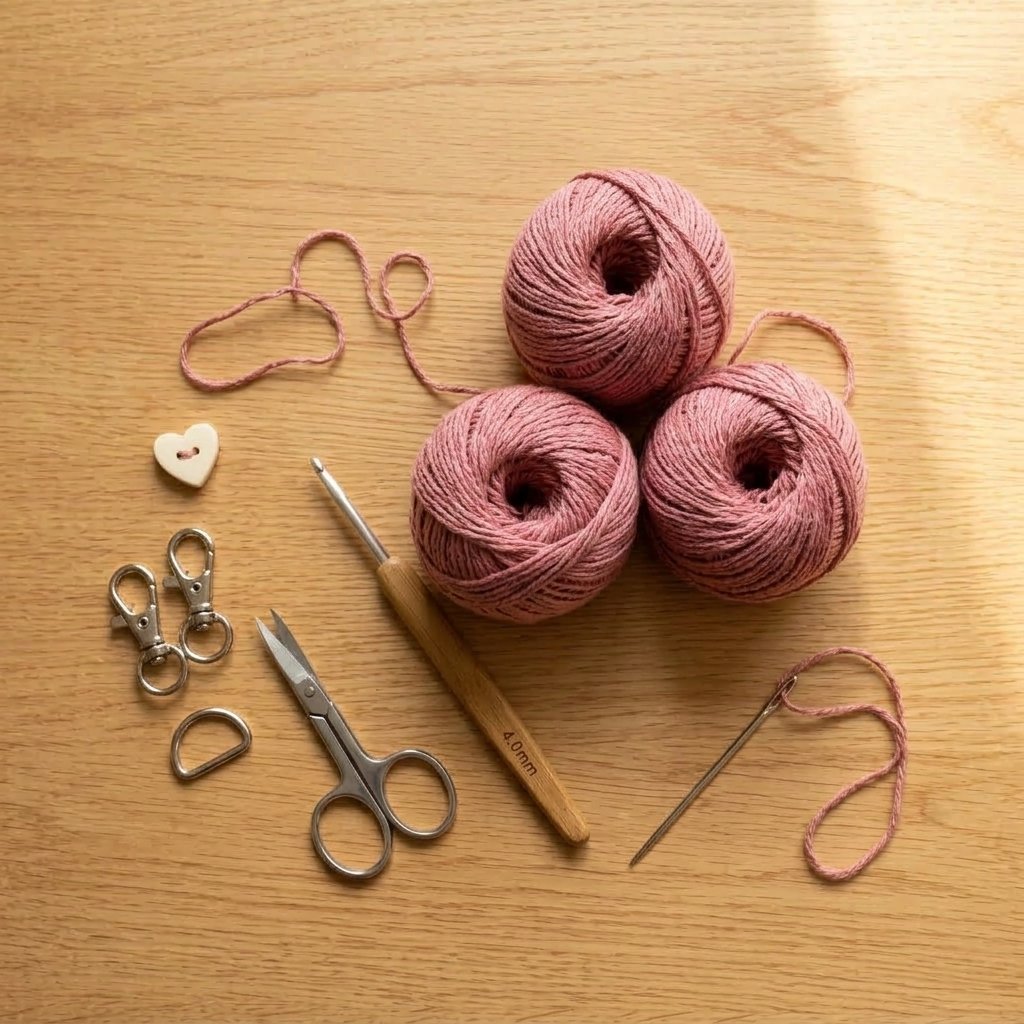
Materials
- DK-weight cotton yarn in dusty rose: approximately 180–230 yards.
- 3.5 mm crochet hook.
- One smooth, sew-through heart-shaped button, approximately 0.6–0.75 inch across.
- Two small closed D-rings with approximately 0.5-inch internal width.
- Two small swivel clips with closed attachment eyes wide enough for the crochet strap.
- Tapestry needle.
- Sewing needle and matching strong sewing thread for the button.
- Scissors.
- Measuring tape.
- Two removable stitch markers.
Choose smooth hardware without sharp edges that could rub through the cotton. The button should pass through its finished loop with gentle pressure.
Hook Size
Use a 3.5 mm crochet hook to begin.
If your panel is narrower than the target width, try a larger hook. If it is wider or the fabric feels too loose, try a smaller hook. The bag should have defined mesh openings without feeling floppy.
Yarn
Choose DK-weight, category 3 cotton yarn with a smooth finish. Cotton gives the small bag clear stitch definition, although the finished strap may still lengthen during use.
Allow approximately 180–230 yards for the sample bag and long strap. A larger pouch or longer strap will need additional yarn.
Dusty rose closely suits the soft look of this project. Other lovely choices include mauve, sage, oatmeal, denim blue, and terracotta.
Gauge
Target mesh gauge: 20 stitch positions and 12 mesh rows = approximately 4 inches.
One stitch position means either one double crochet or one chain space. The pattern’s 21-position panel should measure approximately 4.2 inches wide before joining.
For a sample, work the panel instructions through Row 10. Measure the width without stretching. Measure row height across the mesh section only, excluding the single crochet foundation rows.
The single crochet sections may have a slightly different row gauge. Use actual measurements when checking the finished height and strap length.
Choosing the Right Size
This bag has no separate gusset. Its two flat panels must provide enough room for both the width and thickness of your phone.
As a starting point, add your phone’s width and thickness, then add approximately 0.25–0.5 inch of ease. That gives a useful target for the bag’s usable flat width inside the seams.
For example, a phone measuring 3 inches wide and 0.5 inch thick needs approximately 3.75–4 inches of usable flat bag width. Check this with your actual phone and case before permanently joining the panels.
| Measurement | Sample Target |
|---|---|
| Panel width before assembly | Approximately 4.2 inches |
| Finished outside bag width | Approximately 4 inches |
| Finished bag height | Approximately 8–8.5 inches |
| Crocheted strap length between folded ends | Approximately 44 inches |
The usable interior is smaller than the outside measurements. Make the body tall enough to hold your phone while allowing the closure loop to pass comfortably over the opening.
Abbreviations
- ch: chain
- sc: single crochet
- dc: double crochet
- sl st: slip stitch
- st: stitch
- sts: stitches
Before You Start
- Work both panels flat in rows.
- The ch 1 used for single crochet rows does not count as a stitch.
- The ch 3 at the beginning of a mesh row counts as one dc plus one ch-1 space.
- Each mesh row contains 11 dc, including the beginning chain’s dc portion, and 10 ch-1 spaces.
- Keep the first and last stitches of every row aligned. Do not add an extra dc into the first stitch beneath the turning chain.
- The strap is a narrow, flat single crochet band.
- Make both panels the same size before joining.
Crochet Phone Crossbody Bag Pattern Instructions
Part 1 — Front Panel
Foundation: Ch 22.
Row 1: Sc in the second ch from the hook and in each remaining ch. Turn. (21 sc)
Row 2: Ch 1. Sc in each st across. Turn. (21 sc)
Row 3: Ch 3; this counts as the first dc and one ch-1 space. Skip the first sc directly below the chain and skip the next sc. Dc in the following sc.
Repeat [ch 1, skip the next sc, dc in the next sc] across to the end. Turn. (11 dc and 10 ch-1 spaces)
Row 4: Ch 3. Skip the first dc and the first ch-1 space. Dc in the next dc.
Repeat [ch 1, skip the next ch-1 space, dc in the next dc] across. Work the final dc into the second chain of the previous row’s beginning ch 3. Turn. (11 dc and 10 ch-1 spaces)
Rows 5–24: Repeat Row 4. (11 dc and 10 ch-1 spaces in each row)
You now have 22 mesh rows above the two foundation rows.
Row 25: Ch 1. Sc in the first dc. Repeat [sc in the next ch-1 space, sc in the next dc] across. For the final repeat, work into the beginning chain space and then into the second chain of the previous row’s beginning ch 3. Turn. (21 sc)
Row 26: Ch 1. Sc in each st across. (21 sc)
Fasten off and weave in the ends.
Part 2 — Back Panel
Make a second panel exactly as written for the front.
Lay the panels together and compare their widths and heights. If one is slightly uneven, lightly dampen both and arrange them to matching dimensions. Let them dry flat without pulling the mesh out of shape.

Part 3 — Check the Fit
Place the panels together with the sides you want visible facing outward. Temporarily hold their side edges together with a loose length of yarn.
Slide in your phone with its case on. Allow space for the permanent side seams, and confirm that the phone enters and comes out without forcing the fabric apart.
If the panels are too narrow, remake them with a wider foundation using the adjustment instructions below. Stretching a narrow panel around the phone will distort the mesh and strain the seams.
Part 4 — Join the Sides and Bottom
Keep the panels aligned with the chosen outer sides facing outward. You will work through both layers to make a visible single crochet seam.
Join yarn at the upper right corner with a sl st through both panels. Ch 1.
Work down the first side, placing approximately 1 sc into each single crochet row end and 2 sc into each mesh row end. Catch corresponding parts of both panels in every stitch.
At the lower corner, work an additional sc if needed to turn without pulling the corner tight.
Continue along the bottom, working 1 sc through each pair of corresponding foundation-chain positions. Add an extra corner stitch if needed, then work up the second side using the same spacing as the first side.
Stop at the upper corner. Leave the entire top opening unjoined. Fasten off and weave in the ends.
The seam should lie smoothly. If an edge ripples, use fewer joining stitches along that section. If it draws inward, add a stitch where the fabric needs more room.
Part 5 — Make the Ring Tabs
Make two tabs.
Foundation: Ch 5.
Row 1: Sc in the second ch from the hook and each remaining ch. Turn. (4 sc)
Rows 2–6: Ch 1. Sc in each st across. Turn after every row except the last. (4 sc)
The tab should be long enough to pass around the straight bar of its D-ring and leave both ends available for sewing. Add rows if your hardware needs a longer tab.
Fasten off, leaving a 12-inch tail.
Pass a tab through the first D-ring and fold it in half. Position its two ends inside one upper side corner of the bag, with the curved part of the ring above the opening.
Sew both tab ends securely to the solid upper band and the adjacent side seam. Make several passes across the tab’s width, catching sturdy stitches rather than only one strand of yarn.
Repeat at the opposite corner. Check that both rings sit at the same height.
Part 6 — Crochet the Strap
Foundation: Ch 5.
Row 1: Sc in the second ch from the hook and in each remaining ch. Turn. (4 sc)
Row 2: Ch 1. Sc in each st across. Turn. (4 sc)
Repeat Row 2 until the strip measures approximately 46 inches without stretching. This allows approximately 1 inch at each end to fold around the clip attachments, leaving about 44 inches of crochet between the folds.
For a different length, measure a comfortable strap on a bag you already own. Account for the added length of both swivel clips and the folded crochet ends.
Fasten off, leaving an 18-inch tail. Weave in the starting end.
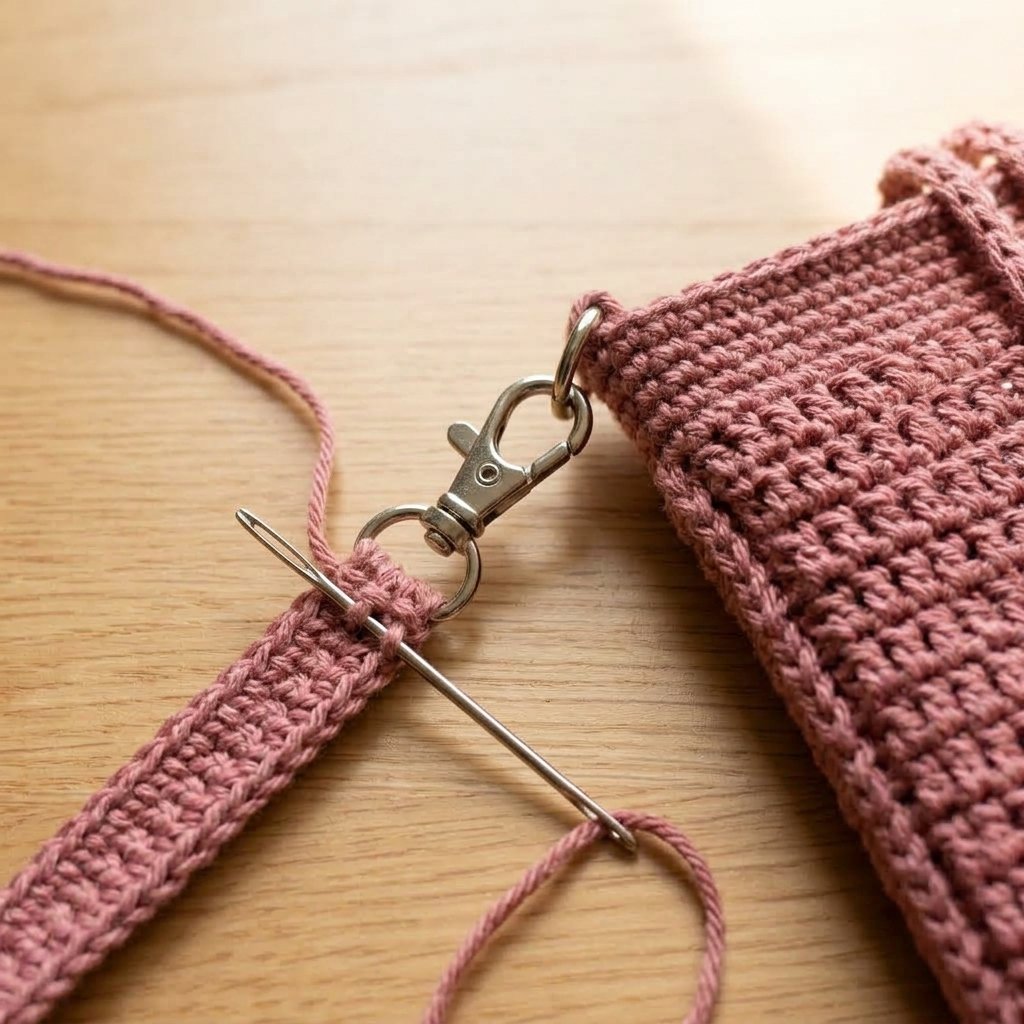
Pass one end of the strap through the closed attachment eye of a swivel clip. Fold approximately 1 inch of crochet back against the strap.
Sew the folded section in place along both sides and across its free end, then make another line of stitches across the folded section. Use additional matching yarn if needed.
Repeat at the other end. Lay the strap flat before sewing the second clip so you do not accidentally create a permanent twist.
Clip the strap onto the two D-rings.
Part 7 — Add the Heart Button and Closure Loop
Sew the heart button to the center front, approximately 0.75–1 inch below the top edge. Use strong matching sewing thread and catch several crochet strands beneath the button.
On the back panel, mark the center top stitch. With 21 stitches across, this is stitch 11.
Join yarn with a sl st in stitch 10, immediately beside the center stitch. Ch 16 as a starting point.
With the phone inside, bring the chain over the top opening and around the front button. Adjust the chain count until the loop reaches comfortably but will not slip off the button easily.
Return the chain to the back panel and sl st into stitch 12, leaving stitch 11 between the two attachment points. Fasten off.
Secure and weave in both ends thoroughly. The closure should hold the top together without bending the phone or pulling the bag out of shape.
Finishing
Weave all yarn tails through several stitches, reverse direction, and weave through another section before trimming.
Inspect the side seams, ring tabs, strap folds, and button. Gently pull each attachment while the bag is empty to check for loose stitches.
Try the completed bag with your phone while supporting it over a soft surface. Cotton straps can lengthen with use; shorten the strap by adjusting the folded ends if necessary.
This is a light phone pouch, so avoid adding heavy items. The mesh and button loop do not make it drop-proof or fully enclosed.

Finished Size
The sample targets approximately 4 inches wide by 8–8.5 inches tall (10 by 20–22 cm), depending on gauge and joining tension.
The crochet portion of the finished strap measures approximately 44 inches (112 cm) between its folded ends. The clips add to the overall carrying length.
Measure your completed bag rather than relying on these target dimensions when checking phone compatibility.
Tips and Customization
Make the Bag Wider
Increase the foundation chain by an even number. For example, ch 24 produces 23 sc in Row 1 and a mesh row with 12 dc and 11 ch-1 spaces.
Keep an odd number of stitches in the solid rows so the mesh begins and ends with a dc. Make the same change to both panels.
At the target gauge, adding two stitch positions adds approximately 0.4 inch of panel width before seaming.
Change the Height
Add or remove repeats of the mesh row before working the two upper single crochet rows. Each mesh row adds approximately one-third of an inch at the target row gauge.
Keep both panels identical, and check the position of the phone before adding the button.
Use a Different Button
A smooth round or flower-shaped button works with the same construction. Adjust the chain loop to the actual button rather than keeping a fixed chain count.
Make a Short Shoulder Strap
Work fewer strap rows for a shorter shoulder bag. Try the length before permanently securing the second clip.
Create a Gift Set
Pair the pouch with a handmade card and a small care note. Choose a color the recipient wears often, and check their phone measurements if possible.
Frequently Asked Questions
Is this phone bag suitable for beginners?
It is a good next project after learning basic stitches. The main challenge is recognizing the beginning chain at the end of each mesh row and keeping both panels the same size.
Will this fit a large phone?
Measure the phone with its case on and compare it with the bag’s usable interior. Large or thick phones may need wider panels, extra mesh rows, or both.
Why does my mesh keep getting wider?
You may be adding a dc beneath the beginning ch 3. That chain already supplies the first dc position. Count 11 dc and 10 spaces across every mesh row in the sample size.
Can I skip the metal clips?
Yes. Omit the clips, D-rings, and ring tabs, and sew the strap ends directly inside the upper side corners. Overlap each end by approximately 1 inch and sew through the solid band and nearby seam with several secure passes.
How do I clean the bag?
Follow the yarn and hardware care instructions. If the hardware allows it, remove the strap and gently hand-wash the crochet. Reshape and dry flat without hanging the wet bag from its strap.
Save This Pattern for Later
Save this crochet phone crossbody bag pattern to your crochet accessories or handmade gift board on Pinterest. It is a lovely small project when you want to make something practical in a favorite color.
Looking for Your Next Crochet Project?
Love this project? Explore Cute Stitch Studio’s premium crochet patterns for more cute, cozy, gift-worthy, and beginner-friendly handmade ideas.