Crochet Spiderweb Top Pattern with Long Sleeves
This crochet spiderweb top pattern creates an airy statement layer with circular webs, a wide neckline, and long openwork sleeves. Soft ivory yarn gives the design a delicate look, while black yarn creates a moodier Halloween version.
Wear it over a fitted tank, a simple dress, or a comfortable long-sleeve base layer. The generous openings are part of the design, so choose an underlayer you enjoy showing through.
This original Cute Stitch Studio interpretation uses two circular web panels joined at selected sections, plus two sleeves worked from cuff to upper arm. It captures the open spiderweb look without claiming to reproduce the reference garment’s construction.
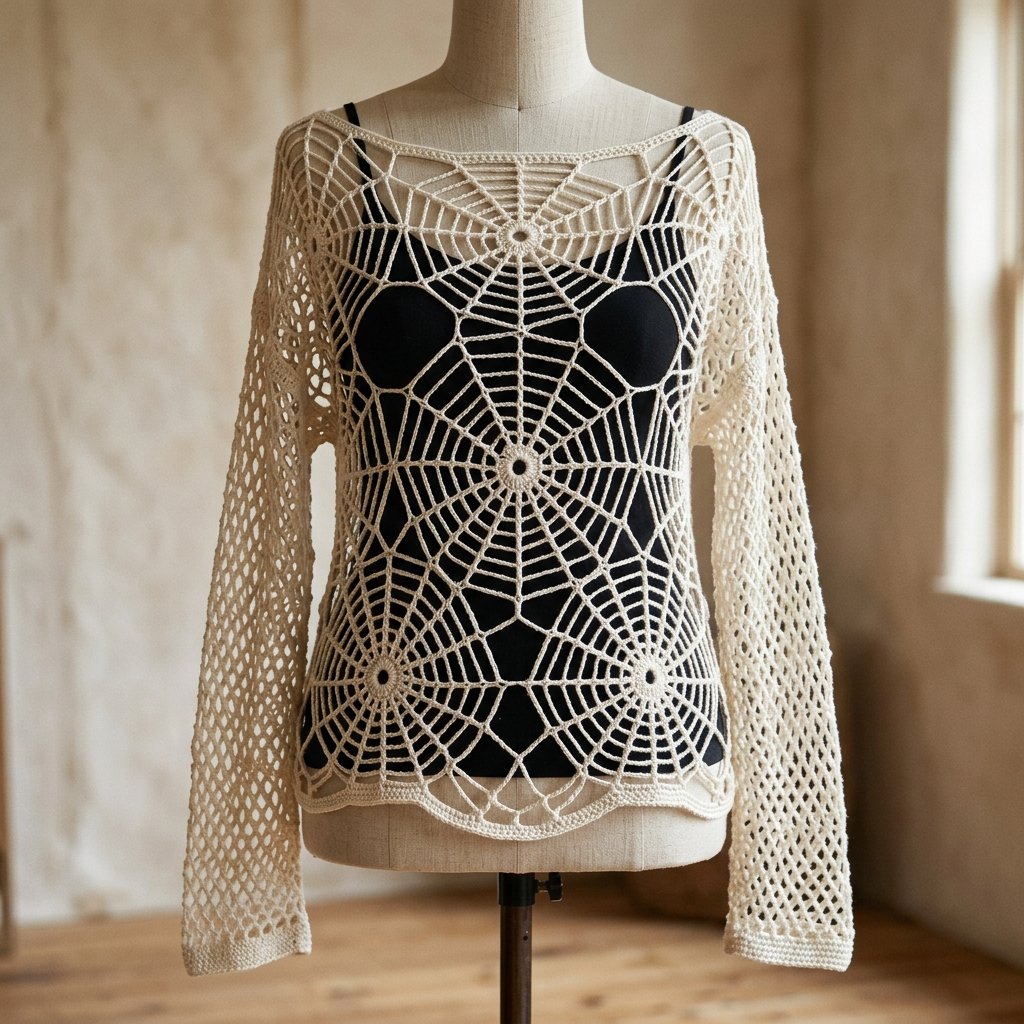
Table of Contents
Crochet Spiderweb Top Pattern With Long Sleeves Instructions
Project Details
- Skill level: Intermediate.
- Estimated time: Approximately 12–20 hours.
- Size: One loose adult sample size, adjusted through measurements and fitting.
- Panel diameter: Approximately 23–24 inches after gentle shaping.
- Neck opening: Approximately 11–12 inches across when laid flat.
- Sleeve length: Approximately 15 inches from cuff to upper sleeve edge; the body provides a dropped shoulder.
- Crochet terminology: US terms.
- Construction: Two circular panels, two tapered mesh sleeves, and short sewn joins.
This is an untested design draft, not a graded garment pattern. Finished fit, yarn quantity, and drape need sample validation. Check each section against your measurements before completing the seams.
Materials
- Approximately 650–850 yards of smooth category 2 yarn in ivory.
- 3.5 mm crochet hook, or the size needed for your swatch.
- Yarn needle.
- Scissors.
- Measuring tape.
- At least 12 removable stitch markers.
Hook Size
Start with a 3.5 mm crochet hook. Make the chains comfortably rather than pulling each loop tight.
A hook that produces stiff chains will make the top less fluid. A very loose chain can make the web difficult to control, so swatch before starting the garment.
Yarn
Choose category 2, sport-weight cotton or a cotton blend with a smooth surface. Avoid fuzzy yarns that hide the chain links and make unraveling difficult.
Ivory is the featured color. Black, charcoal, muted purple, and deep red also suit the spiderweb design.
Use the same yarn and hook for both body panels. Even a small difference in chain tension becomes noticeable across a large circular web.

Abbreviations
- ch: chain.
- sc: single crochet.
- sl st: slip stitch.
- st / sts: stitch / stitches.
Before You Start
Chain Gauge and Panel Measurements
As a starting reference, 24 relaxed chain stitches should measure approximately 4 inches. Do not stretch the chain tightly to measure it.
Chain gauge alone does not establish garment fit. The circular panel’s diameter and the sleeve measurements are the main checkpoints.
Work several web rounds and spread them gently on a flat surface. The web should open without needing to be pulled hard, and its outer edge should not form heavy ruffles.
How the Web Is Built
Each body round has 12 chain loops. Single crochet anchors join each new loop to the midpoint of a loop in the previous round.
The loops grow by two chains per round. This creates 12 repeating sections radiating around a small center.
Work into the specified midpoint chain, not around the whole loop. This keeps the joins positioned consistently.
Round Notes
- Do not turn the circular panels or sleeves between rounds.
- Beginning ch 1 does not count as a stitch.
- Join each round to its first sc with a sl st.
- The positioning slip stitches at the beginning of later rounds do not create additional web loops.
- Count 12 loops on every body round and 8 loops on every sleeve mesh round.
Fit and Wearing Notes
This design is intentionally open and loose. Wear it over a separate garment. Large loops can catch on jewelry, bag straps, and rough surfaces, so handle the finished top gently.
Try it on with temporary joins before sewing permanently. Panel diameter alone does not guarantee a particular bust size.
Crochet Spiderweb Top Pattern
Part 1 — Make the First Web Center
Ch 6 and join with a sl st in the first chain to form a ring.
Center round: Ch 1 and work 12 sc around the ring. Join with a sl st in the first sc. (12 sc)
Keep the center ring flat and leave the starting tail available for weaving in later.
Part 2 — Begin the Circular Web
Web Round 1: Ch 1 and sc in the same stitch as the join. Repeat [ch 3, sc in the next stitch] 11 times. Ch 3 and join with a sl st in the first sc. (12 ch-3 loops)
Web Round 2: Sl st into the first and second chains of the first loop to reach its midpoint. Ch 1 and sc in that same midpoint chain. Repeat [ch 5, sc in the second chain of the next loop] 11 times. Ch 5 and join with a sl st in the first sc. (12 ch-5 loops)
Web Round 3: Sl st through the first three chains of the first loop to reach its midpoint. Ch 1 and sc in that midpoint chain. Repeat [ch 7, sc in the third chain of the next loop] 11 times. Ch 7 and join with a sl st in the first sc. (12 ch-7 loops)
Part 3 — Expand the Web
Continue in the same way. At the beginning of each round, slip stitch along the first loop to its midpoint. Ch 1 and sc in that chain.
Make the new chain length, sc into the midpoint chain of the next old loop, and repeat around. After the final chain loop, join to the first sc.
| Web round | Chains in each new loop | Midpoint chain in the old loop |
|---|---|---|
| 4 | 9 | 4th |
| 5 | 11 | 5th |
| 6 | 13 | 6th |
| 7 | 15 | 7th |
| 8 | 17 | 8th |
| 9 | 19 | 9th |
| 10 | 21 | 10th |
| 11 | 23 | 11th |
| 12 | 25 | 12th |
| 13 | 27 | 13th |
| 14 | 29 | 14th |
| 15 | 31 | 15th |
| 16 | 33 | 16th |
| 17 | 35 | 17th |
| 18 | 37 | 18th |
Each completed round still contains 12 chain loops.
After Round 18, gently spread the panel and measure across its center in several directions. The target diameter is approximately 23–24 inches.
If it is substantially different, adjust your hook or tension and make a new panel. Do not force the web to the target size through aggressive stretching.
Fasten off. Make a second panel with the same round count, chain lengths, and finished diameter.

Part 4 — Mark the Assembly Sections
Lay one panel flat. Place a marker in each of its 12 outer sc anchors.
Choose the anchor at the top as Anchor 0. Number the remaining anchors clockwise from 1 through 11.
The chain loop between two neighboring anchors is one outer section.
- Neck opening: Two sections, from Anchor 11 through Anchor 0 to Anchor 1.
- Right shoulder seam: One section, from Anchor 1 to Anchor 2.
- Right armhole: Two sections, from Anchor 2 through Anchor 3 to Anchor 4.
- Right side seam: One section, from Anchor 4 to Anchor 5.
- Lower opening: Two sections, from Anchor 5 through Anchor 6 to Anchor 7.
- Left side seam: One section, from Anchor 7 to Anchor 8.
- Left armhole: Two sections, from Anchor 8 through Anchor 9 to Anchor 10.
- Left shoulder seam: One section, from Anchor 10 to Anchor 11.
Mark the second panel identically as you view it laid flat. Stack the panels so the matching numbered anchors align.
Part 5 — Join the Body
Temporarily connect the panels at the ends of the two shoulder sections and the two side sections.
Try the body on over your intended underlayer. Check the head opening, shoulder position, armholes, and width across the torso.
Once the fit is suitable, whipstitch the matching chains together along the four marked seam sections. Match one chain to one chain and keep the sewing yarn relaxed.
Reinforce the seam endpoints with a few extra passes through the anchor stitches.
Leave the neck, both armholes, and the lower opening unsewn. The circular panels create a curved lower edge.
Part 6 — Begin a Sleeve Cuff
Make two sleeves.
Ch 56. Before joining, wrap the relaxed chain around the widest part of your hand. It must pass over your hand comfortably.
If needed, add chains in multiples of 8. Record the count so the second cuff matches.
Join with a sl st in the first chain, checking carefully that the chain is not twisted.
Cuff Round 1: Ch 1 and sc in each chain around. Join with a sl st in the first sc. (56 sc for the sample cuff)
Cuff Round 2: Ch 1 and sc in each stitch around. Join. (56 sc)
Part 7 — Begin the Sleeve Mesh
For the sample cuff, divide the stitches into eight groups of seven.
Sleeve Mesh Round 1: Ch 1 and sc in the first stitch. Repeat [ch 7, skip 6 stitches, sc in the next stitch] 7 times. Ch 7, skip the final 6 stitches, and join to the first sc. (8 ch-7 loops)
If you changed the cuff count, divide that count by eight. Skip one fewer stitch than the number in each group. Keep eight loops, each containing seven chains.
Part 8 — Widen the Sleeve
For each later round, slip stitch along the first loop to its midpoint, ch 1, and sc there. Make the specified new chain length, then sc into the midpoint of the next old loop. Continue around and join.
For an odd-numbered old loop, use its single middle chain. For an even-numbered old loop, use the earlier of its two middle chains consistently.
- Mesh Round 2: Ch 8 per loop.
- Mesh Round 3: Ch 9 per loop.
- Mesh Round 4: Ch 10 per loop.
- Mesh Round 5: Ch 11 per loop.
- Mesh Round 6: Ch 12 per loop.
- Mesh Round 7: Ch 13 per loop.
- Mesh Round 8: Ch 14 per loop.
- Mesh Round 9: Ch 15 per loop.
- Mesh Round 10: Ch 16 per loop.
- Mesh Round 11: Ch 17 per loop.
There are eight loops in every round.
Continue with ch-17 loops until the sleeve measures approximately 15 inches from the cuff, or the length needed from your dropped armhole to your wrist. Measure with the sleeve hanging gently, without pulling it long.
Before fastening off, compare the sleeve’s upper edge with the actual armhole. They should match without strong gathering or stretching.
If the sleeve opening is slightly too narrow, use ch-18 or ch-19 loops in the final rounds. If it is slightly too wide, reduce the final loop length. Keep eight loops and record the adjustment.
Make the second sleeve to match the first, including any length or circumference changes.

Part 9 — Attach the Sleeves
Each armhole consists of four outer body loops: two from the front panel and two from the back.
Mark the midpoint of each of these four loops. Together with their endpoints, these divide the armhole into eight sections.
The sleeve has eight upper loops. Match one sleeve loop to each marked half-loop of the armhole.
Position the sleeve round join at the underarm. Pin or mark all eight sections before sewing.
Whipstitch around the opening, distributing the chain links evenly within each section. The chain counts do not need to be identical, but the relaxed lengths should be close.
Reinforce the underarm join, then repeat for the second sleeve.
Finishing
Weave in the ends through several nearby stitches, changing direction to help them stay secure. Trim only after the ends are well anchored.
Gently arrange the web panels and sleeves on a flat surface. Follow the yarn label for washing or damp blocking, and avoid stretching the openings beyond their natural shape.
The neck and lower edges remain as chain loops to preserve the airy web appearance. No solid border is added.
Try the finished top over your chosen underlayer. Check that the neckline stays comfortably on the shoulders and that the cuffs pass over your hands without strain.

Finished Size
- Each body panel: Approximately 23–24 inches in diameter.
- Neck opening: Approximately 11–12 inches across when laid flat.
- Sleeves: Approximately 15 inches from cuff to attachment, adjusted for the dropped shoulder.
- Sample cuff circumference: Approximately 9–10 inches, depending on tension.
- Upper sleeve circumference: Fitted to the assembled armhole.
The web stretches and changes shape when worn. Use the fitting checkpoints rather than treating these numbers as a standard clothing size.
Tips and Customization
Try a Black Spiderweb Version
Black yarn creates a strong Halloween look over a pale tank or dress. Use good lighting while crocheting so the chain links remain easy to count.
Choose a Shorter Sleeve
After widening the sleeve, stop when it reaches your preferred length. Check the upper opening against the armhole before fastening off.
Keep the Web Open
Do not pull the sewing yarn tight along the shoulders or sides. Tight seams can distort the circular pattern and restrict the way the fabric falls.
Make Matching Notes
Write down your panel diameter, cuff chain count, sleeve rounds, and final loop lengths. Those details matter more than assuming the second piece will turn out the same by eye.
Store It Folded
Fold the top gently when it is not being worn. Long periods on a hanger can stretch the open mesh unevenly.
Frequently Asked Questions
Is this a beginner crochet pattern?
The individual stitches are simple, but the garment requires careful counting, fitting, and joining. It is best treated as an intermediate project.
Do I need a crochet chart?
No. The pattern uses written instructions, a round table, and numbered assembly points. Marking those points makes the construction easier to follow.
Why is my web ruffling?
Check that each loop has the correct chain count and that every round has exactly 12 loops. If the counts are correct, your chain tension may differ from the sample assumptions; reassess the swatch before making a second panel.
Why does my panel form a bowl?
Check for missing chains or loops first. Tight chains can also prevent the outer rounds from spreading. Do not try to correct a strongly cupped panel by forcing it flat.
Can I use thicker yarn?
Thicker yarn changes the scale of the web, the garment size, and its weight. Use the recommended yarn weight for this draft or plan to redesign the measurements.
Can I wear it without an underlayer?
The large openings provide very little coverage. This design is intended as a layering garment.
Save This Halloween Crochet Project
Save this crochet spiderweb top pattern to your Pinterest board so you can return to the round counts and assembly guide while you work.
Looking for Your Next Crochet Project?
Love this project? Explore Cute Stitch Studio’s premium crochet patterns for more cute, cozy, gift-worthy, and beginner-friendly handmade ideas.