


Free Fruit Bat Crochet Pattern – 4 Cute Halloween Amigurumi Bats
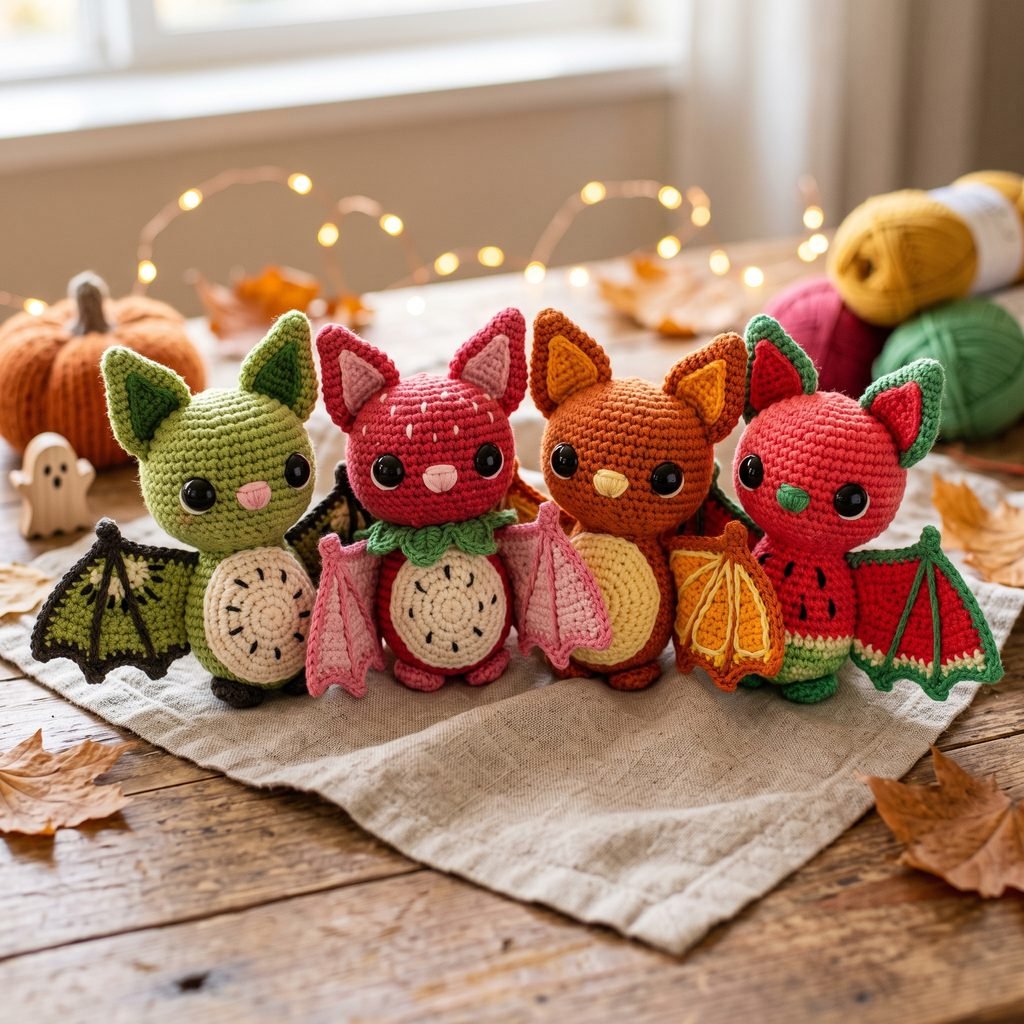
If you love Halloween crochet with a colorful twist, this fruit bat crochet pattern is a fun project to add to your spooky-season list. One simple amigurumi bat base can be transformed into four playful fruit-inspired designs: strawberry, kiwi, orange, and watermelon.
Each little bat features oversized ears, wide crochet wings, a rounded body, and bright fruit-inspired details. Make one favorite version or crochet the complete set for a colorful Halloween display.
This project is best for advanced beginners who are comfortable with single crochet, increases, decreases, simple sewing, and working small appliqué details.
Project Details
- Skill Level: Advanced Beginner
- Estimated Time: 3–4 hours per bat
- Finished Size: Approximately 6–7 inches tall and 9–10 inches wide with wings
- Crochet Terminology: US terms
- Construction: Head, body, ears, wings, and fruit details are made separately and sewn together.
Materials
- Worsted weight #4 yarn in your main fruit color
- Worsted weight #4 yarn in contrasting wing and edging colors
- Small amounts of black, white, pink, green, yellow, cream, or brown yarn for details
- 3.5 mm crochet hook
- Polyester fiberfill stuffing
- 2 safety eyes, approximately 10–12 mm
- Yarn needle
- Scissors
- Stitch marker
- Black embroidery thread for optional seed details

Hook Size
Use a 3.5 mm (E/4) crochet hook.
If your crochet tension is loose, go down one hook size so the stuffing does not show through the finished fabric.
Yarn
Use worsted weight #4 yarn for a structured but still soft amigurumi.
Approximate yarn needed for one bat:
- Main body color: 60–80 yards
- Wing / contrast colors: 40–60 yards
- Detail colors: Small scraps
Fruit Bat Color Ideas
Kiwi Bat
- Bright green body
- Green wings
- Brown wing edging
- Cream belly
- Black seed embroidery
Strawberry Bat
- Strawberry red or pink body
- Pink wings
- Dark pink edging
- Green leafy collar
- Yellow seed embroidery
Orange Bat
- Orange body
- Cream and yellow wing details
- Burnt-orange edging
- Dark green collar
Watermelon Bat
- Deep red body
- Red wings
- Cream inner stripe
- Dark green wing edging
- Black seed embroidery
Abbreviations
- MR = magic ring
- ch = chain
- sc = single crochet
- hdc = half double crochet
- dc = double crochet
- sl st = slip stitch
- st(s) = stitch(es)
- inc = increase, work 2 sc in the same stitch
- dec = invisible single crochet decrease
Before You Start / Pattern Notes
The head and body are worked in continuous spiral rounds.
Use a stitch marker to mark the first stitch of each round.
The wings are worked in rows and attached to the back of the body.
Fruit details can be embroidered or added as simple crochet appliqués.
If the finished bat is intended for a young child, embroidered eyes are a safer alternative to plastic safety eyes.
Free Fruit Bat Crochet Pattern
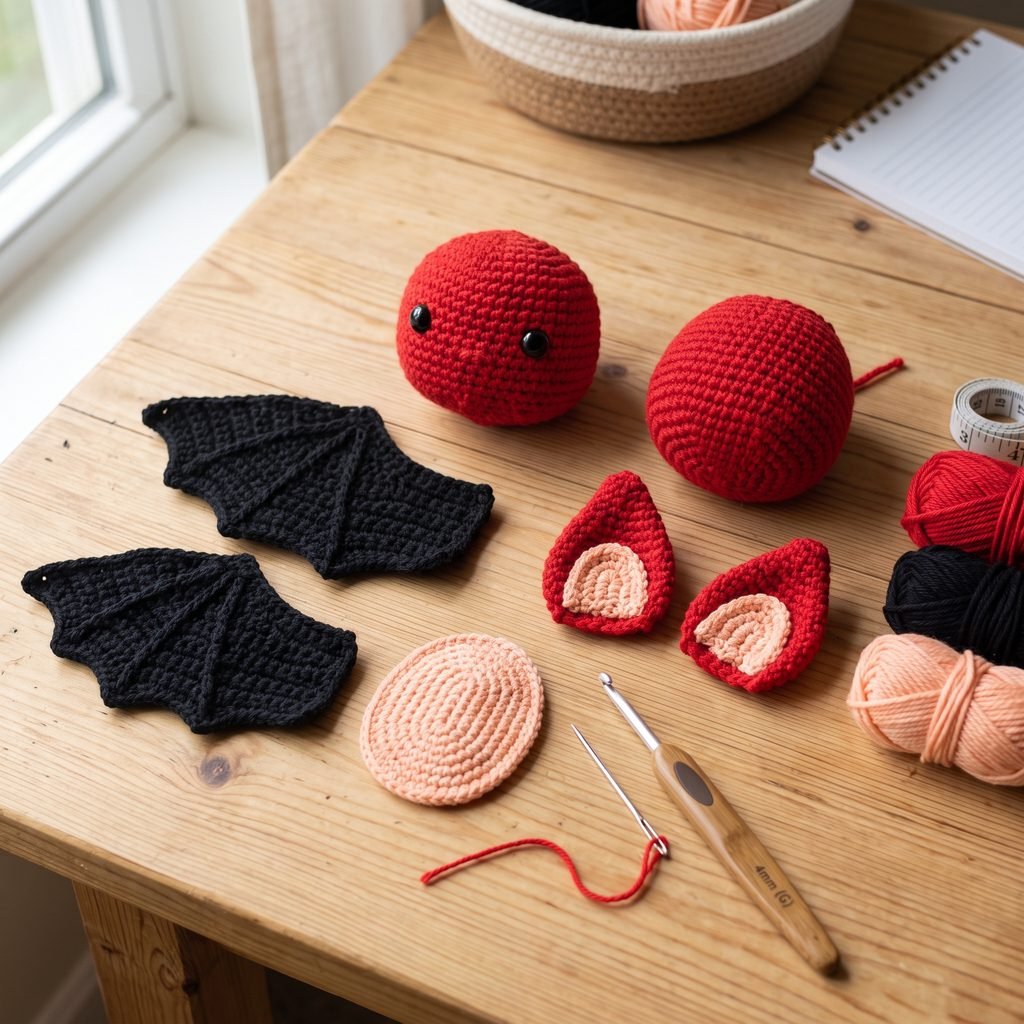
Part 1 — Body
Using your main fruit color:
Round 1: 6 sc into MR. (6 sts)
Round 2: Inc around. (12 sts)
Round 3: *Sc in next st, inc.* Repeat around. (18 sts)
Round 4: *Sc in next 2 sts, inc.* Repeat around. (24 sts)
Rounds 5–8: Sc in each st around. (24 sts)
Round 9: *Sc in next 2 sts, dec.* Repeat around. (18 sts)
Round 10: Sc around. (18 sts)
Round 11: *Sc in next st, dec.* Repeat around. (12 sts)
Begin stuffing firmly.
Round 12: Dec around. (6 sts)
Fasten off and close the opening.
Part 2 — Head
Using the same main color:
Round 1: 6 sc into MR. (6 sts)
Round 2: Inc around. (12 sts)
Round 3: *Sc, inc.* Repeat around. (18 sts)
Round 4: *Sc 2, inc.* Repeat around. (24 sts)
Rounds 5–8: Sc around. (24 sts)
Insert safety eyes between Rounds 6 and 7, approximately 6 stitches apart.
Round 9: *Sc 2, dec.* Repeat around. (18 sts)
Begin stuffing.
Round 10: *Sc, dec.* Repeat around. (12 sts)
Finish stuffing.
Round 11: Dec around. (6 sts)
Fasten off and close.
Part 3 — Ears (Make 2)
Using the main body color:
Ch 2.
Row 1: Work 3 sc into the 2nd chain from hook. Turn. (3 sts)
Row 2: Ch 1, inc, sc, inc. Turn. (5 sts)
Row 3: Ch 1, sc across. Turn. (5 sts)
Row 4: Ch 1, inc, sc 3, inc. Turn. (7 sts)
Row 5: Ch 1, sc across. Turn. (7 sts)
Row 6: Ch 1, inc, sc 5, inc. (9 sts)
Fasten off, leaving a sewing tail.
Inner Ears
Make 2 using a lighter or contrasting color.
Ch 2.
Row 1: 3 sc into 2nd chain from hook. Turn. (3 sts)
Row 2: Ch 1, inc, sc, inc. Turn. (5 sts)
Row 3: Ch 1, sc across. (5 sts)
Fasten off.
Sew each inner ear onto an outer ear, leaving a visible border around the edge.
Part 4 — Wings (Make 2)
Using your main wing color:
Ch 3.
Row 1: Starting in the 2nd chain from hook, sc 2. Turn. (2 sts)
Row 2: Ch 1, inc in each st. Turn. (4 sts)
Row 3: Ch 1, sc across. Turn. (4 sts)
Row 4: Ch 1, inc, sc 2, inc. Turn. (6 sts)
Row 5: Ch 1, sc across. Turn. (6 sts)
Row 6: Ch 1, inc, sc 4, inc. Turn. (8 sts)
Row 7: Ch 1, sc across. Turn. (8 sts)
Row 8: Ch 1, inc, sc 6, inc. Turn. (10 sts)
Row 9: Ch 1, sc across. Turn. (10 sts)
Row 10: Ch 1, inc, sc 8, inc. (12 sts)
Fasten off.
Create the Bat Wing Points
Join yarn to the lower edge of the wing.
Work the following sequence loosely across the lower edge:
Sl st, sc, hdc, 2 dc in next st, hdc, sl st.
Repeat as space allows to create 2–3 soft pointed sections.
Fasten off.
Wing Edging
Using your contrasting color, work sl st evenly around the outside edge of each wing.
This edging is where you can add the brown kiwi skin, green watermelon rind, darker strawberry border, or burnt-orange citrus border.
Optional Wing Veins
Use surface slip stitches or embroidery to add 2–3 lines from the inner wing edge toward the outer points.
Match these lines to your fruit theme.
Part 5 — Fruit Belly Patch
Using a contrasting belly color, ch 8.
Round 1: Starting in the 2nd chain from the hook, sc in next 6 chains, 3 sc in last chain.
Continue along the opposite side of the foundation chain:
Sc in next 5 chains, then work 2 sc in the final chain. (16 sts)
Round 2: Inc, sc 5, inc 3 times, sc 5, inc 2 times. (22 sts)
Fasten off, leaving a sewing tail.
Sew the oval belly patch to the front center of the body.
Fruit Variation 1 — Kiwi Bat
Use bright green for the body and wings.
Make the belly patch in cream.
Use brown yarn for wing edging and ear edging.
Embroider several tiny black oval seed stitches around the cream belly.
Add a small pink cheek stitch under each eye for a cute expression.
Fruit Variation 2 — Strawberry Bat
Use strawberry red or deep pink for the head and body.
Use light pink for the inner ears and wings.
Embroider small yellow seed stitches across the belly.
Strawberry Leaf Collar
Using green yarn, ch 24.
Starting in the 2nd chain from the hook, work:
*Sl st, sc, hdc, sc, sl st* over groups of stitches to create small leaf points.
Fasten off.
Sew the leafy strip around the neck between the head and body.
Optional Strawberry Stem
Using dark green yarn, ch 6.
Sl st back across the chain.
Sew the stem onto the top center of the head.
Fruit Variation 3 — Orange Bat
Use burnt orange for the body.
Make the inner wings cream or pale yellow.
Use orange yarn to embroider lines across the wings like citrus segments.
Add a dark green collar around the neck for a leafy citrus-inspired detail.
Fruit Variation 4 — Watermelon Bat
Use deep watermelon red for the body and wings.
Work the wing edging in dark green.
Add one thin cream embroidered stripe just inside the green edge.
Embroider small black seed shapes on the wings and belly.
Use dark green yarn for the neck collar.
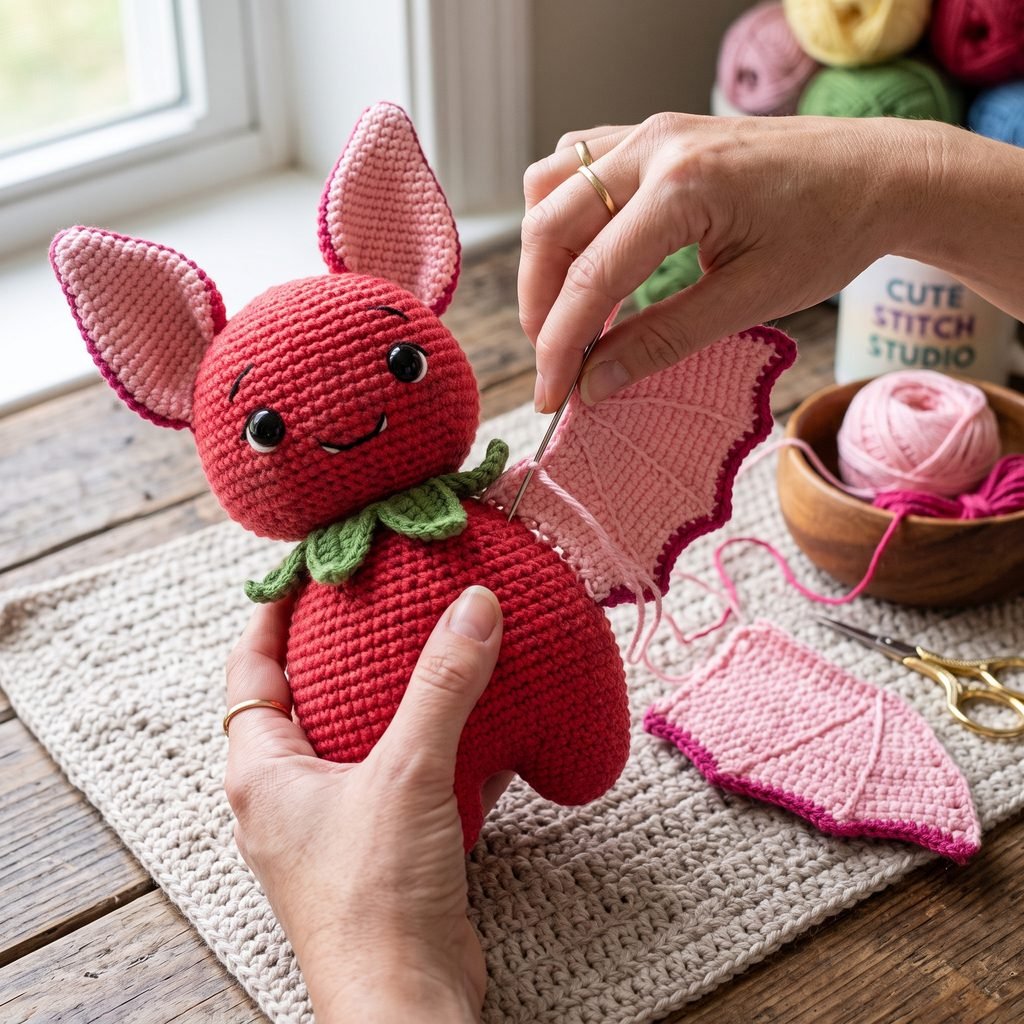
How to Assemble the Fruit Bat

Sew the head securely to the top of the body.
Position the ears on the upper sides of the head and angle them slightly outward.
Sew the ears firmly in place.
Place one wing on each side of the upper back.
The widest portion of each wing should sit close to the shoulder area.
Sew the inner edge of each wing securely to the body while leaving most of the wing free so it can spread outward.
Sew the fruit belly patch to the front of the body if you have not already attached it.
Add your fruit-specific embroidery, seeds, leaf collar, or edging details.
Finishing
Weave in all remaining yarn ends securely.
Gently shape the ears and wing points with your fingers.
Adjust the stuffing if the head or body appears uneven.
Make sure both wings sit at approximately the same height.
Add optional pink cheek stitches underneath the eyes.
Blocking is usually not necessary for the stuffed pieces.

Finished Size
Using worsted weight #4 yarn and a 3.5 mm hook, each finished fruit bat measures approximately:
- Height: 6–7 inches (15–18 cm)
- Wing Span: 9–10 inches (23–25 cm)
- Body Width: Approximately 3–4 inches (7.5–10 cm)
Your measurements may vary depending on yarn, tension, stuffing, and wing placement.
Tips and Customization Ideas
Create Your Own Fruit Bat
Once you know the base pattern, try inventing other versions such as lemon, blueberry, peach, cherry, or dragon fruit.
Mix the Fruit Details
Use one fruit color for the body and another fruit-inspired wing design for a completely unique bat.
Make a Smaller Bat
Use DK weight yarn with a smaller crochet hook to create a mini version for a bag charm or Halloween ornament.
Add Different Expressions
Try embroidered sleepy eyes, eyelashes, rosy cheeks, or a tiny smile.
Make the Full Set
Display strawberry, kiwi, orange, and watermelon bats together for a colorful spooky-cute Halloween collection.
Where to Display Your Crochet Fruit Bats
These colorful amigurumi bats are cute for a Halloween mantel, bookshelf, craft room shelf, party centerpiece, fall market display, or seasonal gift basket.
Because the design is playful rather than scary, the bats also work well for cozy Halloween and kawaii-style decor.
Looking for Your Next Crochet Project?
Love this colorful Halloween project? Explore Cute Stitch Studio’s premium crochet patterns for more cute, cozy, seasonal, and gift-worthy handmade ideas.


