Crochet Hanging Magazine Holder Pattern for a Cozy Reading Nook
This crochet hanging magazine holder pattern adds a warm handmade detail to your reading corner. Caramel cotton, open stitchwork, and two wooden dowels create a simple wall pocket for a favorite magazine, incoming mail, or a slim notebook.
The taller back frames the contents, while the shorter front keeps them visible and easy to reach. Crocheted side straps connect the dowels and finish the piece with a relaxed boho look.
This original Cute Stitch Studio design uses a folded rectangle with alternating mesh and solid sections. It is a manageable project for a confident beginner who enjoys a little assembly.
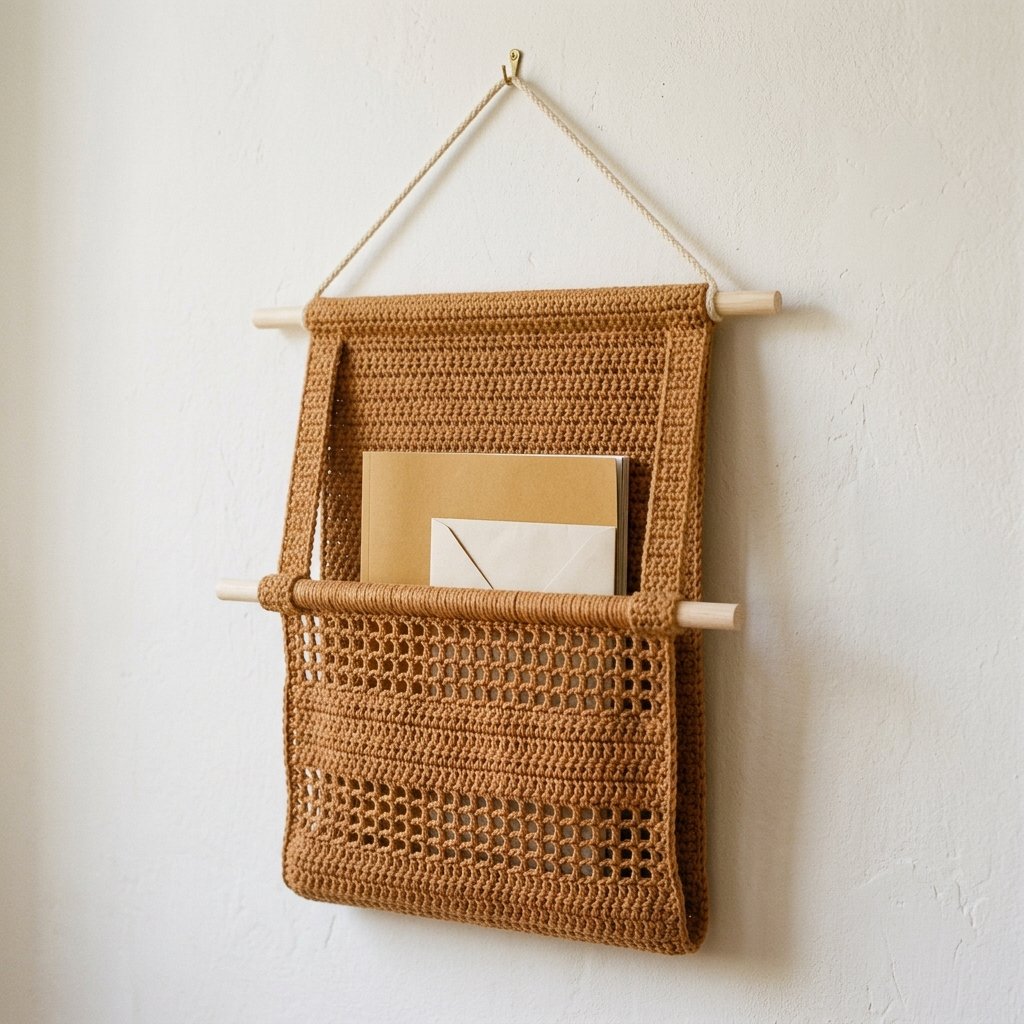
Table of Contents
Crochet Hanging Magazine Holder Pattern For A Cozy Reading Nook Instructions
Project Details
- Skill level: Confident beginner.
- Estimated time: Approximately 6–9 hours.
- Finished width: Approximately 14 inches across the crochet.
- Finished back height: Approximately 17 inches, including the upper dowel sleeve.
- Finished front height: Approximately 9 inches, including the front dowel sleeve.
- Crochet terminology: US terms.
- Construction: One rectangular panel, folded and seamed into a pocket, with a sleeve at each short end and two separate side straps.
This pattern is an untested design draft. Measurements and yarn quantities are estimates. Check the panel size, sleeve fit, and assembled pocket before placing items inside.
Materials
- Approximately 450–550 yards of sturdy category 4 cotton yarn in caramel or terracotta.
- 5 mm crochet hook, or the size needed to meet gauge.
- Yarn needle.
- Scissors.
- Measuring tape.
- Removable stitch markers.
- Two smooth wooden dowels, each approximately 17 inches long and ¾ inch in diameter.
- Approximately 48 inches of separate braided cotton hanging cord.
- Wall hardware appropriate for your wall and intended display.
Hook Size
Start with a 5 mm crochet hook. The solid sections should feel reasonably firm, while the mesh openings should remain easy to see.
If your fabric stretches heavily under a gentle pull, try a smaller hook and check the gauge again.
Yarn
Use category 4, worsted-weight cotton with a firm twist. Smooth cotton makes the alternating solid and open rows clear and gives the wall pocket a clean handmade finish.
Caramel is the featured color. Rust, cinnamon, oatmeal, and natural cream also suit the wooden dowels beautifully.
Choose one yarn for the entire crochet portion. A separate braided cord forms the top hanger.

Abbreviations
- ch: chain.
- sc: single crochet.
- dc: double crochet.
- st / sts: stitch / stitches.
Before You Start
Gauge
12 dc and 7 rows = 4 inches in double crochet.
The mesh should have a similar width and row height. Each dc and each ch-1 space counts as one position when comparing mesh width with the solid fabric.
Make a swatch with a few solid rows followed by a few mesh rows. If the mesh becomes much narrower, loosen your chain tension.
Turning Chains
The beginning ch 3 counts as the first dc. Skip the first stitch directly beneath it when working the rest of the row.
Work the last dc of each row into the top of the previous turning chain. Turn after every panel row.
The ch 1 used for the side straps does not count as a stitch.
How the Panel Becomes a Pocket
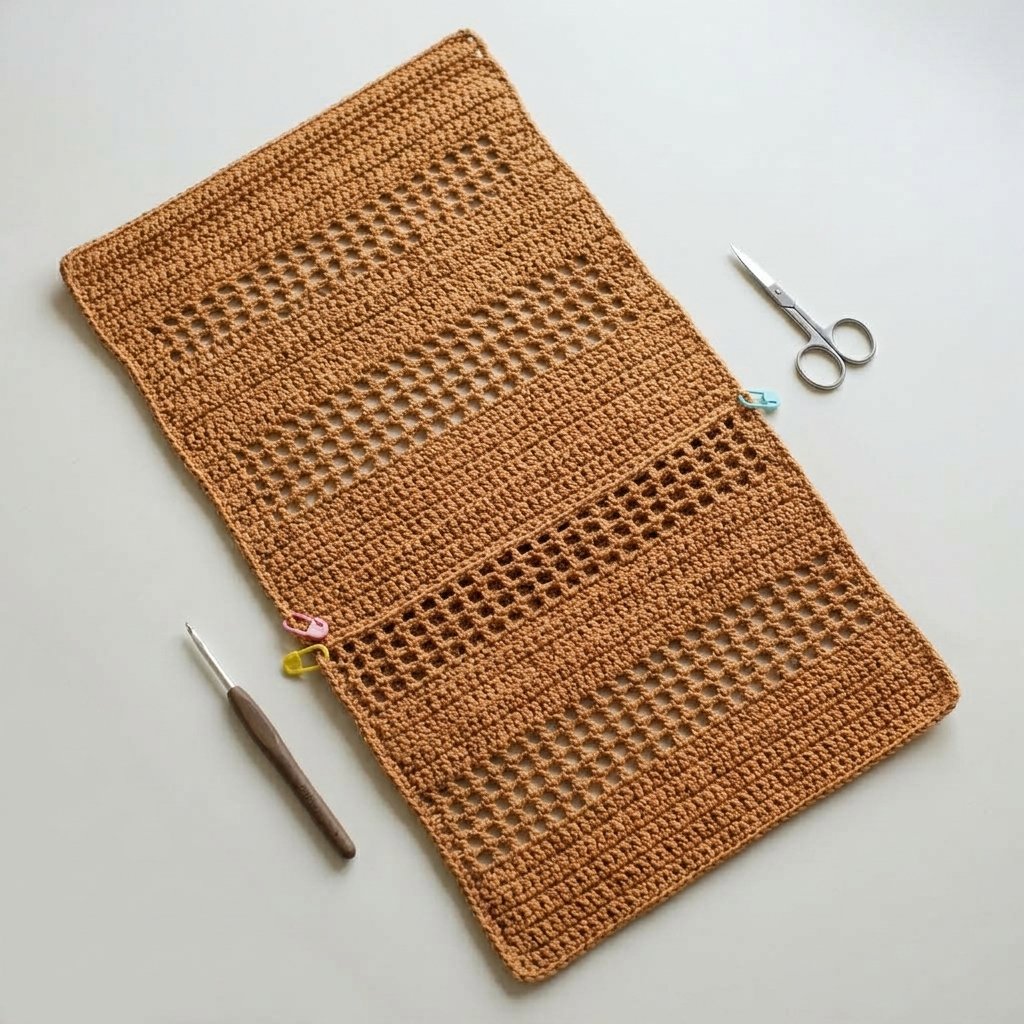
The panel contains 50 rows. Rows 1–5 form the upper dowel sleeve, and Rows 46–50 form the front dowel sleeve.
The main fold sits between Rows 32 and 33. The shorter section folds upward to create the pocket front.
Both side seams are closed, and the opening remains between the two dowels. The separate straps help keep the front dowel positioned below the upper dowel.
What to Store
Start with lightweight mail, one magazine, or a slim notebook. This design does not have a tested load rating and is not intended to hold a stack of heavy books.
Use suitable wall hardware, check the dowels and seams, and keep small loose objects in an envelope or pouch so they cannot slip through the mesh.
Crochet Hanging Magazine Holder Pattern
Part 1 — Learn the Three Row Types
The panel alternates solid rows and simple mesh. Use these instructions whenever the row schedule calls for them.
Solid row after a solid row: Ch 3, skip the first stitch, and dc in each remaining stitch across, including the top of the turning chain. Turn. (43 dc)
Mesh row after a solid row: Ch 3. Repeat [ch 1, skip the next stitch, dc in the next stitch] 21 times. Turn. (22 dc and 21 ch-1 spaces)
Mesh row after a mesh row: Ch 3. Repeat [ch 1, skip the next chain space, dc in the next dc] 21 times. Work the final dc into the turning chain. Turn. (22 dc and 21 ch-1 spaces)
Solid row after a mesh row: Ch 3. Repeat [dc around the next ch-1 space, dc in the next dc] 21 times. Turn. (43 dc)
Every row contains 43 positions across. Count periodically, especially when changing between mesh and solid sections.
Part 2 — Begin the Upper Sleeve
Ch 46.
Row 1: Dc in the fourth chain from the hook and in each remaining chain. The three skipped chains count as the first dc. Turn. (43 dc)
Rows 2–5: Work a solid row after a solid row. (43 dc)
Place a marker at each end of Row 5. These markers identify the lower boundary of the upper sleeve section.
Part 3 — Crochet the Back
Continue with the following row schedule, using the appropriate row instructions from Part 1.
- Rows 6–9: Mesh rows.
- Rows 10–11: Solid rows.
- Rows 12–15: Mesh rows.
- Rows 16–17: Solid rows.
- Rows 18–21: Mesh rows.
- Rows 22–23: Solid rows.
- Rows 24–27: Mesh rows.
- Rows 28–32: Solid rows.
Place a marker at each end of Row 32. The main pocket fold will sit immediately after this row.
Do not fasten off.
Part 4 — Crochet the Front
Rows 33–35: Solid rows.
The solid section from Rows 28–35 will wrap around the lower fold, giving the bottom a denser fabric.
Rows 36–39: Mesh rows.
Rows 40–41: Solid rows.
Rows 42–45: Mesh rows.
Place a marker at each end of Row 45. The front sleeve begins after this row.
Rows 46–50: Solid rows.
Fasten off and weave in the ends.
The unassembled panel should measure approximately 14¼ inches wide by 28½ inches long. Check that it remains approximately the same width through the solid and mesh sections.

Part 5 — Sew the Upper Dowel Sleeve
Lay the panel flat and choose which face you want to show on the outside.
At the Row 1 end, fold the five-row sleeve section toward the reverse side. Bring the foundation edge to the boundary between Rows 5 and 6.
This folds the section in half to make a horizontal tube. The fold passes through the middle of the five-row section rather than along a numbered row boundary.
Slide a dowel into the fold to check the space. The sleeve should fit around it without stretching tightly.
Remove the dowel. Using matching yarn, sew the foundation edge to the marked boundary across the width. Catch the fabric securely without sewing the tube shut.
Leave both short ends of the sleeve open so the dowel can slide through.
Part 6 — Sew the Front Dowel Sleeve
At the opposite end, fold Rows 46–50 toward the same reverse face of the panel.
Bring the outer edge of Row 50 to the boundary between Rows 45 and 46. Check the fit around the second dowel, then remove it.
Sew the outer edge in place across the width, leaving the two sleeve ends open.
Both dowel sleeves are now finished. When the pocket is assembled, their seams will sit inside the holder.
Part 7 — Fold the Pocket
Place the panel with the sleeve seams facing upward.
Lift the shorter front section and fold it upward between Rows 32 and 33. The sleeve at the front should sit below the upper sleeve, leaving the tall back visible.
Match the side edges as follows:
- Front Row 33 meets Back Row 32 at the bottom fold.
- Front Row 34 meets Back Row 31.
- Continue matching one front row end to one back row end.
- Front Row 45 meets Back Row 20 at the top of the side seam.
There are 13 row-end pairs along each side. Mark the bottom, middle, and top before sewing.
Part 8 — Sew the Sides
With matching yarn, whipstitch the first side from the bottom fold upward through all 13 matched row-end pairs.
Catch the actual crochet stitches at the edges, including the mesh-row anchors. Make two small sewing passes through each row-end pair for a tidy join.
Stop at the boundary below the front sleeve. Do not close the sleeve opening or continue sewing up the exposed back.
Repeat on the other side. Secure and weave in the sewing ends.
Gently open the pocket with your hand. The front should lift away from the back while the bottom and sides remain closed.
Part 9 — Insert the Dowels
Slide one dowel through the upper sleeve and the other through the front sleeve.
Center both dowels so approximately equal lengths extend beyond the crochet at each side.
The upper dowel supports the back. The lower dowel keeps the pocket opening spread across its width.
Part 10 — Make the Two Side Straps
The strap length is fitted to your assembled pocket rather than determined by one fixed chain count.
Lay the pocket flat with the dowels parallel. Measure the distance from the center of the upper dowel to the center of the front dowel. It should be approximately 8 inches at the stated gauge.
For the first strap, leave a 12-inch starting tail. Make a foundation chain approximately 5 inches longer than that measured distance.
Row 1: Sc in the second chain from the hook and in each remaining chain. Turn.
Row 2: Ch 1 and sc in each stitch across.
Fasten off, leaving a 12-inch sewing tail. Make the second strap with the same chain count.
The extra length allows each end to wrap around a dowel and overlap the strap for sewing.
Part 11 — Attach and Adjust the Side Straps
Position the first strap just outside the sleeves on one side of the holder.
Wrap its upper end around the upper dowel, fold the end back onto the strap, and pin the overlap. Do the same around the front dowel.
Adjust the overlaps until the strap lies neatly between the dowels without pulling the pocket front upward or bunching the exposed back.
Sew both overlaps securely with several passes through the doubled crochet fabric.
Attach the second strap in the same way. Keep the finished distance between its loops equal to the first strap.
Check that the dowels remain parallel. Tack each strap loop to the adjacent sleeve edge with matching yarn to help keep it from drifting toward the dowel end.
Part 12 — Add the Top Hanging Cord
Tie one end of the braided cord around the upper dowel, outside the side strap. Wrap the cord around the wood twice, then secure it with two half hitches around the standing cord.
To make a half hitch, pass the short end around the standing cord and through the loop you have formed. Tighten and repeat in the same direction.
Attach the other end to the opposite side, leaving a triangular hanging section above the dowel. Adjust the cord until the holder hangs level.
Keep generous knot tails until you have checked and tightened both attachments. If the knots slide on the wood, use a dowel with end stops or suitable hanging hardware before loading the pocket.
Finishing
Weave in remaining ends and inspect the two side seams, sleeve seams, and strap overlaps.
If the crochet needs shaping, follow the yarn label for washing or damp blocking. Dry the fabric flat without stretching the mesh. Remove the wooden dowels before washing.
Hang the empty holder first. Add one lightweight magazine or a few envelopes and check that the front dowel stays level.
Recheck the seams and attachments after the first display period. Reduce the contents if the fabric sags noticeably or the straps stretch unevenly.

Finished Size
- Crochet width: Approximately 14 inches.
- Back height: Approximately 17 inches, including its sleeve.
- Front height: Approximately 9 inches, including its sleeve.
- Dowel length: 17 inches.
- Exposed distance between dowels: Approximately 8 inches.
- Total hanging height: Approximately 25–29 inches, depending on the top cord.
This is a soft wall pocket with limited depth, not a rigid shelf. Check the dimensions of the items you plan to display.
Tips and Customization
Choose a Color That Suits Your Space
Caramel pairs naturally with pale wood and warm walls. Cream creates a lighter look, while olive or rust can add a little color to a neutral room.
Keep the Mesh Consistent
Use the same relaxed tension for every ch-1 space. Tight chains can pull the mesh inward, making the solid sections appear wider.
Use It as a Mail Holder
Keep smaller envelopes together inside one larger envelope or a slim folder. This keeps corners from slipping through the open stitchwork.
Style It Lightly
One magazine with a simple cover is enough to show off the pocket. Leaving part of the back visible makes the alternating stitch sections easier to appreciate.
Make the First Version at the Written Size
The sleeve placement and side seams depend on the row schedule. Follow the written size first before experimenting with a taller or wider version.
Frequently Asked Questions
Is this pattern suitable for beginners?
The crochet uses chains, single crochet, and double crochet. Beginners who can count rows and sew simple seams can work through it, but the assembly benefits from careful measuring.
Does this pattern use macrame?
The pocket and side straps are crocheted. Only the separate hanging cord uses simple securing knots.
Can I store books in the holder?
A slim, lightweight notebook may fit, but this draft does not establish suitability for heavy books. Start with lightweight paper items and assess the complete hanging assembly.
Why does my mesh look narrower than the solid rows?
Your chains may be tighter than your double crochet stitches. Check the stitch count first, then loosen the chain tension if needed.
What if the dowel does not fit inside the sleeve?
Check the sleeve before sewing it permanently. If it is too snug, use a smaller-diameter dowel or adjust the sleeve construction before completing the holder. Do not force the wood through tightly stretched stitches.
Why is the front dowel tilted?
Check that the two side straps have equal finished lengths, the side seams match the specified rows, and the contents are centered.
Save This Pattern for Your Reading Corner
Save this crochet hanging magazine holder pattern to your Pinterest home decor board so you can find the row schedule and assembly guide when you are ready to make it.
Looking for Your Next Crochet Project?
Love this project? Explore Cute Stitch Studio’s premium crochet patterns for more cute, cozy, gift-worthy, and beginner-friendly handmade ideas.