

Crochet Pumpkin Baby Hat: Free Ribbed Pattern
This crochet pumpkin baby hat brings a little autumn charm to a simple ribbed beanie. Orange yarn creates the pumpkin texture, while a short green stem and two small leaves finish the top.
Make it for a fall baby gift or a supervised Halloween photo session. The folded brim gives the hat a cozy finish without complicated edging.
The main hat starts as a rectangle, making this a friendly project for beginners who know basic stitches and are ready to try simple seaming.

Project Details
- Skill Level: Confident beginner
- Estimated Time: Approximately 3–4 hours
- Sample Finished Circumference: Approximately 15 inches, unstretched
- Sample Finished Height: Approximately 6 inches with a 1-inch folded brim, excluding the stem
- Sizing: One sample size with measurement-based adjustments
- Crochet Terminology: US terms
- Construction: Ribbed rectangle, side seam, gathered crown, and separately crocheted stem and leaves
This original pattern has not been physically tested. Gauge, finished dimensions, fit, and yarn quantities should be checked on a sample.
Materials
- Medium-weight orange yarn
- A small amount of matching-weight green yarn
- 4.5 mm crochet hook, or the size needed for gauge
- Yarn needle
- Scissors
- Flexible measuring tape
- Two removable stitch markers
No stuffing, wire, buttons, or ties are needed.
Hook Size
Start with a 4.5 mm crochet hook.
Use a hook that produces soft, flexible ribbing. The fabric should stretch gently and recover without feeling stiff.
Adjust your hook size if needed to match the gauge.
Yarn
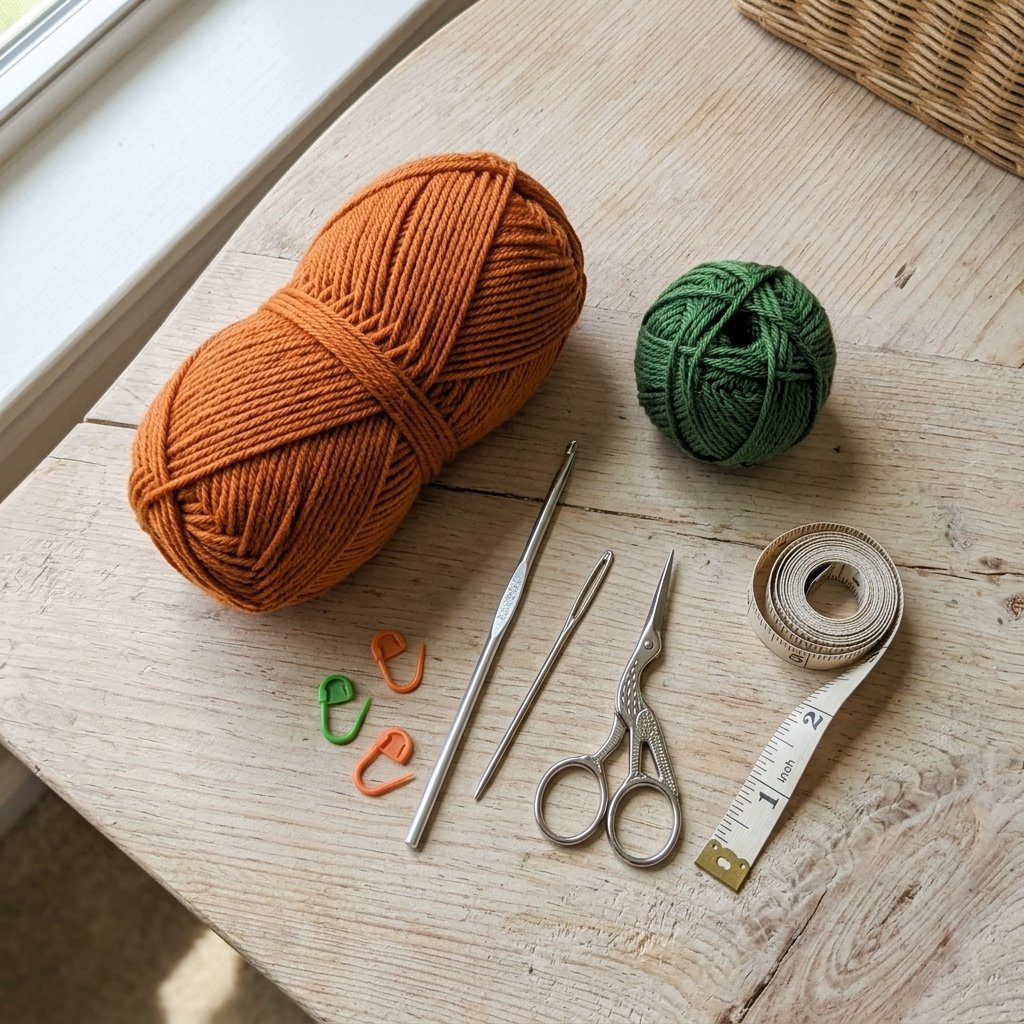
Use medium-weight yarn, category 4, in a smooth, soft, washable acrylic or wool-acrylic blend.
Approximate quantities for the sample hat:
- Pumpkin orange: 110–150 yards
- Leaf green: 10–15 yards
Choose a yarn suitable for the recipient and include its washing instructions with the finished gift.
Classic orange and leaf green create a bright pumpkin look. Terracotta and olive make a softer autumn combination.
Abbreviations
- ch: chain
- sc: single crochet
- hdc: half double crochet
- dc: double crochet
- BLO: back loop only
- sl st: slip stitch
- st(s): stitch(es)
Before You Start
Gauge
Target gauge: 16 hdc stitches and 12 rows = approximately 4 inches, worked in BLO.
Measure the swatch relaxed, without pulling the ribs apart, after washing and drying it according to the yarn label.
The stitch count controls the hat’s height. The number of rows controls its circumference.
How the Rectangle Becomes a Hat
Each row runs from the lower brim edge toward the crown.
You will crochet enough rows to wrap around the head, join the first and last rows to form a tube, then gather one end closed.
The remaining opening becomes the brim.
Working in the Back Loop
Look at the two loops along the top of a stitch. The back loop is the loop farther away from you.
Working into this loop creates the ridges that give the hat its pumpkin-like texture.
Turning Chains
The ch 2 at the beginning of a row does not count as a stitch.
Work the first hdc into the first stitch of the previous row.
Choose the Size by Measurement
Measure around the widest part of the baby’s head, above the eyebrows and ears.
For this stretchy ribbed fabric, start with a finished circumference approximately ½–1 inch smaller than the head measurement. Confirm that your swatch stretches comfortably before choosing that amount.
The sample hat is approximately 15 inches around and may suit a head measuring approximately 15½–16 inches. This is a measurement guide, not a guaranteed age range.
The brim should rest above the eyes without squeezing.
Crochet Pumpkin Baby Hat: Step-by-Step Instructions
Part 1 — Crochet the Ribbed Rectangle

With orange yarn, ch 30.
Row 1: Hdc in the third chain from the hook and in each remaining chain. (28 sts)
Row 2: Ch 2 and turn. Working in BLO, hdc in each st across. (28 sts)
Rows 3–45: Repeat Row 2. (28 sts per row)
At the target gauge, the rectangle should measure approximately:
- 7 inches along the stitches
- 15 inches across the rows
Measure it relaxed.
If your row gauge differs slightly, add or remove rows until the width reaches your intended hat circumference.
Fasten off, leaving a tail approximately 30 inches long for the side seam.
Part 2 — Join the Side Seam
Bring the foundation-chain edge and the final row together. These are the two edges that run along the hat’s 7-inch height.
Align the corners and place a marker at each end.
Thread the long tail onto a yarn needle.
Using a whipstitch:
- Pass through the first stitch at one edge and the corresponding foundation-chain loop at the other.
- Continue matching the 28 stitch positions from one end to the other.
- Keep the seam flexible rather than pulling it tightly.
Secure the yarn and weave in the remaining tail.
Turn the tube so the seam sits inside.
Both open ends are made from row ends. Choose one as the crown and keep the opposite end for the brim.
Part 3 — Gather the Crown
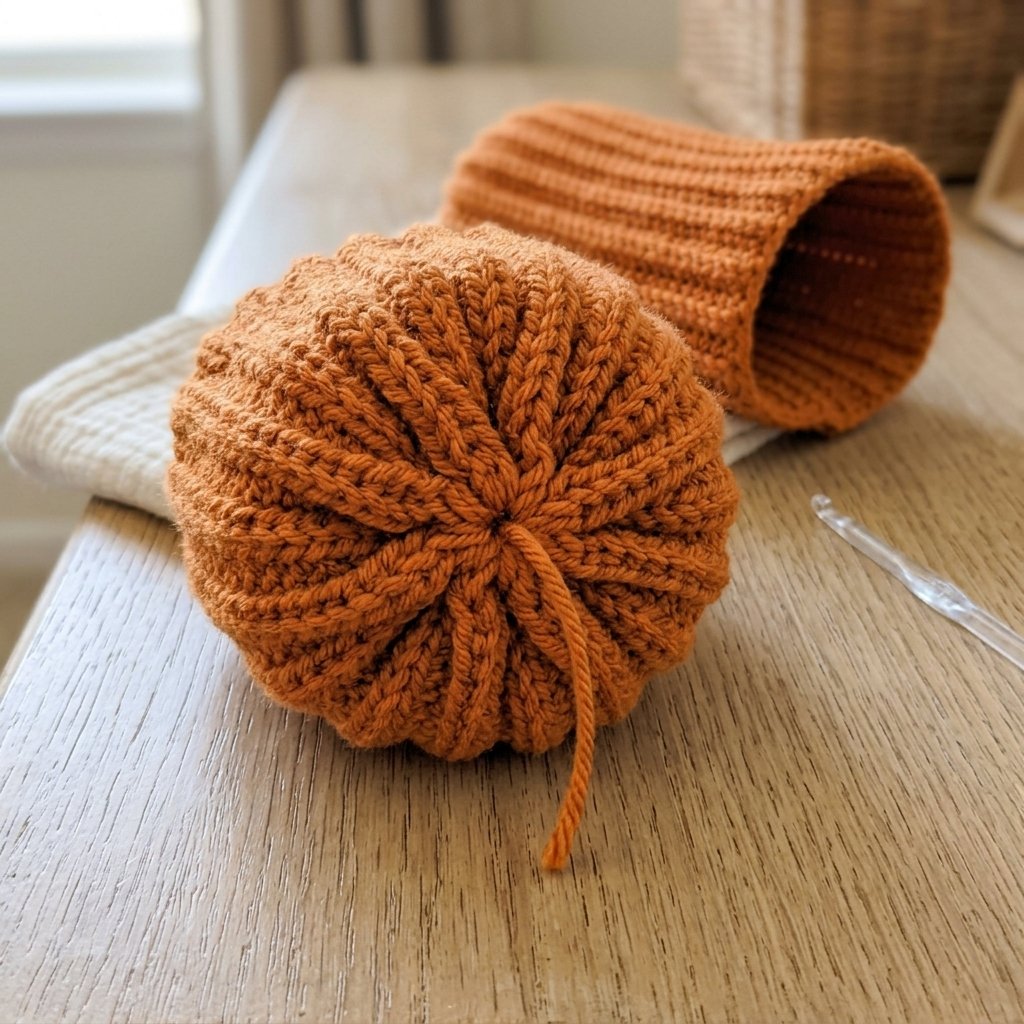
Cut an orange yarn strand approximately 24 inches long and thread it onto the yarn needle.
Leave a 6-inch starting tail.
- Work a running stitch around the crown edge, passing through sturdy fabric close to each row end.
- Continue around the entire opening.
- Pull the two yarn ends gradually to gather the fabric.
- Distribute the folds with your fingers as the opening closes.
- Use the threaded end to sew across the remaining center gap in several directions.
Secure both ends and weave them into the inside of the hat.
Avoid pulling so hard that the yarn breaks. The crown should form soft gathers.
Flatten the gathered center gently with your fingers. The stem and leaves will sit over this area.
Part 4 — Fold the Brim
Turn up the lower edge approximately 1 inch around the entire hat.
Check that the fold is even and that the side seam lies neatly inside it.
Leave the brim untacked so you can adjust the fold slightly when checking the fit.
The target height from folded brim to crown is approximately 6 inches, excluding the stem. Gathering can change this measurement slightly.
Part 5 — Make the Green Stem
With green yarn, ch 2.
Round 1: Work 5 sc in the second chain from the hook. (5 sts)
Continue in a spiral without joining or turning. Mark the first stitch of each round.
Rounds 2–4: Sc in each st around. (5 sts per round)
Sl st in the next st and fasten off, leaving a 10-inch sewing tail.
Do not stuff.
The starting end is the tip of the stem. The final open edge is the base that will be sewn to the hat.
The stem should be approximately ½–¾ inch tall.
Part 6 — Crochet the Leaves
Make two with green yarn.
Ch 7.
Work along one side of the chain:
- Sc in the second chain from the hook.
- Hdc in the next chain.
- Dc in each of the next 2 chains.
- Hdc in the next chain.
- Work 3 sc in the last chain.
Rotate the piece and work along the unused side of the foundation chain:
- Hdc in the next chain.
- Dc in each of the next 2 chains.
- Hdc in the next chain.
- Sc in the last chain.
Join with a sl st to the first sc. (13 sts, excluding the joining sl st)
Fasten off, leaving a 12-inch sewing tail.
The end where you joined is the leaf base. The opposite end, containing 3 sc, is the leaf tip.
Each leaf should be approximately 1½ inches long, depending on your tension.
Weave in the short starting tail. Keep the long finishing tail for attachment.
Part 7 — Attach the Stem and Leaves
Place the stem over the gathered crown center.
Using its sewing tail, stitch around the entire open base, catching firm fabric beneath it. Make a second pass around the base, then secure and weave in the yarn.
Position the two leaves beside the stem, angled in different directions.
For each leaf:
- Sew its base to the crown beside the stem.
- Add two or three small stitches along the lower portion of the leaf’s center.
- Leave only the tip free to lift slightly.
- Secure the yarn and weave it into the inside of the hat.
Keep the decoration close to the crown, with no long loops or loose yarn tails.
Finishing
Check the Seams
Inspect the side seam, gathered crown, and green attachments.
The inside should feel smooth, with no large knots or loose loops.
Shape the Hat
Follow the yarn label’s care instructions.
If washing is needed, reshape the damp hat gently and let it dry completely. Do not stretch the ribbing flat or pull the brim wider than its intended size.
Arrange the leaves with your fingers.
Check the Fit
Try the hat on briefly while the baby is awake and supervised.
The brim should stay above the eyes, and the fabric should feel comfortable around the head. Adjust the fold as needed.
Use the hat for supervised wear and photos, and remove it for sleep.
Finished Size

The sample hat targets:
- Circumference: Approximately 15 inches (38 cm), unstretched
- Height with folded brim: Approximately 6 inches (15 cm), excluding the stem
- Brim fold: Approximately 1 inch (2.5 cm)
- Stem height: Approximately ½–¾ inch (1.3–2 cm)
- Leaf length: Approximately 1½ inches (4 cm)
Actual measurements depend on your yarn, gauge, seam, and crown gathering.
Tips & Customization
Adjust the Circumference
Add or remove rows from the main rectangle.
At the target gauge, 3 rows equal approximately 1 inch. Measure the fabric rather than relying only on row counts.
Keep 28 stitches per row if you are changing circumference only.
Adjust the Height
Change the starting chain to adjust the rectangle’s height.
At the target gauge, 4 hdc stitches equal approximately 1 inch.
For your chosen stitch count, add 2 chains to create the foundation chain. Remember to allow for the folded brim when planning the height.
Choose a Softer Pumpkin Palette
Try burnt orange with moss green, pale peach with sage, or cream with olive leaves.
Keep the Ribbing Springy
Measure the rectangle without stretching it. A stretched measurement can produce a hat that is too small when relaxed.
Make a Matching Gift
Pair the hat with baby booties in cream or a coordinating fall shade.
For the gift packaging, add a small crochet heart and a note listing the hat’s finished circumference and yarn-care instructions.
Looking for Your Next Crochet Project?
Love making sweet seasonal gifts? Explore Cute Stitch Studio’s premium crochet patterns for more baby accessories, cute animal projects, and cozy handmade ideas.


