Easy Crochet Plant Hanger Pattern for Beginners
This easy crochet plant hanger pattern turns a small plant pot into a charming handmade accent. A solid crochet base supports the bottom, while an open diamond mesh lets your planter peek through.
Made in natural cotton, this Cute Stitch Studio design looks lovely beside a sunny window or in a cozy reading corner. If you can chain and single crochet, you have the basic skills needed to get started.
The instructions below create an original version of this classic net-style hanger, with three simple straps and a hanging ring. Try the cover on your pot as you work so the finished fit feels snug and balanced.
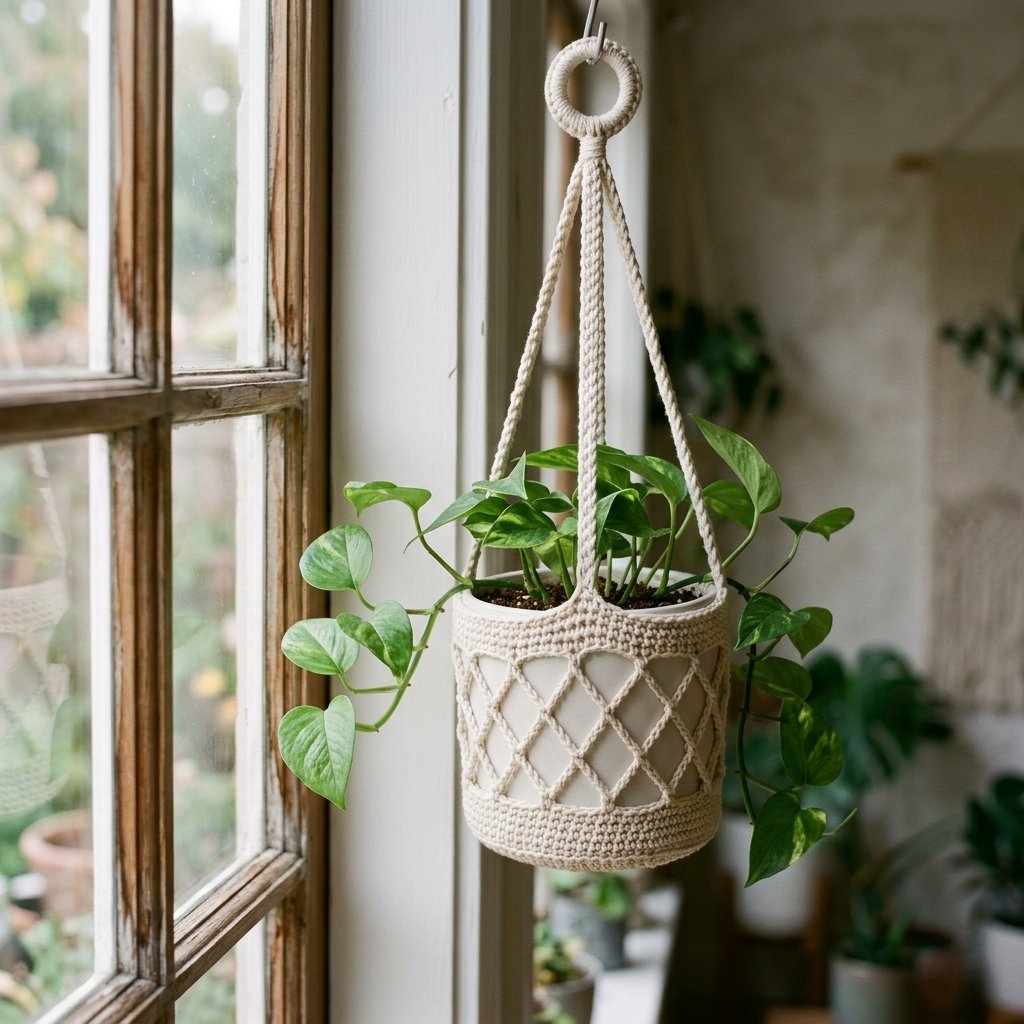
Table of Contents
Easy Crochet Plant Hanger Pattern For Beginners Instructions
Why You’ll Love This Easy Crochet Plant Hanger Pattern For Beginners
- Clear step-by-step sections make the project easier to follow.
- Materials, sizing, finishing, and customization notes are easy to find.
- The pattern includes practical tips for a neat handmade result.
Project Details
- Skill level: Confident beginner.
- Estimated time: Approximately 3–5 hours, depending on your experience.
- Finished size: Approximately 6 inches tall around the pot, with about 12–14 inches of suspension above the rim.
- Suggested pot: A lightweight, slightly tapered planter approximately 4–4.5 inches across the bottom, 5–5.5 inches across the top, and 5.5–6 inches tall.
- Crochet terminology: US terms.
- Construction: A circular base worked in continuous rounds, joined mesh rounds, a firm upper border, and three separately made straps.
Measurements and yarn quantities are estimates. This pattern has not been physically tested, so check the fit and hanging assembly before displaying your planter.
Materials
- Approximately 140–180 yards of firmly spun, worsted-weight cotton yarn.
- 4 mm crochet hook, or the size needed for a firm fabric at the stated gauge.
- Yarn needle.
- Scissors.
- Stitch markers.
- Measuring tape.
- One smooth, closed hanging ring approximately 2 inches across, suitable for suspending the intended planter.
- A lightweight plastic planter or cachepot in the suggested size.
- A securely installed hanging hook appropriate for the planter and its contents.
Hook Size
Start with a 4 mm crochet hook. Your single crochet stitches should feel firm, with small gaps between them.
If the fabric feels loose, try a smaller hook and measure again. A loose fabric can stretch considerably once the planter is inside.
Yarn
Use category 4, worsted-weight cotton with a smooth, firmly twisted structure. Avoid stretchy yarns and loosely spun novelty yarns for this project.
Natural cream gives the hanger a simple, airy appearance. Oatmeal, sage green, warm gray, and terracotta also work beautifully with houseplants.
Keep the yarn consistent across the base, mesh, and straps. Changing yarn thickness between sections can change how the hanger fits and stretches.

Abbreviations
- ch: chain.
- sc: single crochet.
- sl st: slip stitch.
- st / sts: stitch / stitches.
- inc: work 2 single crochet stitches in the same stitch.
Before You Start
Gauge
Approximately 16 sc and 18 rows = 4 inches in single crochet.
Gauge is a starting point. The circular base should measure approximately 4–4.5 inches across after Round 9 and sit beneath your pot without curling up its sides or extending far beyond it.
How the Mesh Works
Each mesh loop contains 7 chains. In later rounds, you work a single crochet around the chain loop below rather than into an individual chain stitch.
This makes an open net that spreads around the planter. The mesh height varies with your chain tension and how much the net stretches around the pot.
Round and Stitch Notes
- Work the base in a continuous spiral. Do not join or turn between base rounds.
- Move a stitch marker into the first stitch of each base round.
- Join the mesh and upper-border rounds as directed.
- Beginning ch 1 does not count as a stitch.
- Work through both loops unless instructed otherwise.
- Numbers in parentheses show the completed stitch or mesh-loop count.
Check the Pot Before You Begin
This design is intended for a small, lightweight planter. Its load capacity has not been established. A pot containing wet soil can weigh much more than an empty pot, so do not assume that an empty-pot fit check establishes its suitability for a planted display.
Use suitable hanging hardware, check the finished assembly over a padded surface, and position it away from seating and walkways. Remove the inner plant pot for watering and return it only after it has drained.
Easy Crochet Plant Hanger Pattern: Step-by-Step Instructions
Part 1 — Make the Solid Base
Ch 2.
Round 1: Work 6 sc in the second chain from the hook. Place a marker in the first sc. (6 sts)
Round 2: Inc in each stitch around. (12 sts)
Round 3: Repeat [sc in the next stitch, inc in the next stitch] 6 times. (18 sts)
Round 4: Repeat [sc in the next 2 stitches, inc in the next stitch] 6 times. (24 sts)
Round 5: Repeat [sc in the next 3 stitches, inc in the next stitch] 6 times. (30 sts)
Round 6: Repeat [sc in the next 4 stitches, inc in the next stitch] 6 times. (36 sts)
Round 7: Repeat [sc in the next 5 stitches, inc in the next stitch] 6 times. (42 sts)
Round 8: Repeat [sc in the next 6 stitches, inc in the next stitch] 6 times. (48 sts)
Round 9: Repeat [sc in the next 7 stitches, inc in the next stitch] 6 times. (54 sts)
Sl st in the first stitch of Round 9 to finish the spiral. Keep the yarn attached.
Place the empty pot on the base. The crochet circle should lie flat under it. If the size is substantially different, adjust your hook or choose a better-fitting pot before continuing.

Part 2 — Begin the Diamond Mesh
Mesh Round 1: Ch 1 and sc in the same stitch as the joining slip stitch. Repeat [ch 7, skip the next 5 stitches, sc in the next stitch] 8 times. Ch 7, skip the final 5 stitches, and sl st in the first sc. (9 chain loops and 9 sc)
Count your loops before moving on. You should have nine evenly spaced openings around the base.
Mesh Round 2: Sl st into the first chain loop. Ch 1 and sc around that same loop. Repeat [ch 7, sc around the next chain loop] 8 times. Ch 7 and sl st in the first sc. (9 chain loops and 9 sc)
Mesh Rounds 3–7: Repeat Mesh Round 2. (9 chain loops per round)
Keep your chains relaxed and consistent. Tight chains make the net difficult to stretch around the planter.
Part 3 — Check the Mesh Height
Place the pot inside the hanger with the crochet base centered underneath it. Gently lift the mesh toward the rim, spreading the openings evenly around the sides.
The final mesh loops should reach approximately ½ inch below the pot’s rim when gently extended. The upper border will fill most of that remaining space.
If the mesh is too short, repeat Mesh Round 2 one additional time and check again. If it bunches around the top, remove one mesh round.
Keep nine loops in every round. Adjusting the number of rounds changes the height without changing the construction of the top border.
Part 4 — Crochet the Upper Border
Remove the pot while working this section.
Border Round 1: Sl st into the first chain loop and ch 1. Work 7 sc around that loop. Work 7 sc around each of the remaining 8 loops. Do not work into the single crochet anchors between loops. Join with a sl st in the first sc. (63 sts)
Border Round 2: Ch 1 and sc in each stitch around. Join with a sl st in the first sc. (63 sts)
Fasten off and weave in the end.
Try the cover on the pot again. The border should fit around the upper sides, just below the rim, without needing to be forced into place.
If the border is too tight for the suggested pot, redo only the border with a slightly larger hook. If it is loose, try a smaller hook. A large mismatch means the pot or overall gauge needs changing.

Part 5 — Make Three Hanging Straps
Make three identical straps. Leave a 12-inch yarn tail before beginning each one.
Row 1: Ch 61. Sc in the second chain from the hook and in each remaining chain. (60 sts)
Fasten off, leaving another 12-inch tail.
Each strap should measure approximately 15 inches long before attachment. Lay all three side by side and check that their lengths match.
If your first strap differs slightly from the estimate, you can use that length as long as you are happy with the hanging height. Make the other two the same length and stitch count.
Part 6 — Mark the Attachment Points
Lay the upper border flat enough to count its stitches without stretching it.
Place markers in stitches 1, 22, and 43 of the final border round. This divides the 63-stitch border into three equal sections.
Each marker identifies the center of a strap attachment. Even spacing helps the planter sit level.
Part 7 — Attach the Straps to the Hanger
Position one end of the first strap vertically against the outside of the upper border, centered on a marker. Overlap the strap end with the full height of both border rounds.
Using the yarn tail, sew the strap end to both rounds of the border. Make several passes through the strap and border, spreading the stitches across the attachment area rather than catching a single loop.
Weave the remaining tail through the nearby stitches in several directions.
Repeat at the other two marked points. Keep all three overlaps equal.
Part 8 — Attach the Hanging Ring
Bring the three free strap ends together above the hanger. Check that none of the straps are twisted.
Pass each end through the closed ring and fold approximately 1 inch of the strap back onto itself. Sew each folded section securely along its sides and across its lower edge using the remaining yarn tail.
Arrange the three strap loops side by side on the ring.
Place the empty planter inside the hanger and lift it just above a padded surface. Check that the pot sits upright and the three straps share the tension.
If the pot tilts, set it down and adjust the folded strap lengths before completing the final securing stitches.
Finishing
Weave in every remaining yarn end. Inspect the base, upper border, strap attachments, and ring loops for missed stitches or loose joins.
Blocking is usually unnecessary because the planter shapes the mesh. If you wash the hanger, follow the yarn care instructions and let it dry flat completely before using it.
Arrange the mesh evenly around the pot, keeping the solid base centered underneath. Recheck the attachments after the first display period and periodically afterward. Stop using the hanger if the yarn, seams, ring, or hardware show wear.
Finished Size
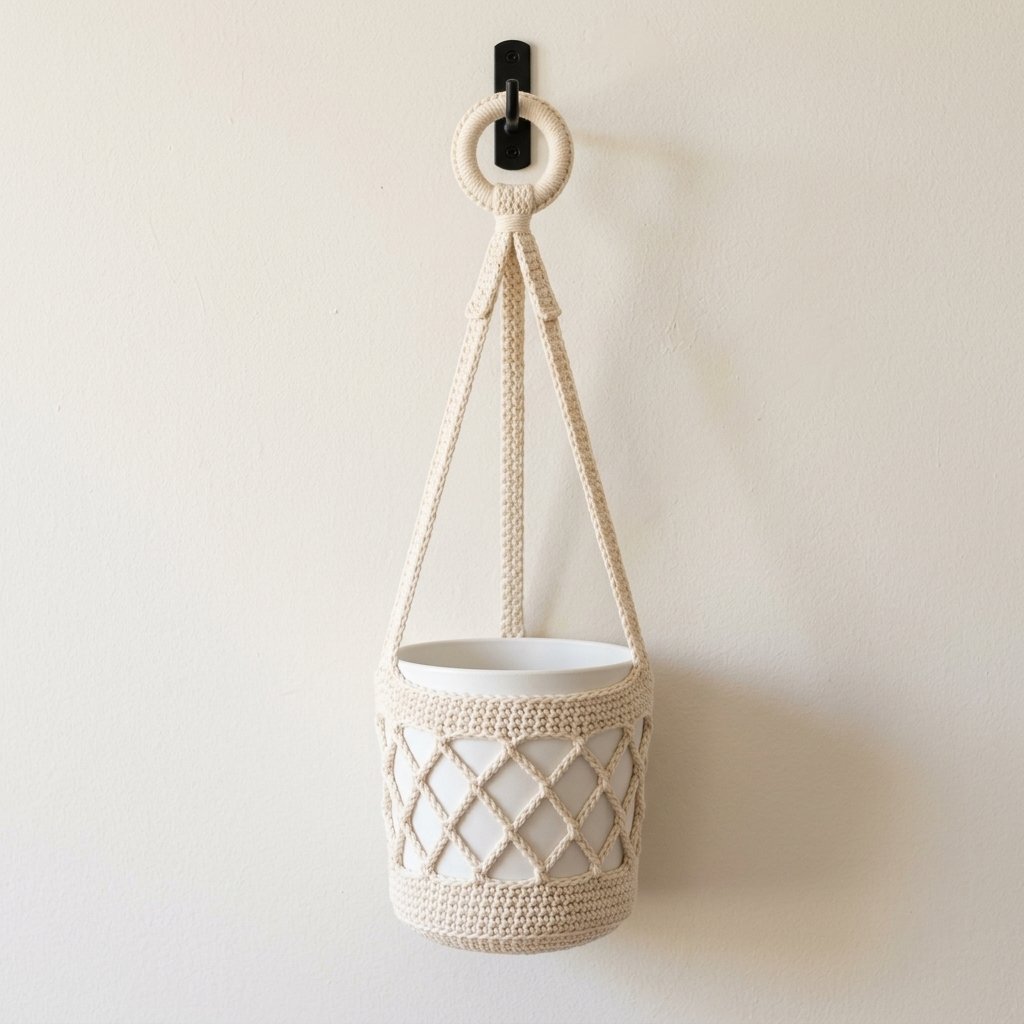
- Base diameter: Approximately 4–4.5 inches.
- Pot-cover height: Approximately 6 inches, adjusted to the planter.
- Upper border circumference: Approximately 15¾ inches before stretching.
- Suspension above the pot: Approximately 12–14 inches after attachment.
- Total hanging height: Approximately 18–20 inches, depending on tension, ring size, and pot shape.
The mesh is flexible, but this is not a universal-size holder. Check the fit against your actual planter.
Tips and Customization
Make a Two-Color Version
Use cream for the base and mesh, then switch to sage or terracotta for the upper border and straps. Join the new color when beginning Border Round 1.
Adjust the Height
Add or remove mesh rounds to suit a slightly taller or shorter pot with a similar diameter. Keep nine loops per round so the 63-stitch border still works.
Adjust the Hanging Length
For shorter straps, begin with fewer chains. For longer straps, add chains. Each strap will have one fewer single crochet stitch than its starting chain count.
Make all three straps identical and allow for the overlap at the border and the fold around the ring.
Keep Larger Changes Separate
A much wider pot needs a redesigned base, mesh circumference, and border. Simply making longer straps will not make this cover fit a larger planter.
Make It a Housewarming Gift
Pair the hanger with a lightweight matching planter and a care note. Include the yarn fiber, washing instructions, and a reminder to remove the plant for watering.
Frequently Asked Questions
Is this crochet plant hanger beginner-friendly?
Yes, for beginners who are comfortable with chains, single crochet, and counting stitches. The mesh uses one repeating round. Take your time with the strap attachments and fit checks.
Why is my crochet base curling?
First, check your stitch counts and confirm that you made six increases in each increase round. Tight tension or a mismatch between yarn and hook can also affect how the circle lies.
Why does my hanger sit crooked?
Check that the straps are attached at stitches 1, 22, and 43, that their finished lengths match, and that the base is centered beneath the planter. Uneven mesh distribution can also pull the pot to one side.
Can I use this with a heavy ceramic pot?
This pattern does not provide a tested load rating. The suggested setup uses a small, lightweight planter. Choose a purpose-built holder with a suitable load rating for a heavy pot.
Can I hang it outdoors?
This version is intended for indoor use. Outdoor moisture and sunlight can affect the yarn and its attachments.
Save This Project for Later
Save this easy crochet plant hanger pattern to your crochet home decor board on Pinterest so you can find the instructions when you are ready to make another.
Project Checklist
- Confirm your yarn weight, hook size, and gauge before beginning.
- Read through the full Easy Crochet Plant Hanger Pattern For Beginners instructions once before you start.
- Check stitch counts at the end of each row or round before continuing.
- Review the finishing and sizing notes before weaving in the final ends.
Looking for Your Next Crochet Project?
Love this project? Explore Cute Stitch Studio’s premium crochet patterns for more cute, cozy, gift-worthy, and beginner-friendly handmade ideas.