Crochet Pumpkin Dress Pattern: A Cute Halloween Outfit
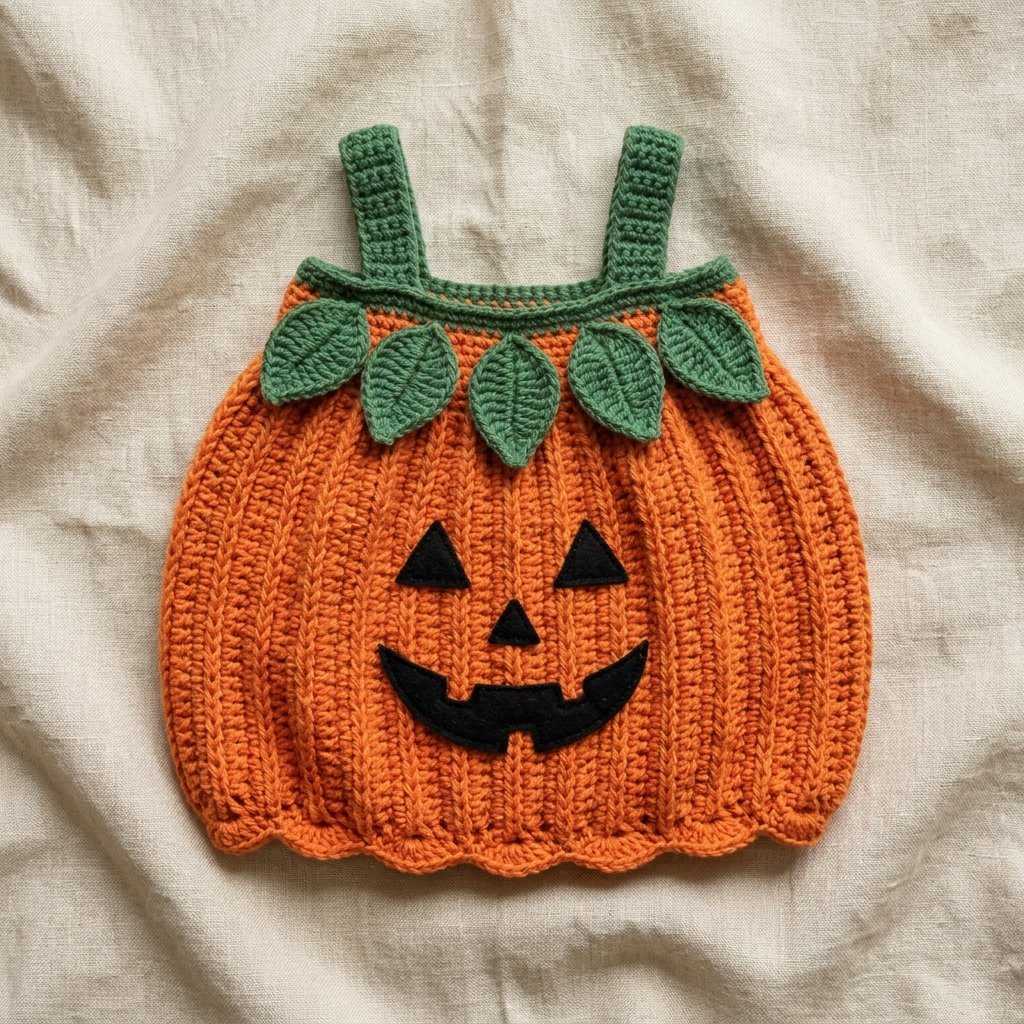
This crochet pumpkin dress pattern combines a rounded orange skirt, green shoulder straps, and a leafy neckline. A cheerful jack-o’-lantern face turns the front into a little wearable pumpkin.
The dress is worked from a sideways ribbed rectangle, then shaped with a smaller upper band and a compact lower edging. There is no stuffing: the extra fabric creates the soft pumpkin silhouette.
This project is best for confident beginners who are comfortable counting rows, sewing seams, and checking garment measurements. Three finished chest sizes are included, along with instructions for adjusting the length and straps.
The instructions cover the dress only. The headband and shoes shown in the inspiration styling are separate accessories.
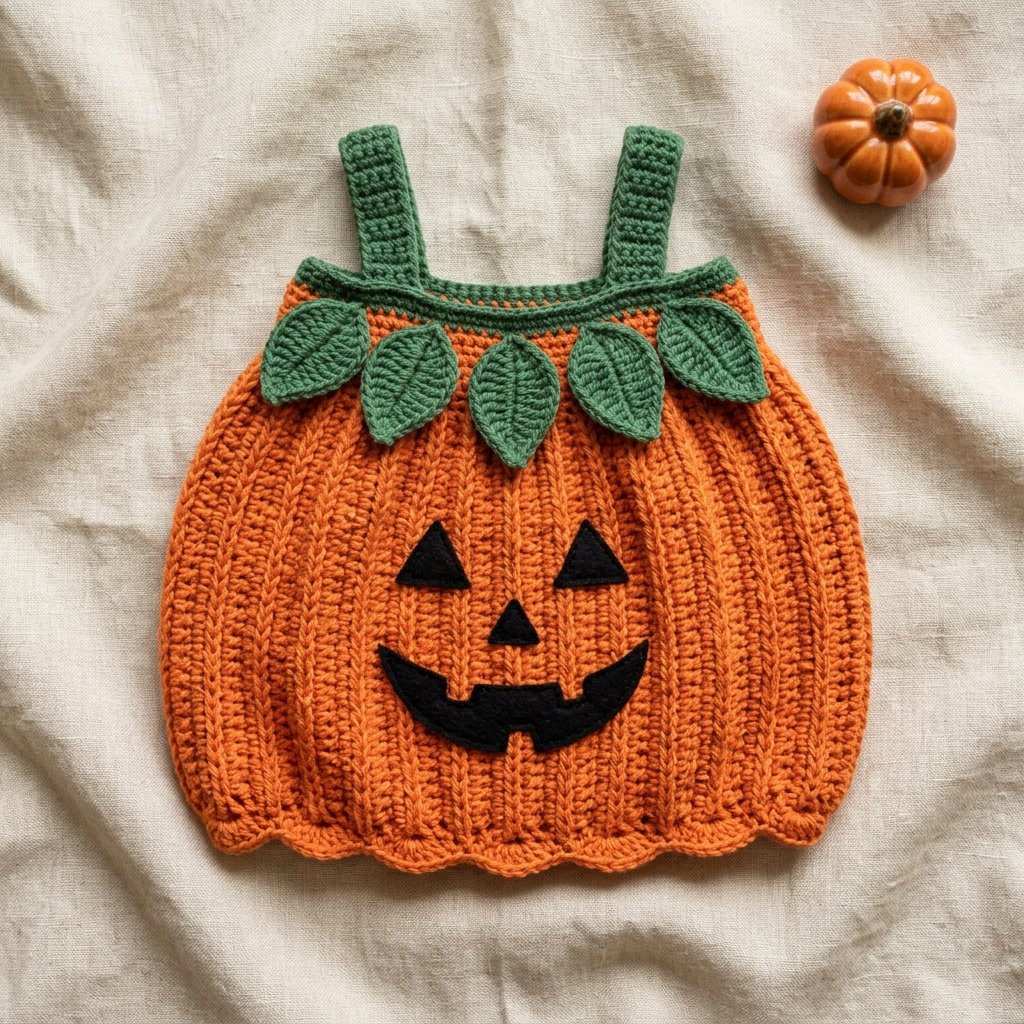
Table of Contents
Crochet Pumpkin Dress Pattern: A Cute Halloween Outfit Instructions
Project Details
- Skill level: Confident beginner to intermediate.
- Estimated time: Approximately 12–18 hours, depending on size and experience.
- Sizes: A, B, and C, selected by measurements rather than age.
- Finished upper circumference: Approximately 20, 22, or 24 inches.
- Terminology: US crochet terms.
- Construction: Sideways ribbed body, partial back seam, green upper band, separate straps, and sewn leaf and face details.
This original Cute Stitch Studio pattern has not been physically tested. Gauge, fit, yardage, and finished proportions need sample verification before the dress is worn.
Sizing
Measure around the child’s chest where the upper band will sit, below the underarms. Choose approximately 2 inches of positive ease.
Check the length separately. The hem should allow comfortable movement and finish above the knees. Shorten the orange panel when needed rather than choosing a smaller chest size.
| Measurement | Size A | Size B | Size C |
|---|---|---|---|
| Suggested body chest | 18 inches | 20 inches | 22 inches |
| Finished upper circumference | 20 inches | 22 inches | 24 inches |
| Orange panel height before edging | 9 inches | 10.5 inches | 12 inches |
| Full orange body circumference before gathering | 30 inches | 33 inches | 36 inches |
| Target exposed strap length | 6 inches | 7 inches | 8 inches |
| Approximate shoulder-to-hem length | 13.5 inches | 15.5 inches | 17.5 inches |
Shoulder-to-hem measurements are estimates. The child’s shoulder shape and final strap adjustment affect the actual length.
Materials
- DK-weight orange yarn: approximately 450–550 yards for A, 550–650 yards for B, or 650–800 yards for C.
- Matching-weight green yarn: approximately 60–90 yards.
- 4 mm crochet hook, or size needed for gauge.
- Soft black felt, approximately 6 by 8 inches, for the face.
- Black sewing thread and sewing needle.
- Two smooth 0.5-inch sew-through buttons for the back opening.
- Matching sewing thread for the buttons.
- Tapestry needle.
- Scissors.
- Measuring tape.
- Removable stitch markers.
- Paper and pencil for the face templates.

Hook Size
Start with a 4 mm crochet hook.
If your swatch has too many stitches per inch, try a larger hook. If it has too few, try a smaller hook. Check both the ribbed fabric and the green single crochet band.
Yarn
Use DK-weight, category 3 yarn with a smooth finish. A soft cotton-acrylic blend is a practical choice for a dress with clearly defined stitches.
Choose pumpkin orange for the body and a leafy green for the upper band, straps, and leaves. Use the same yarn range or closely matching thicknesses for both colors.
Avoid substituting bulky or chenille yarn without redesigning the measurements. Those yarns change the weight, drape, and fit substantially.
Gauge
- Ribbed body: 16 hdc and 12 rows = 4 inches, worked in back loops only after the foundation row.
- Upper band: 16 sc and approximately 18 rows = 4 inches.
Measure the ribbed swatch relaxed, without stretching it sideways. In this construction, the stitch count determines dress length, while the number of rows determines fullness around the body.
Wash and dry the swatches according to the yarn label before measuring. If you cannot match both gauges, use actual measurements to adjust the panel and upper band before assembling the dress.
Abbreviations
- ch: chain
- sc: single crochet
- hdc: half double crochet
- dc: double crochet
- sl st: slip stitch
- st(s): stitch(es)
- BLO: back loop only
- sc2tog: single crochet two stitches together
To work sc2tog: Insert the hook into the next stitch and pull up a loop. Insert it into the following stitch and pull up another loop. Yarn over and pull through all three loops. Two stitches become one.
Before You Start
- Instructions are written as A (B, C).
- Beginning ch 1 does not count as a stitch.
- The orange panel is worked sideways in rows.
- The upper band is worked back and forth, leaving a center-back opening.
- The hem is worked in joined rounds.
- Straps and leaves are made separately and sewn on.
- All face pieces are sewn around their full edges.
- The dress contains no stuffing, elastic, or drawstrings.
Crochet Pumpkin Dress Pattern Instructions
Part 1 — Ribbed Orange Body
With orange, ch 37 (43, 49).
Row 1: Hdc in the second ch from the hook and each remaining ch. Turn. 36 (42, 48) hdc.
Row 2: Ch 1. Hdc in BLO of every st across. Turn. 36 (42, 48) hdc.
Rows 3–90 (99, 108): Repeat Row 2. The total number of rows, including Row 1, is 90 (99, 108).
Fasten off, leaving a long sewing tail.
The relaxed rectangle should measure approximately 9 by 30 inches for A, 10.5 by 33 inches for B, or 12 by 36 inches for C.
The ridges will run vertically on the finished dress. Choose one long row-end edge as the top and mark it.

Part 2 — Sew the Back Seam
Bring the foundation edge and final-row edge together to form a tube, with the chosen outside of the fabric facing inward.
These are the short edges of the rectangle. Match the stitches carefully so the top and bottom edges remain level.
Starting at the hem, sew corresponding stitches together. Leave the uppermost 8 stitches unseamed, creating an opening approximately 2 inches deep.
You will seam 28 (34, 40) stitch pairs and leave 8 pairs open.
Secure the tail and turn the body right side out. Mark the center front directly opposite the back seam.
Part 3 — Green Upper Band
With the outside facing you, join green at one edge of the back opening along the top row-end edge.
Row 1: Ch 1. Work 1 sc into the end of each orange row around the upper edge, stopping at the other side of the back opening. Do not join. Turn. 90 (99, 108) sc.
Row 2: Ch 1. Repeat [sc in the next 7 sts, sc2tog] across. Turn. Work the repeat 10 (11, 12) times. 80 (88, 96) sc.
Rows 3–4: Ch 1. Sc in each st across. Turn after Row 3 only. 80 (88, 96) sc.
Fasten off and weave in the ends.
Measure the band from one back edge to the other. At gauge, it should measure approximately 20 (22, 24) inches without stretching.
The extra orange width should gather gently beneath the smaller green band. Check this measurement before adding straps or decorations.
Part 4 — Shape the Hem
Join orange at the back seam along the lower row-end edge.
Round 1: Ch 1. Work 1 sc into the end of each orange row around. Sl st into the first sc to join. 90 (99, 108) sc.
Round 2: Ch 1. Sc in each st around. Sl st into the first sc. 90 (99, 108) sc.
Fasten off.
The shorter single crochet stitches draw the ribbed fabric inward slightly, creating a softly rounded hem. At the stated single crochet gauge, the opening measures approximately 22.5 (24.75, 27) inches around.
Check that the opening permits comfortable movement. Do not tighten the hem with an added cord or elastic.
Part 5 — Shoulder Straps
Make two with green.
Foundation: Ch 5.
Row 1: Sc in the second ch from the hook and each remaining ch. Turn. 4 sc.
Row 2: Ch 1. Sc in each st across. Turn. 4 sc.
Repeat Row 2 until each strip measures approximately 7 (8, 9) inches. This includes 0.5 inch at each end for sewing, leaving an exposed length of approximately 6 (7, 8) inches.
Fasten off with an 18-inch tail.
Lay the dress flat with the back opening centered. Position the front strap ends approximately 1 inch inward from each side fold. Place the back ends directly opposite the front ends.
Overlap each strap end by 0.5 inch on the inside of the green band. Sew across the full width of the end and along both sides of the overlap.
Before permanently securing the second end of each strap, check the length against a well-fitting garment or during a brief supervised fitting. Remove any temporary markers before dressing the child.
Part 6 — Leaf Neckline
Make five leaves with green.
Foundation: Ch 9.
Round 1, first side: Sc in the second ch from the hook, hdc in the next ch, dc in each of the next 4 ch, and hdc in the next ch.
In the final ch, work [sc, ch 2, sc] to form the pointed tip.
Second side: Working along the unused underside loops of the foundation chain, hdc in the next ch, dc in each of the next 4 ch, hdc in the next ch, and sc in the final ch.
Sl st into the first sc to join. 16 stitches plus one ch-2 tip.
Fasten off with a 12-inch sewing tail. The end where you began and finished is the leaf base; the ch-2 end is the tip.
Place one leaf at center front with its tip pointing downward. Arrange two leaves on either side, angling the outer leaves slightly outward.
Sew each base securely to the lower edge of the green band. Then tack the leaf sides and tip to the orange fabric so the leaves remain flat against the dress.
Part 7 — Back Closure
Sew one button to the left edge of the green band near its top. Sew the second button to the same side of the back opening, approximately 1.25 inches below the first.
Use matching yarn to create a loop opposite each button: join with a sl st at the opening edge, ch 5 as a starting point, and sl st back into the same attachment point.
Check the loop against its button before fastening off. Add or remove chains so the button passes through with gentle pressure but does not slip out freely.
Secure both loop ends through several nearby stitches. The edges should meet without requiring a wide overlap.
Part 8 — Jack-O’-Lantern Face
Make paper templates first. Lay them on the front of the dress to check the scale before cutting the felt.
| Face Piece | Size A | Size B | Size C |
|---|---|---|---|
| Each triangular eye: width × height | 1.25 × 1.5 inches | 1.5 × 1.75 inches | 1.75 × 2 inches |
| Triangular nose: width × height | 0.9 × 1.1 inches | 1 × 1.25 inches | 1.1 × 1.4 inches |
| Smile: width × maximum height | 4 × 1.25 inches | 4.5 × 1.5 inches | 5 × 1.75 inches |
Cut two triangular eyes and one smaller triangular nose from black felt.
For the mouth, draw a broad crescent smile with raised ends and a rounded lower edge. Cut one small rectangular notch down from the upper edge and another up from the lower edge to suggest pumpkin teeth. Keep enough felt between the notches for the mouth to remain one connected piece.
Position the eyes below the leaves with their points facing upward. Center the nose beneath them, then place the smile below the nose.
Keep the face within the center-front area and away from the back seam. Check the arrangement with the dress gently rounded, not stretched flat.
Using black sewing thread, sew around the entire edge of every piece with small stitches. Catch the crochet fabric without sewing through to the back of the dress.
Finishing
Weave in every yarn tail, reversing direction through several stitches before trimming.
Check both straps, the leaf attachments, all face edges, and the back buttons. Remove every temporary marker and loose sewing thread.
If the dress needs shaping, follow the yarn’s care instructions and dry it flat. Avoid pressing the ribbing completely flat; its texture helps create the pumpkin appearance.

Finished Size
The finished upper circumference is approximately 20 (22, 24) inches, or 51 (56, 61) cm.
The estimated shoulder-to-hem length is approximately 13.5 (15.5, 17.5) inches, or 34 (39, 44) cm, after adjusting the straps.
Use the actual finished measurements and the child’s measurements to confirm fit. The dress should allow movement without the upper band pressing into the underarms.
Tips and Customization
Adjust the Dress Length
Add or remove chains from the orange foundation. Every added chain creates one additional hdc in each row. At gauge, four stitches change the panel height by approximately 1 inch.
Keep the row count unchanged when adjusting length only. Leave approximately 2 inches open at the top of the back seam.
Make an Everyday Fall Version
Omit the black face and keep the orange body with its green leaves. The same construction becomes a simple pumpkin-inspired fall dress.
Choose Softer Autumn Colors
Try burnt orange with olive green, or pale apricot with sage. Keep the yarn weight and gauge consistent.
Check the Fit Before Decorating
Complete the body, band, and straps before adding the leaves and face. Adjusting a plain garment is much easier than moving sewn decorations later.
Wear and Care Notes
Use this dress as a supervised costume or photo outfit. It is not intended for sleep.
Check the buttons and sewn decorations before each wear. Keep the neckline clear of the face and leave off loose cords or detachable embellishments.
Follow the yarn and felt care instructions. Gently reshape the dress and dry flat rather than hanging it by the straps.
Frequently Asked Questions
Is the dress stuffed to create the pumpkin shape?
No. The orange body is wider than the upper band, and the compact hem draws in its lower edge. The fabric provides the fullness.
Can I choose a size by age?
Choose by chest measurement and required length. Children of the same age can need different garment dimensions.
Why is my upper band too small?
Check your single crochet gauge. A tighter stitch gauge produces a smaller circumference even when the stitch count is correct. Adjust your hook and remake the band before continuing.
Can I make the face without felt?
You can embroider a simpler face directly onto the crochet. Keep the stitches short and secure the ends carefully. Large solid shapes will take considerably longer to embroider.
Are the headband and shoes included?
No. This pattern includes the dress, shoulder straps, leaf trim, back closure, and face details.
Save This Pattern for Later
Save this crochet pumpkin dress pattern to your Halloween crochet or handmade costume board on Pinterest so you can return to the sizing and assembly steps when you are ready.
Looking for Your Next Crochet Project?
Love this project? Explore Cute Stitch Studio’s premium crochet patterns for more cute, cozy, gift-worthy, and beginner-friendly handmade ideas.