Crochet Glasses Case Pattern: Easy Textured Drawstring Pouch
This free crochet glasses case pattern creates a cream-colored pouch with a softly textured surface and a simple drawstring closure. It is a useful little project for keeping reading glasses or sunglasses together inside a larger bag.
The original Cute Stitch Studio design combines a single crochet base with small bean stitches. These stitches give the pouch its raised texture without requiring complicated shaping or separate pieces to sew together.
If you already know single crochet and feel ready to try a new stitch, this project offers a manageable next step. Make one for yourself, or pair it with a book for a thoughtful handmade gift.
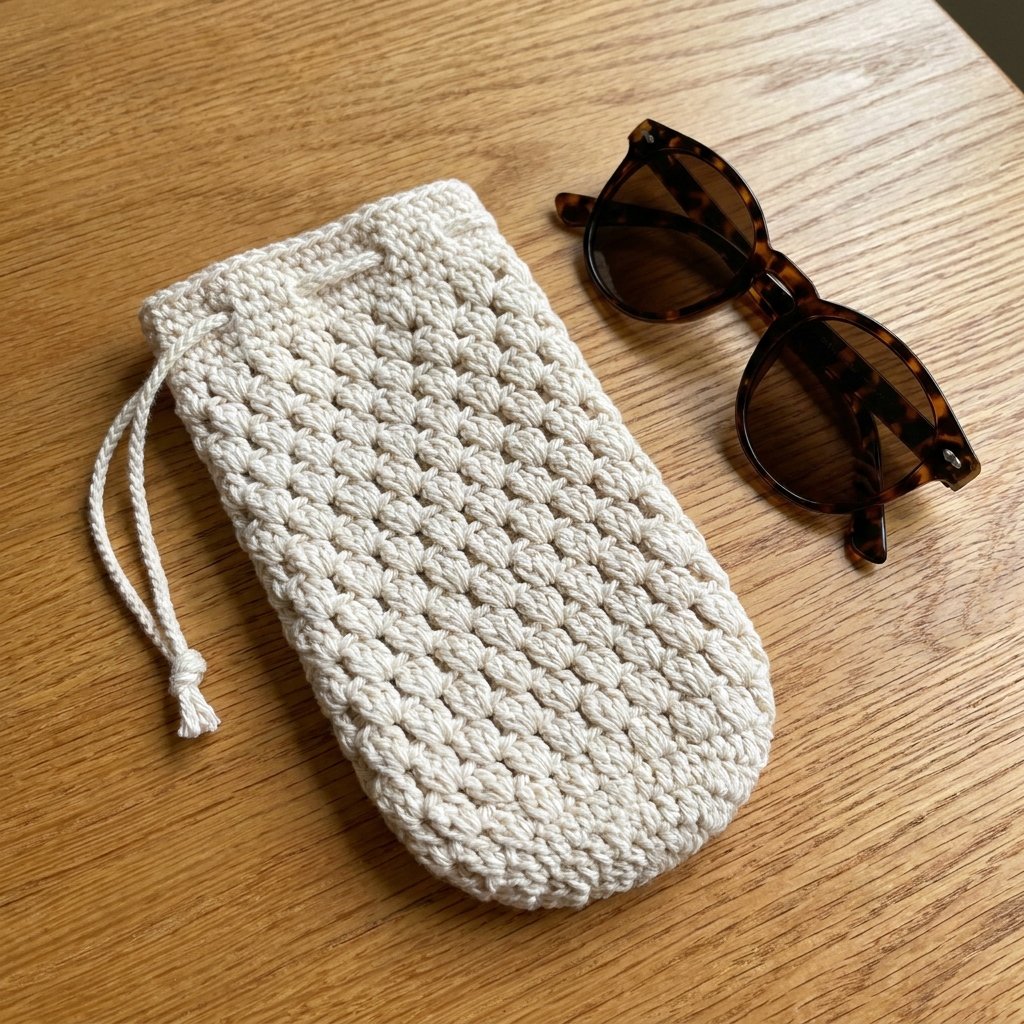
Table of Contents
Crochet Glasses Case Pattern: Easy Textured Drawstring Pouch Instructions
Why You’ll Love This Crochet Glasses Case Pattern: Easy Textured Drawstring Pouch
- Clear step-by-step sections make the project easier to follow.
- Materials, sizing, finishing, and customization notes are easy to find.
- The pattern includes practical tips for a neat handmade result.
Project Details
- Skill level: Adventurous beginner.
- Estimated time: Approximately 2–4 hours.
- Finished size: Approximately 4¼ inches (11 cm) wide when flattened and 7–7½ inches (18–19 cm) tall.
- Crochet terminology: US terms.
- Construction: An oval base worked around a starting chain, followed by joined textured rounds and a drawstring cuff.
This is an original, untested pattern draft. Finished measurements and yarn quantities are estimates based on the suggested gauge. Check the fit against your folded glasses before completing the cuff.
Materials for the Crochet Glasses Case Pattern
- Approximately 100–130 yards (91–119 m) of category 3 light/DK-weight cotton yarn.
- 4 mm crochet hook, or the size needed to achieve the suggested fabric.
- Yarn needle.
- Scissors.
- One removable stitch marker.
- Measuring tape.
- Your folded glasses for checking the fit.
The drawstring uses the same yarn as the pouch. No buttons, zipper, beads, or other hardware are required.

Hook Size
Start with a 4 mm crochet hook. Your hook should move comfortably through the bean stitches without leaving unusually large openings.
If the fabric is too loose, try a smaller hook. If it feels stiff or the hook struggles to pull through the loops, try a slightly larger hook and check the measurements again.
Yarn
Use smooth category 3 light/DK-weight cotton yarn. Choose a yarn with a soft surface and a clearly defined strand so you can see where to place each stitch.
Warm cream gives the pouch a simple, understated look similar to the visual inspiration. Oatmeal, dusty pink, sage green, or pale blue also show the texture nicely.
Allow approximately 100–130 yards for the sample, including the drawstring. Bean stitches use more yarn than a plain single crochet fabric, so keep some extra available if you plan to make the pouch longer.
Gauge and Fit
Suggested textured gauge: 8 bean stitches, each followed by its closing ch 1, measure approximately 4 inches (10 cm) across. Approximately 12 textured rounds measure 4 inches (10 cm) high.
Measure the fabric relaxed rather than stretched. The sample contains 17 bean stitches around the body, giving an estimated circumference of 8½ inches (22 cm), or 4¼ inches (11 cm) when flattened.
Gauge does not need to match perfectly, but your glasses must slide inside without forcing the fabric apart. This crochet glasses case pattern is sized as a roomy pouch rather than a tight sleeve.
After several body rounds, insert your folded glasses gently. Check their width and thickness together. The opening should clear the widest part of the frame comfortably.
Abbreviations
- ch: chain.
- sc: single crochet.
- sl st: slip stitch.
- st / sts: stitch / stitches.
The term bean stitch is written out throughout the instructions. Its closing ch 1 is included every time you make the stitch.
How to Make the Bean Stitch
Practice this sequence before beginning the textured body:
- Insert your hook into the indicated stitch or space, yarn over, and pull up a loop. You have 2 loops on the hook.
- Yarn over, insert your hook into the same place, yarn over, and pull up a loop. You have 4 loops.
- Yarn over, insert your hook into the same place again, yarn over, and pull up a loop. You have 6 loops.
- Yarn over and pull through all 6 loops.
- Ch 1 to close the stitch.
Keep the pulled-up loops approximately the same height. Avoid tightening the closing chain too much because you will work into that chain space on the next textured round.
Before You Start
- Work in joined rounds, without turning.
- The beginning ch 1 does not count as a stitch.
- The closing ch 1 of each bean stitch does count as a chain space.
- Join textured rounds into the top of the first bean stitch, before its closing chain.
- Do not work into the joining slip stitch.
- Mark the first stitch of each round and move the marker upward as you work.
- Leave an approximately 8-inch (20 cm) yarn tail for weaving in.
The pouch is a soft storage accessory, not a rigid protective case. It does not provide crush protection, and an unlined crochet fabric is not guaranteed to prevent lens scratches. Keep glasses in their usual microfiber sleeve inside the pouch if you want a separate layer between the lenses and yarn.
Crochet Glasses Case Pattern: Step-by-Step Instructions
Part 1 — Crochet the Oval Base
Ch 17.
Round 1: Sc in the second ch from the hook and in each of the next 14 chains. Work 3 sc into the final chain.
Rotate the chain so you can work along its underside. Sc into the next 14 unused chain positions, then work 2 sc into the underside of the same chain that received your very first sc.
Join with a sl st to the first sc. (34 sts)
The count is 15 + 3 + 14 + 2 = 34 stitches. Each end of the starting chain has three stitches in total, creating the two rounded ends.
Place the stitch marker in the first sc. Check that the starting chain is not twisted and that the small oval sits reasonably flat.
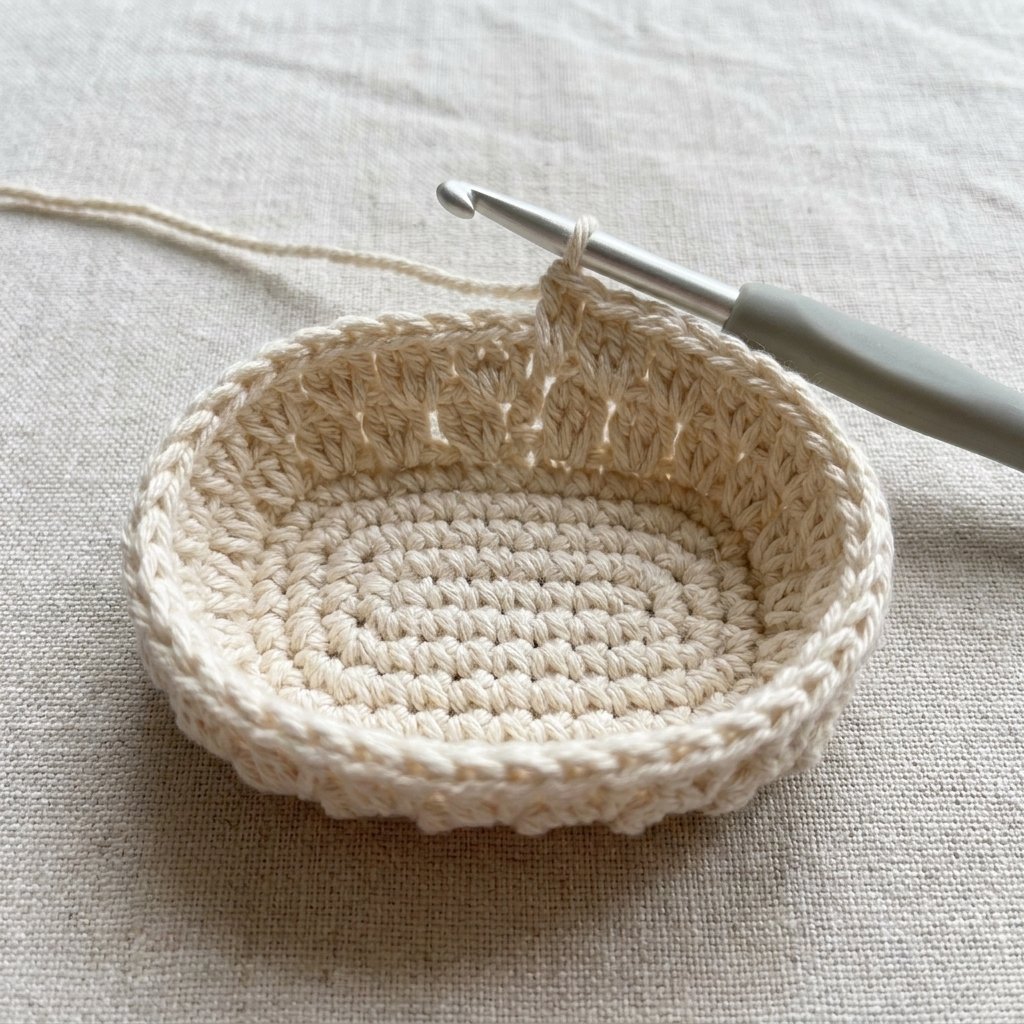
Part 2 — Start the Textured Body
Round 2: Ch 1. Make one bean stitch in the same stitch as the join, then skip the next sc.
Continue around, making one bean stitch in the next sc and skipping the following sc. Join with a sl st to the top of the first bean stitch. (17 bean stitches and 17 ch-1 spaces)
Remember that each bean stitch already includes its closing ch 1. Do not add another chain between the bean stitches.
The base will begin to cup upward as the textured body develops. This is expected.
Part 3 — Continue the Bean Stitch Rounds
Round 3: Sl st into the next ch-1 space. Ch 1, then make one bean stitch in that same space.
Make one bean stitch in each remaining ch-1 space around. Join to the top of the first bean stitch. (17 bean stitches and 17 ch-1 spaces)
Rounds 4–20: Repeat Round 3. (17 bean stitches and 17 ch-1 spaces per round)
Count the raised bean stitches after every few rounds. The count stays at 17 throughout the textured section.
Rounds 2–20 give you 19 textured rounds. At the suggested gauge, this section measures approximately 6⅓ inches (16 cm), excluding the base and cuff.
Check the Length Before Making the Cuff
Slide your folded glasses inside. The textured section should reach approximately to the top of the frames, with the cuff adding room above them for the closure.
If the glasses are too tall, add more rounds using the Round 3 instructions. For shorter glasses, stop earlier.
Do not count a tightly gathered drawstring area as usable storage space. The cuff needs room to close above the frames rather than pulling across them.
Part 4 — Crochet the Drawstring Cuff
Round 21: Ch 1. Work 1 sc into the top of each bean stitch and 1 sc into each ch-1 space around. Join to the first sc. (34 sts)
Round 22: Ch 1. Repeat the following around: sc in the next st, ch 1, skip the next st. Join to the first sc. (17 sc and 17 ch-1 spaces)
Round 23: Ch 1. Work 1 sc into each sc and 1 sc into each ch-1 space around. Join to the first sc. (34 sts)
Fasten off, leaving a tail for weaving in.
If you added or removed body rounds, continue with these same three cuff rounds; the stitch counts remain unchanged.
Part 5 — Make and Thread the Drawstring
Make a chain approximately 22 inches (56 cm) long without stretching it.
Sl st in the second ch from the hook and in every remaining ch. Keep the slip stitches relaxed so the cord does not curl tightly or become rigid.
Fasten off and weave in both yarn ends. The finished cord may be slightly shorter than the original chain.
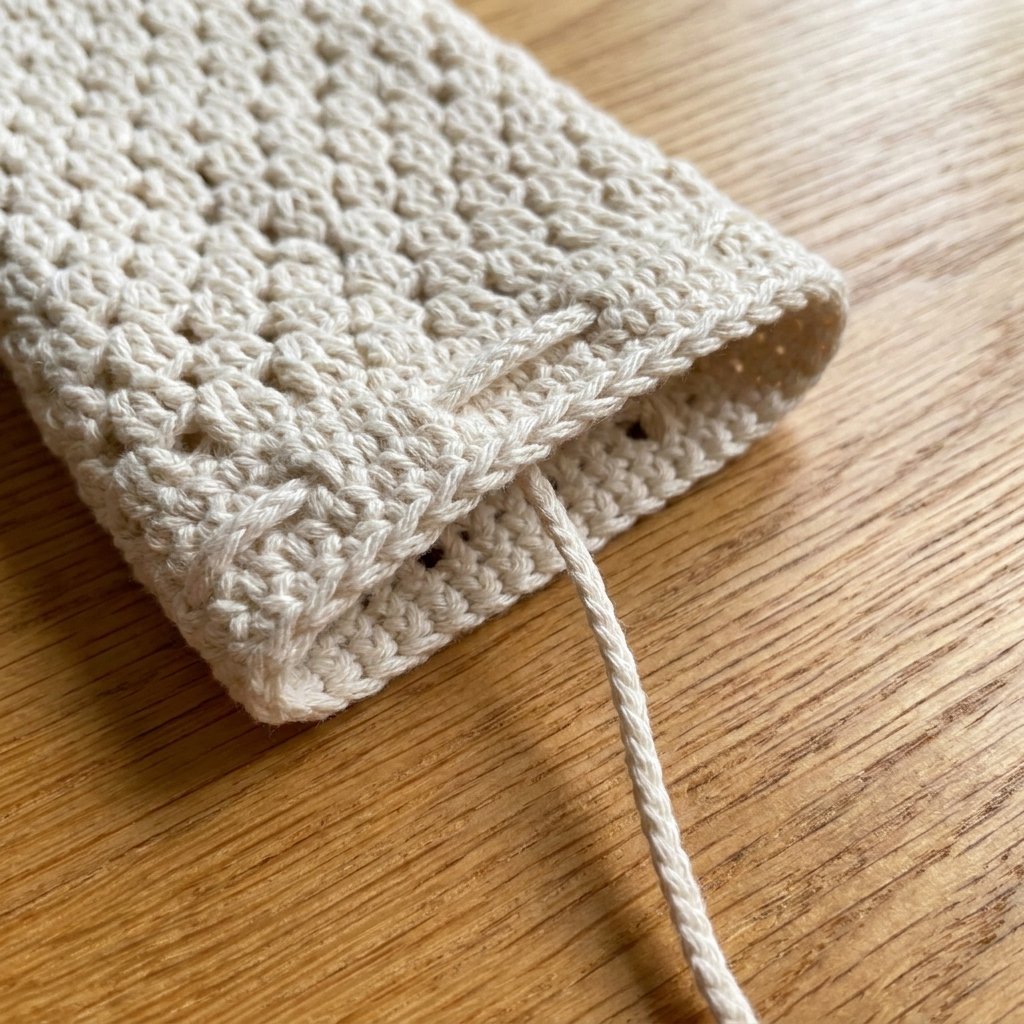
Thread one end through the yarn needle. Starting near a side of the pouch, pass the cord through the eyelets in Round 22, alternating between the outside and inside as you travel around the cuff.
Bring both ends out near the starting point. Because there are 17 eyelets, you may use the starting eyelet again to return the second end to the outside.
Adjust until both ends are even. Pull gently to gather the top, then tie a loose bow. The cord should move freely without pulling individual stitches out of shape.
Tips for the Best Crochet Result
Keep your tension consistent throughout this crochet glasses case pattern: easy textured drawstring pouch. Small tension changes can affect the finished size, shaping, and how neatly the pieces line up during assembly.
Pause at the end of important sections to compare your stitch count with the pattern. Correcting a missed increase or decrease early is much easier than adjusting the finished piece later.
When you reach the finishing stage, take a little extra time with seams, shaping, and yarn ends. These small details can make the finished crochet project look cleaner and more polished.
Finishing Your Crochet Glasses Case
Weave all pouch tails into the inside of the fabric, changing direction to help hold them securely. Keep the ends smooth and away from the opening.
Check the base for a loose starting-chain gap. If needed, use the beginning yarn tail to close that gap with a small stitch before weaving it in.
Gently arrange the pouch into a rectangular shape. If washing is needed, follow the yarn label and lay it flat to dry.
Avoid stretching the textured body during blocking. The aim is to settle the stitches and even out the shape, not to make the pouch larger.

Finished Size
At the suggested textured gauge, the finished pouch is approximately 4¼ inches (11 cm) wide when flattened and 7–7½ inches (18–19 cm) tall.
The finished drawstring is approximately 20–22 inches (51–56 cm) long, depending on how much the slip-stitch row contracts the chain.
Your final size may vary with yarn thickness and tension. The most useful measurement is whether your folded glasses fit comfortably with enough space above them to close the cuff.
Tips and Customization
Make a Narrower Version
For smaller reading glasses, begin with ch 15 instead of ch 17.
Work 13 sc along the first side, 3 sc into the final chain, 12 sc along the underside, and 2 sc into the starting end. This gives 30 sc.
The textured rounds then contain 15 bean stitches and 15 ch-1 spaces. The plain cuff rounds contain 30 sc, and the eyelet round contains 15 sc and 15 spaces.
At the suggested gauge, this version is approximately 3¾ inches (9.5 cm) wide when flattened. Check it against your actual frames.
Add More Width
Adding two chains to the starting chain adds four stitches to the oval base and two bean stitches to the body. Follow the same rounded-end construction and keep the body stitch count consistent.
For example, ch 19 produces a 38-stitch base and 19 bean stitches per textured round. This is approximately 4¾ inches (12 cm) wide when flattened at the stated gauge.
Change the Length
Add or remove complete textured rounds before the cuff. Each textured round contributes approximately ⅓ inch (0.8 cm) at the suggested gauge.
Use a Contrast Drawstring
Keep the pouch cream and make the cord in dusty rose or sage green. This small change adds color without interrupting the textured body.
Make It Part of a Gift
Pair the finished case with a book, a handwritten note, or a lens-cleaning cloth. Neutral colors work well when you do not know the recipient’s favorite shade.
Frequently Asked Questions
Is this crochet glasses case pattern suitable for beginners?
It is suitable for crocheters who know single crochet and are ready to learn bean stitches. Practice a few bean stitches first, then use the stitch counts to check each round.
Why do my bean stitches look uneven?
The pulled-up loops may be different heights. Keep the working yarn relaxed and pull each loop to a similar height before drawing through all six loops.
Why is my pouch getting wider?
You may be working into both the bean stitch and its chain space during the textured rounds. After the first textured round, work one bean stitch into each ch-1 space only.
Can I use this pouch for large sunglasses?
Possibly, but frame shapes vary. Check the width after several rounds and use the wider starting-chain option if needed. Add body rounds for extra height.
Does the pouch replace a hard glasses case?
No. It keeps glasses together and offers a soft outer layer, but it does not protect them from being crushed. Use a hard case when your glasses need impact protection.
Can I wash the finished case?
Follow the yarn manufacturer’s care instructions. Remove the glasses, wash as directed, and let the pouch dry completely before using it again.
Save this crochet glasses case pattern to your handmade accessories board so you can find it when you are ready for a small, useful project.
Project Checklist
- Confirm your yarn weight, hook size, and gauge before beginning.
- Read through the full Crochet Glasses Case Pattern: Easy Textured Drawstring Pouch instructions once before you start.
- Check stitch counts at the end of each row or round before continuing.
- Review the finishing and sizing notes before weaving in the final ends.
Looking for Your Next Crochet Project?
Love this project? Explore Cute Stitch Studio’s premium crochet patterns for more cute, cozy, gift-worthy, and beginner-friendly handmade ideas.