Crochet Mermaid Tail Lapghan Pattern with Colorful Shell Stitches
This crochet mermaid tail lapghan pattern turns a cozy reading break into a little underwater adventure. Pink, turquoise, and purple shell rows create the tail, while a wide two-piece fin finishes the playful shape.
The lower section forms a soft pocket for the feet and legs. The upper back stays open, making the blanket easier to put on and remove while sitting.
This original Cute Stitch Studio design uses repeated shell bands with larger shells toward the top. The fin is made separately and sewn over the closed lower end.
The stitches are approachable, but the changing shell sizes and assembly make this a confident-beginner project rather than a first crochet lesson.
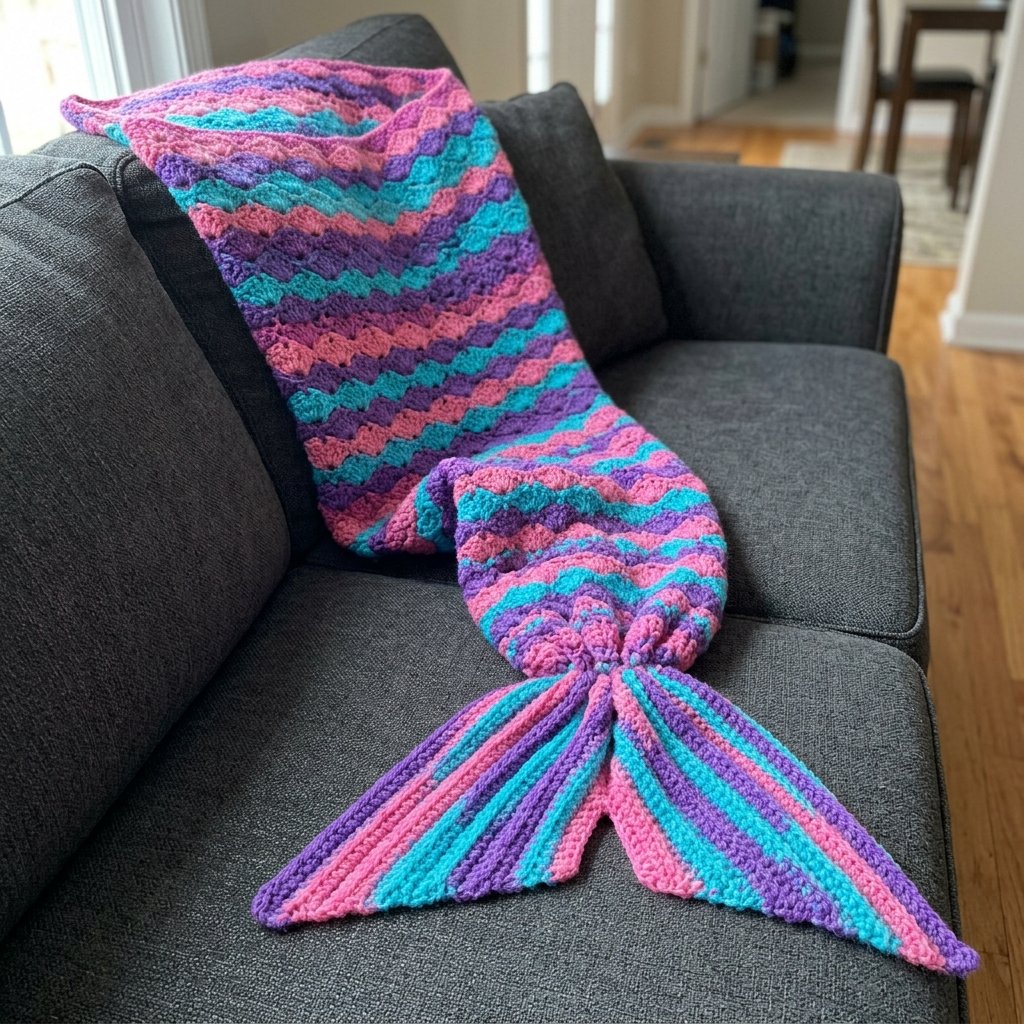
Table of Contents
Crochet Mermaid Tail Lapghan Pattern With Colorful Shell Stitches Instructions
Project Details
- Skill level: Confident beginner.
- Estimated time: Approximately 14–22 hours.
- Size: One child-size sample, selected by measurements rather than age alone.
- Body length: Approximately 36 inches before the fin.
- Upper width: Approximately 30–32 inches laid flat before seaming.
- Lower body width: Approximately 14–16 inches before seaming.
- Fin: Approximately 15–18 inches across when arranged, with about 8–9 inches extending below the body.
- Crochet terminology: US terms.
- Construction: A tapered flat panel, partially seamed at the back, with a closed foot end and two separate fin lobes.
This is an original, untested design draft. Measurements and yarn quantities are estimates. Check your swatch and the intended wearer’s seated measurements before completing the blanket.
Materials
- Approximately 1,200–1,500 yards total of category 4 yarn, divided roughly equally among pink, turquoise, and purple.
- 5 mm crochet hook, or the size needed for a soft fabric at the suggested measurements.
- Yarn needle.
- Scissors.
- Measuring tape.
- Removable stitch markers.
Hook Size
Start with a 5 mm crochet hook.
The shell fabric should fold easily around the legs. If it feels stiff, try a larger hook and measure a new swatch before beginning the body.
Yarn
Use category 4, worsted-weight yarn that feels soft against the skin. A washable acrylic is a practical option for a regularly used lap blanket.
Choose yarns of the same thickness and with compatible care instructions. The featured palette uses bright pink, turquoise, and purple.
A smooth yarn makes the shell stitches easier to see. Avoid combining a thick velvet yarn with a much thinner smooth yarn in the same body panel.

Abbreviations
- ch: chain.
- sc: single crochet.
- hdc: half double crochet.
- dc: double crochet.
- sl st: slip stitch.
- st / sts: stitch / stitches.
- BLO: back loop only.
Before You Start
Gauge and Measurements
For the fin, aim for approximately 12 hdc and 10 rows = 4 inches.
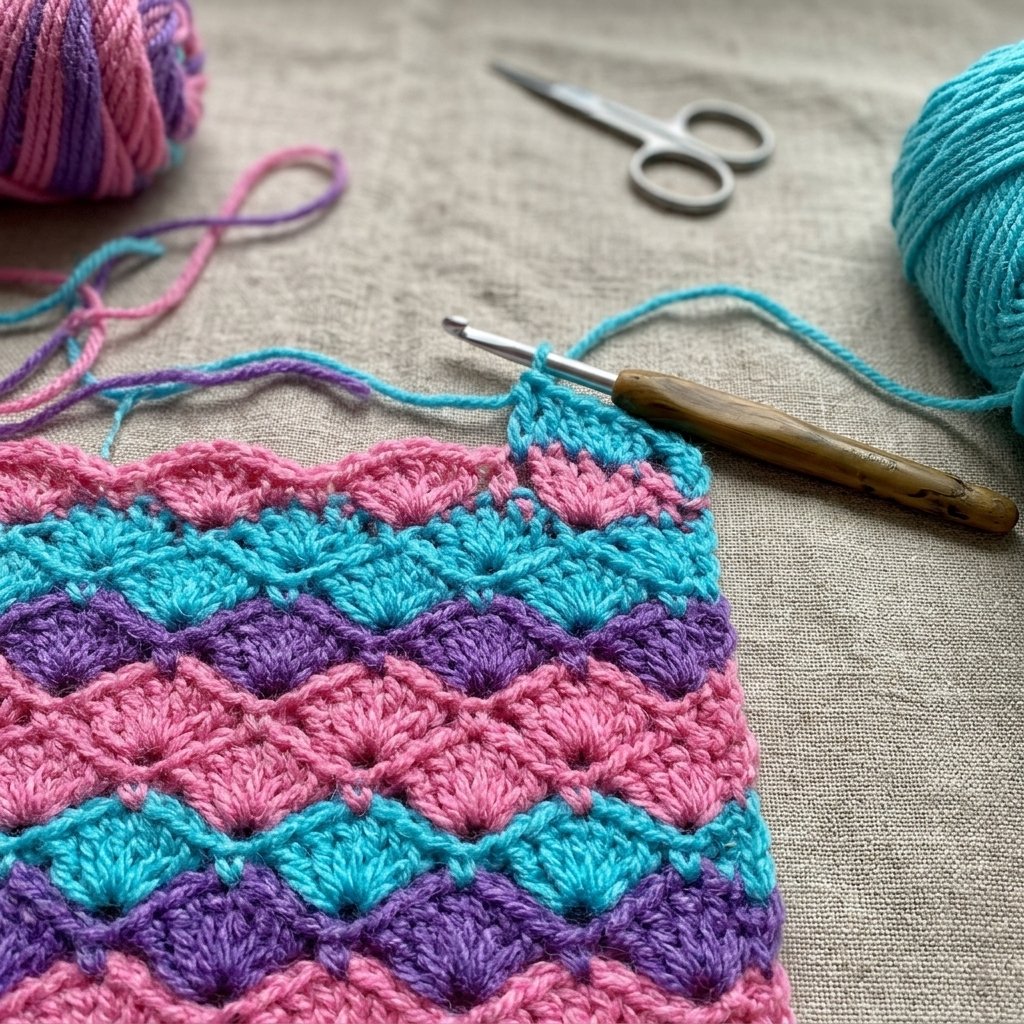
For the body, use the shell swatch below. Three large shells should span approximately 7½–8 inches after gentle shaping. Twelve large shells therefore give a target upper width of approximately 30–32 inches.
The body instructions use measured section lengths because the small and large shell bands have different heights. Do not assume a fixed number of rows will produce the same length in every yarn.
Make a Shell Swatch
Ch 14. Sc in the second chain from the hook. Repeat [ch 3, skip 3 chains, sc in the next chain] three times. You have three chain arches and four sc anchors.
Turn. Ch 1, sc in the first anchor, then repeat [3 dc around the next arch, sc in the next anchor] three times.
Turn. Ch 1, sc in the first anchor, then repeat [ch 4, skip the shell stitches, sc in the next anchor] three times. Turn and work 5 dc around each arch, with sc in the anchors between them.
Repeat once more using ch-5 arches and 7 dc in each shell. Add several more large-shell bands before measuring the upper section.
How the Shell Bands Work
Each band has two rows: a support row of chain arches, followed by a row of shells worked around those arches.
The body always contains 12 shells and 13 single crochet anchors. Only the chain lengths and number of dc in each shell change.
The shells align in horizontal bands. This version does not use an offset crocodile stitch or separate scale appliques.
Color Order
Use pink, turquoise, and purple in repeating order. Work both rows of each band in the same color, then change colors for the next band.
Fasten off at a color change and leave a tail long enough to weave securely into the stitches.
Turning Chains and Use Notes
Ch 1 at the start of a row does not count as a stitch. Turn after every body and fin row.
This is a seated lap blanket, not a walking costume or an infant sleep sack. Remove it before standing or walking, and keep the upper opening easy to release.
Crochet Mermaid Tail Lapghan Pattern
Part 1 — Start the Narrow End
Begin with pink. Ch 50.
Support Row 1: Sc in the second chain from the hook. Repeat [ch 3, skip 3 chains, sc in the next chain] 12 times. Turn. 12 arches and 13 sc anchors.
Shell Row 2: Ch 1 and sc in the first anchor. Repeat [3 dc around the next chain arch, sc in the next anchor] 12 times. Turn. 12 small shells and 13 sc anchors.
This completes the first shell band.
Part 2 — Work the Lower Section
Change to turquoise.
Support row: Ch 1 and sc in the first sc anchor. Repeat [ch 3, skip the 3 dc of the next shell, sc in the next sc anchor] 12 times. Turn.
Shell row: Ch 1 and sc in the first anchor. Repeat [3 dc around the next arch, sc in the next anchor] 12 times. Turn.
Change to purple for the next band, then continue cycling through pink, turquoise, and purple.
Repeat these small-shell bands until the lower section measures approximately 6 inches, ending after a shell row.
The lower section should be approximately 14–16 inches wide when laid flat without stretching. This width becomes the circumference of the lower tube after seaming.
Check that it provides comfortable room around both feet together. If it is too narrow, correct the gauge before continuing.
Part 3 — Expand to Medium Shells
Begin the next color in your sequence.
Transition support row: Ch 1 and sc in the first anchor. Repeat [ch 4, skip all 3 dc of the next shell, sc in the next anchor] 12 times. Turn.
Medium shell row: Ch 1 and sc in the first anchor. Repeat [5 dc around the next arch, sc in the next anchor] 12 times. Turn.
For subsequent support rows, ch 4 between anchors and skip all 5 dc of each shell.
Continue with medium-shell bands, changing color every two rows, until the entire panel measures approximately 16 inches from the foundation edge.
The medium section is approximately 10 inches long. The wider arches and larger shells begin opening the fabric around the legs.
Part 4 — Expand to Large Shells
Begin the next color in the sequence.
Transition support row: Ch 1 and sc in the first anchor. Repeat [ch 5, skip all 5 dc of the next shell, sc in the next anchor] 12 times. Turn.
Large shell row: Ch 1 and sc in the first anchor. Repeat [7 dc around the next arch, sc in the next anchor] 12 times. Turn.
For subsequent support rows, ch 5 between anchors and skip all 7 dc of each shell.
Continue until the panel measures approximately 36 inches from its foundation edge, ending after a shell row.
The top should measure approximately 30–32 inches across. Check that it can wrap loosely over the intended wearer’s lap with the upper back left open.
Fasten off.
Part 5 — Finish the Upper Edge
With the outer face toward you, join pink yarn at one upper corner.
Ch 1 and sc in every dc and sc across the final large-shell row. There are 84 dc and 13 sc to work into, giving 97 sc.
Fasten off. Keep this row relaxed so the top edge does not draw inward.
Part 6 — Seam the Lower Back
Fold the body lengthwise with its outer face inward. Bring the two long side edges together.
Measure 18 inches upward from the narrow foundation end and mark that point on both edges.
Whipstitch the matching row ends together from the foundation edge to the markers. Align the colored bands and catch the edge stitches securely.
Leave the upper approximately 18 inches unsewn. This opening makes the blanket easier to enter and remove.
Reinforce the top of the seam with several extra sewing passes, then weave in the ends.
Part 7 — Close the Foot End
Keep the lower tube inside out. Position the back seam at the center back, then flatten the narrow opening.
Whipstitch the two layers of the foundation edge together from one side to the other. Catch corresponding chain sections and anchor stitches without leaving large gaps.
Turn the body right side out.
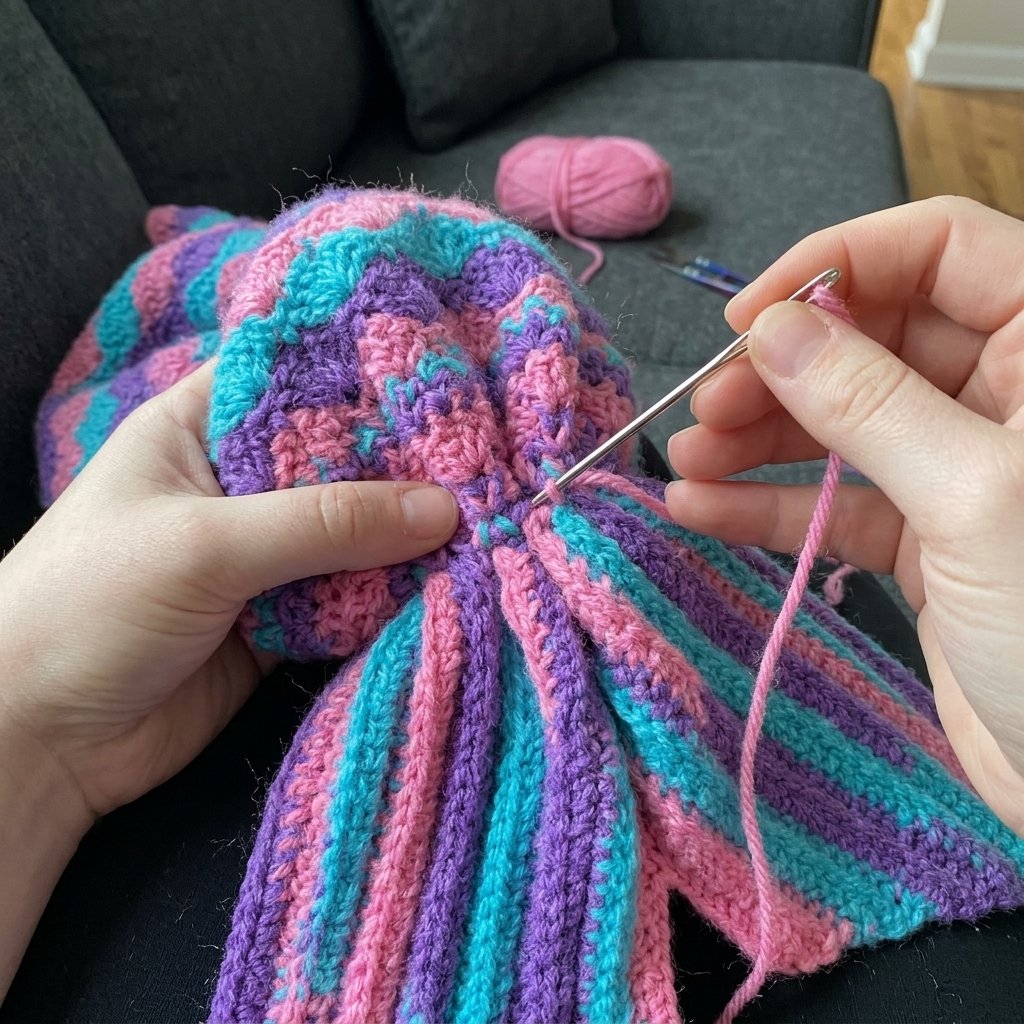
Using a separate strand of yarn, make a loose running stitch through the closed foot seam. Draw it in gently until the end measures approximately 4–5 inches across, then secure the yarn.
This gathered area forms the tail neck where the decorative fin will be attached. Keep the fabric immediately above it roomy enough for the feet.
Part 8 — Finish the Open Back Edges
Join pink yarn at the top of the back seam.
Work sc evenly up one open back edge, across the upper edge, and down the other open back edge. Work 3 sc at each upper corner to turn neatly.
Along row ends, adjust the number of stitches so the edge lies flat. There is no required total count for this finishing pass.
Fasten off at the seam junction and weave in the ends.
Part 9 — Crochet the First Fin Lobe
Each fin lobe begins at a narrow tip and widens toward its outer edge. Make two identical pieces, then arrange them as mirror images during assembly.
With pink, ch 3.
Row 1: Hdc in the second chain from the hook and in the last chain. Turn. 2 sts.
Row 2: Ch 1. Working in BLO, make 2 hdc in the first stitch, then hdc in each remaining stitch. Turn. 3 sts.
Rows 3–24: Repeat Row 2, adding one stitch at the beginning of every row. 25 sts after Row 24.
Because you turn each row, these increases alternate between the two physical sides, producing a widening triangular lobe.
Use this stripe sequence:
- Rows 1–4: Pink.
- Rows 5–8: Turquoise.
- Rows 9–12: Purple.
- Rows 13–16: Pink.
- Rows 17–20: Turquoise.
- Rows 21–24: Purple.
Fasten off. The lobe should measure approximately 8–8½ inches across its widest edge and 9–9½ inches from its narrow tip to that edge.
Make the second lobe in the same way.
Part 10 — Shape and Attach the Fin
Lay the body flat with its front facing upward. Place the two fin lobes below the gathered foot end.
Keep their narrow tips together at the tail neck and angle their broad ends outward, one to the left and one to the right. Arrange the colors and ribbed faces to match.
Bring the inner edges of the lobes together near the narrow tips. Sew those inner edges together for approximately 3 inches, leaving the lower portions separate to form a visible central notch.
Overlap the joined upper fin area with the closed body end by approximately 1 inch. Adjust the angle until the two sides look balanced.
Sew the fin to the closed foot seam and nearby lower body stitches with several rows of small stitches. Attach through both lobes where they meet rather than relying on a single narrow tip.
The fin is decorative and does not contain the feet. The feet remain inside the closed body pocket above it.
Finishing
Weave in all remaining yarn ends, especially at the color changes and fin attachment.
Check the lower back seam, the closed foot end, and the point where the back opening begins. Reinforce any loose sections.
Wash or gently block according to the yarn label. Lay the blanket flat, smooth the shell bands, and arrange the fin lobes symmetrically.
Once dry, check the fit while the intended wearer is seated. The blanket should sit loosely over the lap, with enough room to move the feet and remove the legs easily.

Finished Size
- Body length: Approximately 36 inches.
- Upper width before wrapping: Approximately 30–32 inches.
- Lower tube circumference: Approximately 14–16 inches before gathering the closed end.
- Open back section: Approximately 18 inches.
- Fin span: Approximately 15–18 inches, depending on the assembly angle.
- Total length: Approximately 44–45 inches, including the exposed fin.
These measurements describe the sample design. They are not a guarantee of fit for every child of a particular age.
Tips and Customization
Adjust the Length
Measure from the intended lap position to the toes while seated. Add or remove complete shell bands to match that body length.
For a longer version, distribute extra length between the medium and large sections. Keep the upper back opening long enough for easy entry.
Adjust the Width
To change the number of shell repeats, use a starting chain of four times the desired number of shells, plus 2.
For example, 14 shells begin with ch 58. Every support and shell row then uses 14 repeats instead of 12.
Each additional shell changes the width of every section. Swatch and calculate the upper width before committing to a larger version; an adult blanket also needs more lower-leg room, length, and yarn.
Choose an Ocean Palette
Try teal, seafoam, and navy for a quieter look. Lavender, blush, and cream create a softer pastel version.
Keep the Shell Anchors Visible
Place a marker in the first and last sc anchor when learning the repeat. Accidentally working into a shell’s dc instead of its anchor can change the shell count.
Make Both Fin Lobes Together
Finish each color section on both lobes before moving to the next color. This makes it easier to keep their tension and dimensions similar.
Frequently Asked Questions
Is this mermaid tail blanket fully closed?
The lower half is seamed into a tube with a closed foot end. The upper back remains open so it can wrap comfortably over the lap.
Are the feet inside the fin?
No. The fin is a decorative piece sewn beneath the closed foot pocket.
Does the pattern use crocodile stitch?
No. The body uses groups of double crochet worked into chain arches. These shell bands create texture with fewer construction steps than post-worked crocodile scales.
Why does my body panel ripple?
A little movement around the shells is expected, but deep ripples can indicate uneven tension or extra repeats. Check that every band contains 12 shells and 13 anchors.
Can I make it for a baby?
This pattern is intended as a seated lap blanket for an older child who can remove it independently. It is not an infant sleep sack or a baby sleeping blanket pattern.
Can it go in the washing machine?
Follow the instructions for your specific yarn. If machine washing is permitted, protect the fin from snagging and reshape the blanket as directed by the yarn label.
Save This Mermaid Crochet Project
Save this crochet mermaid tail lapghan pattern to your Pinterest board so you can return to the shell sizes and fin instructions while you work.
Looking for Your Next Crochet Project?
Love this project? Explore Cute Stitch Studio’s premium crochet patterns for more cute, cozy, gift-worthy, and beginner-friendly handmade ideas.