Crochet Gingerbread Cape Pattern for a Cozy Toddler Christmas Outfit
This crochet gingerbread cape pattern turns warm cinnamon yarn into a cheerful Christmas layer. A pointed hood, embroidered smile, pink cheeks, and white scalloped edging give it the look of a little decorated gingerbread cookie.
Flat red and green crochet circles add a festive finish to the front. Two hidden snaps close the cape without long neck ties.
This original Cute Stitch Studio design is worked from the neckline downward, with the hood added afterward. The basic stitches are approachable, while the shaping, edging, and finishing make it a confident-beginner project.
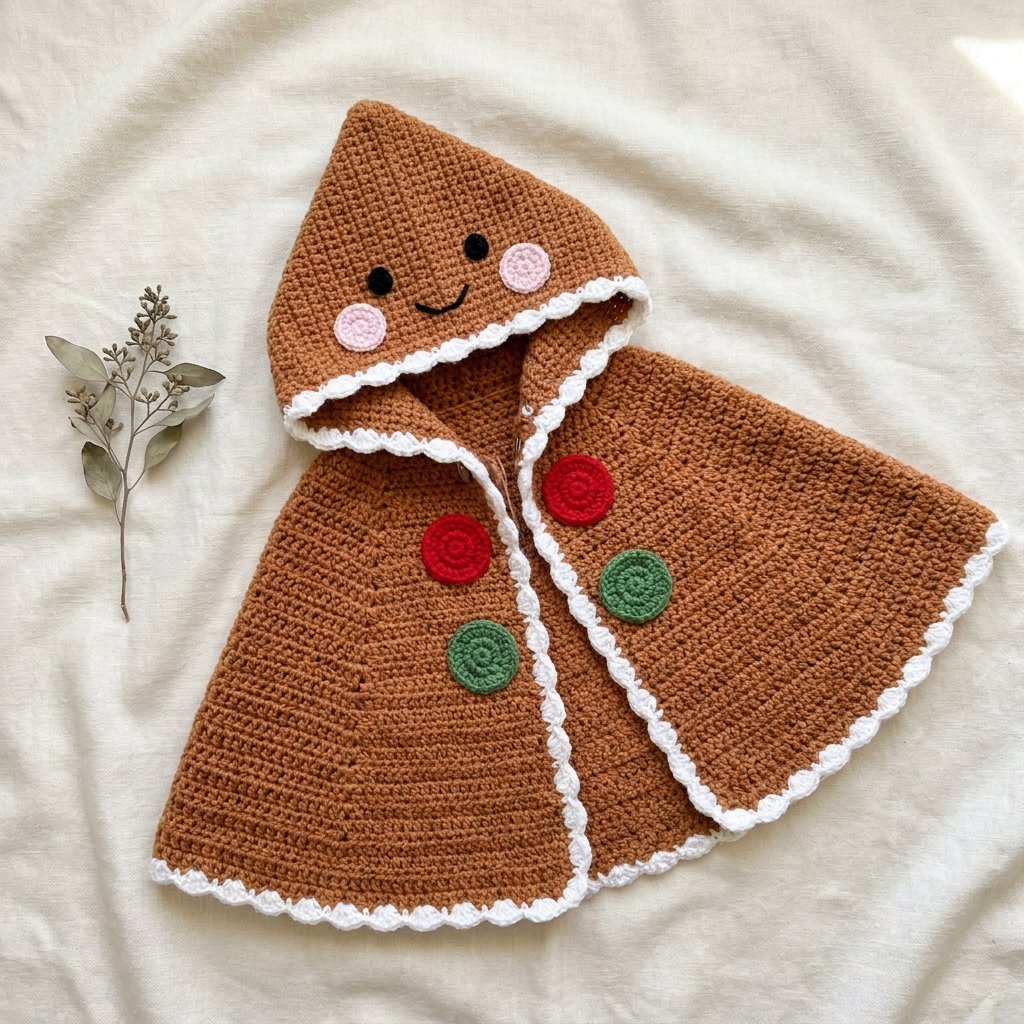
Table of Contents
Crochet Gingerbread Cape Pattern For A Cozy Toddler Christmas Outfit Instructions
Project Details
- Skill level: Confident beginner.
- Estimated time: Approximately 8–14 hours.
- Sizes: A, B, and C, with approximate age guides below.
- Crochet terminology: US terms.
- Construction: Top-down cape, attached hood with a crown seam, white edging, embroidered face, and sewn decorations.
- Closure: Two securely sewn, concealed sew-on snaps.
This is an original, untested design draft. Measurements and yarn quantities are estimates. Choose the size by measurements and check the fit before adding the final decorations.
Materials
- Category 4 yarn in cinnamon brown: approximately 350–450 yards for A, 450–550 yards for B, or 550–650 yards for C.
- White yarn in the same weight: approximately 90–130 yards.
- Small amounts of red, green, pale pink, and black yarn.
- 5 mm crochet hook, or the size needed to meet gauge.
- 4 mm crochet hook for the decorative circles.
- Yarn needle.
- Scissors.
- Measuring tape.
- Stitch markers.
- Two approximately ½-inch sew-on snaps.
- Sewing needle and matching strong thread.
No stuffing, safety eyes, beads, pom-poms, or neck cords are used in this version.
Hook Size
Use a 5 mm hook for the cape, hood, and white edging. Use a 4 mm hook for the small circles so their fabric is compact.
Adjust the main hook as needed to achieve gauge. The finished cape should be soft enough to drape over clothing.
Yarn
Choose category 4, worsted-weight yarn with a smooth, soft texture. Washable acrylic or a soft washable blend can be convenient for a seasonal garment.
Use compatible yarns for the brown body and white trim. A much thicker white yarn can make the border heavy or stiff.
The featured colors are cinnamon brown, bright white, Christmas red, leaf green, pale pink, and a small amount of black for embroidery.

Abbreviations
- ch: chain.
- sc: single crochet.
- hdc: half double crochet.
- dc: double crochet.
- sl st: slip stitch.
- st / sts: stitch / stitches.
Before You Start
Gauge
12 hdc and 9 rows = 4 inches, measured after washing and drying the swatch according to the yarn label.
Make a swatch larger than 4 inches and measure its center. If the fabric feels stiff, reassess the yarn and hook combination before beginning the cape.
Size Guide
| Measurement | A | B | C |
|---|---|---|---|
| Approximate age guide | 1–2 years | 2–3 years | 3–4 years |
| Neckline before edging | 16 inches | 18 inches | 20 inches |
| Body length before edging | About 10 inches | About 11½ inches | About 13¼ inches |
| Open hem edge before edging | 48 inches | 54 inches | 60 inches |
| Hood height before edging | About 9 inches | About 9¾ inches | About 10¾ inches |
| Hood depth after folding | 8 inches | 9 inches | 10 inches |
Age labels are only a rough guide. Check the neckline over the clothing the child will wear, and make sure the hood leaves the face clear.
The cape has an open front and no armholes. Its hem measurement is the length along the lower edge, not a fitted chest circumference.
Pattern Notes
- Instructions are written as A (B, C).
- Ch 1 at the beginning of an hdc row does not count as a stitch.
- Work into the first actual stitch of each row.
- Turn after every cape and hood row.
- Six marked sections control the increases.
- The hood is worked into the underside of the neckline foundation chain.
Wearing and Care Notes
This cape is an outer layer for supervised wear and photos, not sleepwear. Remove it for sleep and whenever the hood or fabric interferes with movement or vision.
Secure all decorations and snaps carefully, inspect them before use, and stop using the garment if an attachment loosens. The snap closure is not a tested breakaway fastening.
Crochet Gingerbread Cape Pattern
Part 1 — Begin the Neckline
With cinnamon yarn and the main hook, ch 49 (55, 61).
Row 1: Hdc in the second chain from the hook and in each remaining chain. Turn. 48 (54, 60) sts.
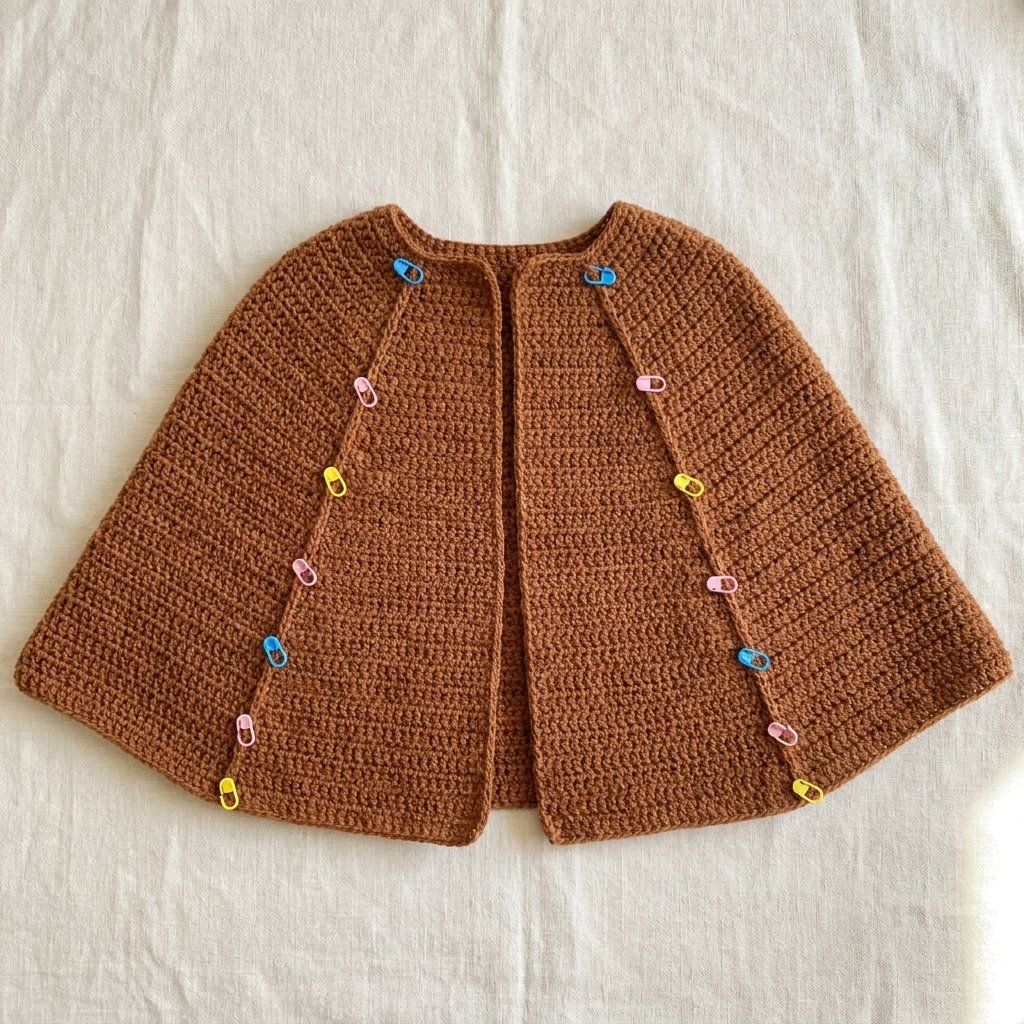
Divide this row into six equal sections of 8 (9, 10) stitches. Place a marker in the final stitch of each section.
Part 2 — Learn the Increase Row
Increase row: Ch 1. In each marked section, work 2 hdc in the first stitch, 1 hdc in every middle stitch, and 2 hdc in the last stitch.
Each section gains two stitches, giving 12 additional stitches per increase row. Move each marker to the final newly worked stitch of its section. Turn.
Plain row: Ch 1 and hdc in every stitch across, keeping the section markers in place. Turn.
Part 3 — Shape the Upper Cape
- Row 2: Increase row. 60 (66, 72) sts.
- Row 3: Plain row. 60 (66, 72) sts.
- Row 4: Increase row. 72 (78, 84) sts.
- Row 5: Plain row. 72 (78, 84) sts.
- Row 6: Increase row. 84 (90, 96) sts.
- Row 7: Plain row. 84 (90, 96) sts.
- Row 8: Increase row. 96 (102, 108) sts.
- Row 9: Plain row. 96 (102, 108) sts.
- Row 10: Increase row. 108 (114, 120) sts.
- Row 11: Plain row. 108 (114, 120) sts.
- Row 12: Increase row. 120 (126, 132) sts.
Lay the piece flat enough to check the shaping. It should widen evenly without one section pulling more tightly than the others.
Part 4 — Complete the Body
Rows 13–15: Plain rows. 120 (126, 132) sts.
Row 16: Increase row. 132 (138, 144) sts.
Rows 17–19: Plain rows. 132 (138, 144) sts.
Row 20: Increase row. 144 (150, 156) sts.
Rows 21–22: Plain rows. 144 (150, 156) sts.
Size A: Fasten off after Row 22.
Sizes B and C, Row 23: Plain row. 150 (156) sts.
Sizes B and C, Row 24: Increase row. 162 (168) sts.
Sizes B and C, Rows 25–26: Plain rows. 162 (168) sts.
Size B: Fasten off after Row 26.
Size C, Row 27: Plain row. 168 sts.
Size C, Row 28: Increase row. 180 sts.
Size C, Rows 29–30: Plain rows. 180 sts. Fasten off.
Part 5 — Crochet the Hood
With the chosen outer face of the cape toward you, join cinnamon yarn at one end of the neckline foundation edge.
Hood Row 1: Ch 1 and hdc in the underside of each foundation stitch across. Turn. 48 (54, 60) sts.
Hood Row 2: Ch 1 and hdc in every stitch across. Turn.
Hood Rows 3–20 (22, 24): Repeat Hood Row 2.
Fasten off, leaving a long sewing tail.
Fold the hood in half with its outer faces together. Match the two halves of the final row and whipstitch the 24 (27, 30) matching stitch pairs.
Turn the hood right side out. The crown seam creates the softly pointed top.
Check the hood before decorating it. It should frame the face comfortably rather than falling forward over the eyes.
Part 6 — Add the White Foundation Edging
Join white yarn at a lower front corner.
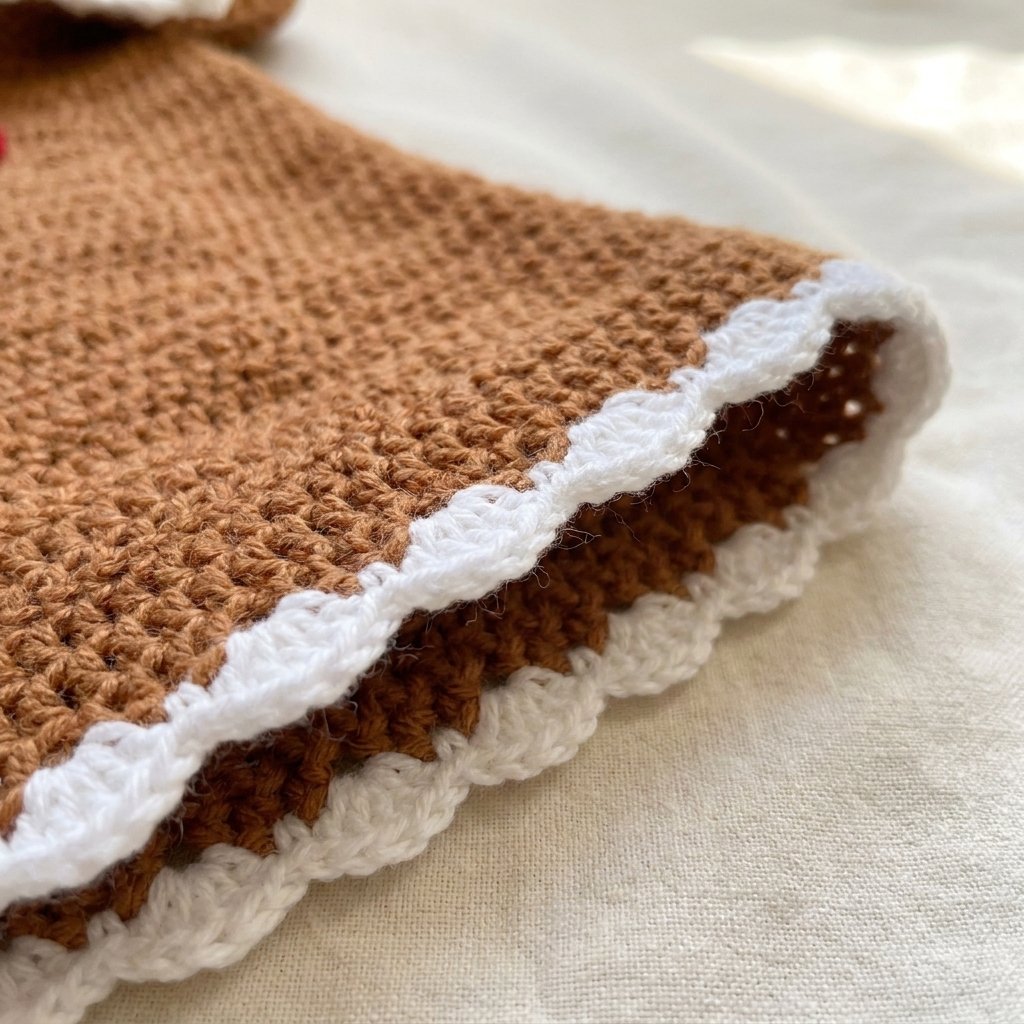
Ch 1 and work sc around the entire outer outline: up the first front edge, around the hood opening, down the opposite front edge, and across the hem.
- Along hdc row ends, begin by alternating 1 sc in one row end and 2 sc in the next.
- Along the lower hem, work approximately 1 sc per stitch.
- At each lower front corner, work 3 sc to turn neatly.
- At the two neckline junctions, continue smoothly without adding corner increases.
Join with a sl st in the first sc.
Lay the border flat. If it waves, reduce the stitches along the affected row-end section. If it pulls inward, add a few evenly spaced stitches.
Part 7 — Crochet the Icing Scallops
Work the scalloped round around the same outline.
Sl st in the first stitch. Repeat [skip 2 stitches, work 5 dc in the next stitch, skip 2 stitches, sl st in the next stitch] around.
At corners, adjust the spacing by skipping only one stitch where needed so a scallop can turn naturally. Near the end, use single slip stitches for any small remainder rather than forcing an extra shell.
Join to the beginning, fasten off, and weave in the ends.
The edging should look softly rounded, like piped icing. Keep it light and flexible around the face.
Part 8 — Make the Pink Cheeks
Make two with pink yarn and the smaller hook.
Ch 2. Work 6 sc in the second chain from the hook. Join with a sl st in the first sc.
Fasten off, leaving a sewing tail.
Each circle should be approximately ½–¾ inch across. If you want a larger cheek, work a second round with 2 sc in every stitch, giving 12 sc.
Use the same number of rounds for both cheeks.
Part 9 — Embroider the Gingerbread Face
Arrange the hood upright with its opening facing you. The face sits on the outer forehead area just behind the white trim.
Place one eye on each side of the crown seam, approximately 2–2½ inches apart. Keep both eyes the same distance from the face-opening edge.
With black yarn, embroider each eye using several small overlapping stitches to create a compact oval approximately ¼ inch across. Secure the ends inside the hood.
Embroider a shallow curved smile between and below the eyes using short backstitches. Avoid one long loose strand that could catch.
Sew a pink cheek below and slightly outside each eye. Stitch around each cheek’s full edge so it lies flat.
Check the expression with the hood shaped as it will be worn, not only flattened on the table.
Part 10 — Make the Red and Green Decorations
Make two red circles and two green circles with the smaller hook.
Round 1: Ch 2 and work 6 sc in the second chain from the hook. Join with a sl st in the first sc. (6 sts)
Round 2: Ch 1 and work 2 sc in every stitch around. Join. (12 sts)
Round 3: Ch 1. Repeat [sc in the next stitch, 2 sc in the next stitch] 6 times. Join. (18 sts)
Fasten off, leaving a sewing tail.
These are flat appliques, not stuffed balls or working buttons.
Part 11 — Position the Closure
Try the cape on over the intended clothing and bring the upper front edges together with a comfortable slight overlap.
Mark the first snap position approximately 1 inch below the neckline. Mark the second approximately 2 inches below the first, adjusting to the child’s fit.
Remove the cape before sewing. Attach each snap half securely through several nearby body stitches using strong matching thread. Do not rely only on the scalloped trim.
Close the snaps and check that the neckline remains loose and the front does not twist.
Part 12 — Sew the Festive Circles
Arrange the red circles as a pair near the upper closure and the green circles as a pair near the lower closure.
Place one circle on each visible front side. Keep the circles clear of the snap connection so the garment still opens easily.
Sew around the entire edge of every applique using its yarn tail, then secure the end inside the fabric.
The finished front should show two red accents above two green accents, with no hanging cords between them.
Finishing
Weave in every remaining end and inspect the hood seam, embroidery, appliques, and snap stitching.
Wash or gently block according to the yarn label. Dry flat and shape the white scallops with your fingers.
Once dry, check the fit again. The cape should drape freely over the shoulders, and the hood opening should stay clear of the child’s face.
Check the attachments before each wear, especially after washing.

Finished Size
- Size A: Approximately 16-inch neckline and 10-inch body length before edging.
- Size B: Approximately 18-inch neckline and 11½-inch body length before edging.
- Size C: Approximately 20-inch neckline and 13¼-inch body length before edging.
- White edging: Adds approximately ¾–1 inch at the hem and around the face opening.
The neckline measurement is taken along the open foundation edge. Closure overlap reduces the effective opening slightly.
Tips and Customization
Change the Gingerbread Shade
Cinnamon, caramel, and warm tan all work well. Choose a shade that gives the black embroidery enough contrast.
Keep the Face Simple
Two small embroidered eyes, one curved smile, and pink cheeks are enough to create the gingerbread character. You do not need separate plastic eyes.
Adjust Body Length
Add or remove plain rows after the final increase for your chosen size. At the stated gauge, two rows change the length by just under 1 inch.
Keep the neckline and hood counts unchanged when making a simple length adjustment.
Use a Smaller Hood on a Larger Body
If the larger body fits but its hood is too roomy, a separate smaller hood can be made and evenly centered along the neckline. This changes the attachment construction, so plan and pin the fit before sewing.
Make a Matching Gift Set
Pair the cape with a plain cream scarf-free outfit or a simple handmade gift bag. Keep the gingerbread face as the main decorative feature.
Frequently Asked Questions
Is this crochet gingerbread cape pattern suitable for beginners?
The body uses basic half double crochet, but you will need to track six increase sections, seam the hood, and sew the decorations. It is a good project for a confident beginner.
Does the cape have sleeves?
No. It is an open-front cape that drapes over the shoulders and arms.
Are the red and green circles buttons?
No. They are flat decorative appliques. Two hidden sew-on snaps close the front.
Can I add the ties shown in some gingerbread cape photos?
This toddler version is designed without neck ties. Follow the snap closure instructions rather than adding hanging cords.
Why is my cape smaller than the measurements?
Check your gauge and stitch counts. A tighter fabric produces a smaller neckline and shorter body even when the row numbers are correct.
Can I make the hood without a face?
Yes. Leave off the embroidery and cheeks for a simple cinnamon-and-white Christmas cape. The body and hood instructions stay the same.
Save This Christmas Crochet Project
Save this crochet gingerbread cape pattern to your Pinterest Christmas crochet board so you can return to the sizing and assembly instructions when you are ready to make it.
Looking for Your Next Crochet Project?
Love this project? Explore Cute Stitch Studio’s premium crochet patterns for more cute, cozy, gift-worthy, and beginner-friendly handmade ideas.