Crochet Skull Poncho Pattern with a Ribbed Collar
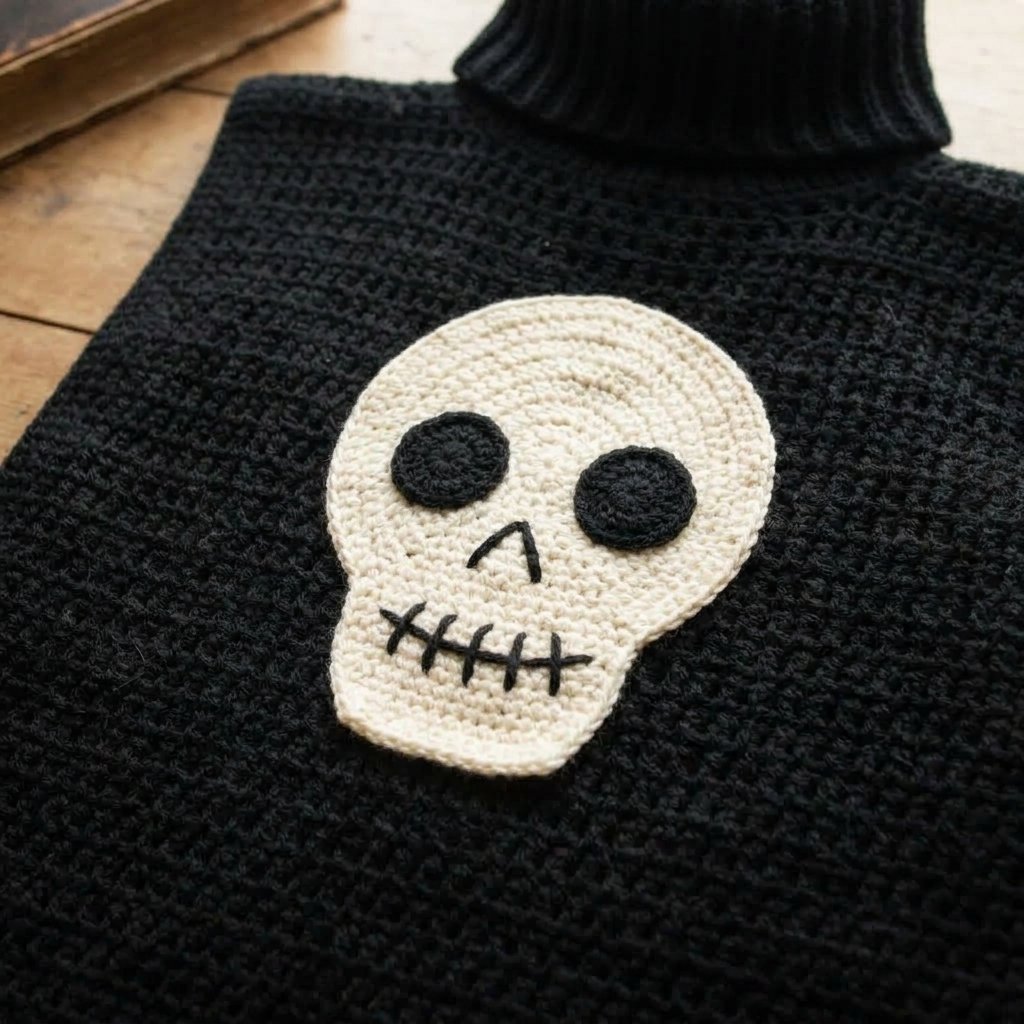
This crochet skull poncho pattern combines airy black mesh, a tall ribbed collar, and a bold cream skull for a dramatic handmade layer. A line of fringe adds movement along the lower edges.
Wear it over a long-sleeve top for a Halloween gathering, a fall outing, or an everyday gothic outfit. The open sides make it easy to layer without shaping sleeves.
This original Cute Stitch Studio version uses two rectangular mesh panels and a separate skull applique. The skull has a solid cream background with dark facial details, making it more approachable than an intricate lace skull.

Table of Contents
Crochet Skull Poncho Pattern With A Ribbed Collar Instructions
Project Details
- Skill level: Adventurous beginner to intermediate.
- Estimated time: Approximately 15–22 hours, depending on size and experience.
- Sizes: Four adult sizes, labeled A through D.
- Crochet terminology: US terms.
- Construction: Two rectangular mesh panels joined at the shoulders, with open sides, a sewn-on ribbed collar, and a separate skull applique.
- Fit: Loose and draped.
This original pattern has not been physically tested. Measurements and yarn quantities are estimates. Check your gauge, collar opening, and panel dimensions before final assembly.
Sizing
Because the sides remain open, this poncho does not have a closed chest circumference. Select a size by the width and length you want, using the bust ranges only as a starting guide.
For a useful fit check, drape a towel or fabric rectangle with the listed dimensions over your shoulders. This shows where the side edges and lower hem will fall.
| Size | Suggested bust range | Panel width | Shoulder-to-hem length |
|---|---|---|---|
| A | 30–36 in (76–91 cm) | 30.25 in (77 cm) | 22 in (56 cm) |
| B | 38–44 in (97–112 cm) | 34.25 in (87 cm) | 24 in (61 cm) |
| C | 46–52 in (117–132 cm) | 38.25 in (97 cm) | 26 in (66 cm) |
| D | 54–60 in (137–152 cm) | 42.25 in (107 cm) | 28 in (71 cm) |
Lengths exclude the edging and approximately 4 inches of fringe. The collar is approximately 5 inches tall and can be worn upright or folded.
Materials
- Worsted-weight black yarn in the estimated quantity below.
- Approximately 80–100 yards of cream worsted-weight yarn for the skull.
- 5 mm crochet hook for the mesh panels.
- 4 mm crochet hook for the collar and skull pieces.
- Yarn needle.
- Scissors.
- Measuring tape.
- Four removable stitch markers.
- A piece of cardboard approximately 5 inches wide for cutting fringe.
The black main yarn also supplies the eye patches and embroidered face details. No buttons, beads, or closures are required.

Hook Sizes
Use a 5 mm hook for the mesh body and a 4 mm hook for the collar and skull.
Adjust the hooks if needed to achieve the gauges below. The mesh should drape easily, while the collar should feel flexible and springy rather than stiff.
Yarn
Choose worsted-weight yarn, category 4, with a smooth surface. A soft acrylic or wool-acrylic blend works well for a lightweight, flexible layer.
| Size | Estimated black yarn, including collar and fringe |
|---|---|
| A | 1,100 yards (1,006 m) |
| B | 1,300 yards (1,189 m) |
| C | 1,500 yards (1,372 m) |
| D | 1,750 yards (1,600 m) |
Use cream yarn of a similar thickness for the skull. Charcoal with ivory creates a softer contrast, while black with bright white gives a bolder finish.
Gauge
Mesh gauge: 12 stitch positions and 8 rows = 4 inches (10 cm), after washing and drying flat. Each double crochet and each chain-1 space counts as one position.
Six complete mesh cells, each made from one double crochet and one chain space, measure approximately 4 inches across.
Collar gauge: 20 single crochet stitches and 24 back-loop rows = 4 inches (10 cm), measured relaxed.
Skull gauge: Approximately 18 single crochet stitches and 20 rows = 4 inches (10 cm). Small differences affect the applique size but not the poncho fit.
Make and wash a mesh swatch before starting. Hanging or stretching an openwork swatch while measuring can give misleading results.
Abbreviations
- ch: chain.
- sc: single crochet.
- dc: double crochet.
- sl st: slip stitch.
- st(s): stitch(es).
- BLO: back loop only.
- inc: work 2 single crochet stitches in the same stitch.
- sc2tog: single crochet 2 stitches together.
Before You Start
- Instructions are written for A (B, C, D).
- The body consists of two identical rectangles.
- The mesh turning chain counts as one double crochet plus one chain-1 space.
- Turning chains for single crochet do not count as stitches.
- Work the skull and collar through both loops unless BLO is specified.
- Make the collar fit your head comfortably before sewing it to the neckline.
- The poncho sides remain completely open.
How to Work sc2tog
Insert the hook into the next stitch, yarn over, and pull up a loop. Repeat in the following stitch. Yarn over and pull through all three loops on the hook. Two stitches become one.
Crochet Skull Poncho Pattern: Step-by-Step Instructions
Part 1 — Front Mesh Panel
With black yarn and the 5 mm hook, chain 94 (106, 118, 130).
Row 1: Dc in the sixth chain from the hook. Repeat (ch 1, skip the next chain, dc in the next chain) across.
The five skipped starting chains represent the first double crochet and the first chain space. You will have 46 (52, 58, 64) double crochets and 45 (51, 57, 63) chain spaces.
That equals 91 (103, 115, 127) stitch positions.
Row 2: Ch 4 and turn. Skip the first double crochet and the adjacent chain space. Dc in the next dc. Repeat (ch 1, skip the next chain space, dc in the next dc) across. Work the final dc into the third chain of the previous row’s starting chain.
For the first repeat row only, the starting edge belongs to the foundation-chain section. Work the final dc into the chain representing the top of that first double crochet, leaving its adjacent chain space open.
Rows 3–44 (48, 52, 56): Repeat Row 2.
The stitch count stays unchanged. Fasten off, leaving a long tail for a shoulder seam.
Check the relaxed dimensions against the size table. The panel should be rectangular, with the same number of mesh cells in every row.
Part 2 — Back Mesh Panel
Make a second panel exactly as the front, using the same foundation chain and row count.
Lay the panels together and compare their dimensions. If one is noticeably wider or longer, check the stitch count and tension before assembly.

Part 3 — Join the Shoulders
Place the panels together with their top edges aligned. Count each double crochet and each chain space as one position.
From each outer top corner, mark off 27 (33, 39, 45) positions for a shoulder seam.
This leaves 37 unseamed center positions on each panel for the neckline.
Using black yarn, whipstitch the matching shoulder sections together. Match double crochets to double crochets and chain spaces to chain spaces. Keep the seams flexible.
Leave the center neckline and both side edges open. Before adding the collar, check that the neck opening passes comfortably over your head.
Part 4 — Ribbed Collar
Use black yarn and the 4 mm hook. Chain 26.
Row 1: Sc in the second chain from the hook and across. 25 sts.
Row 2: Ch 1, turn. Sc BLO in every stitch. 25 sts.
Rows 3–132: Repeat Row 2.
The strip targets approximately 5 inches tall by 22 inches long, measured relaxed. The rows run around the neck when the collar is assembled.
Bring the first and last rows together temporarily and check the opening over your head. Add or remove rows if necessary; record the final count.
Fasten off with a long tail. Sew the first and last rows together, matching all 25 stitches. Turn the seam to the inside.
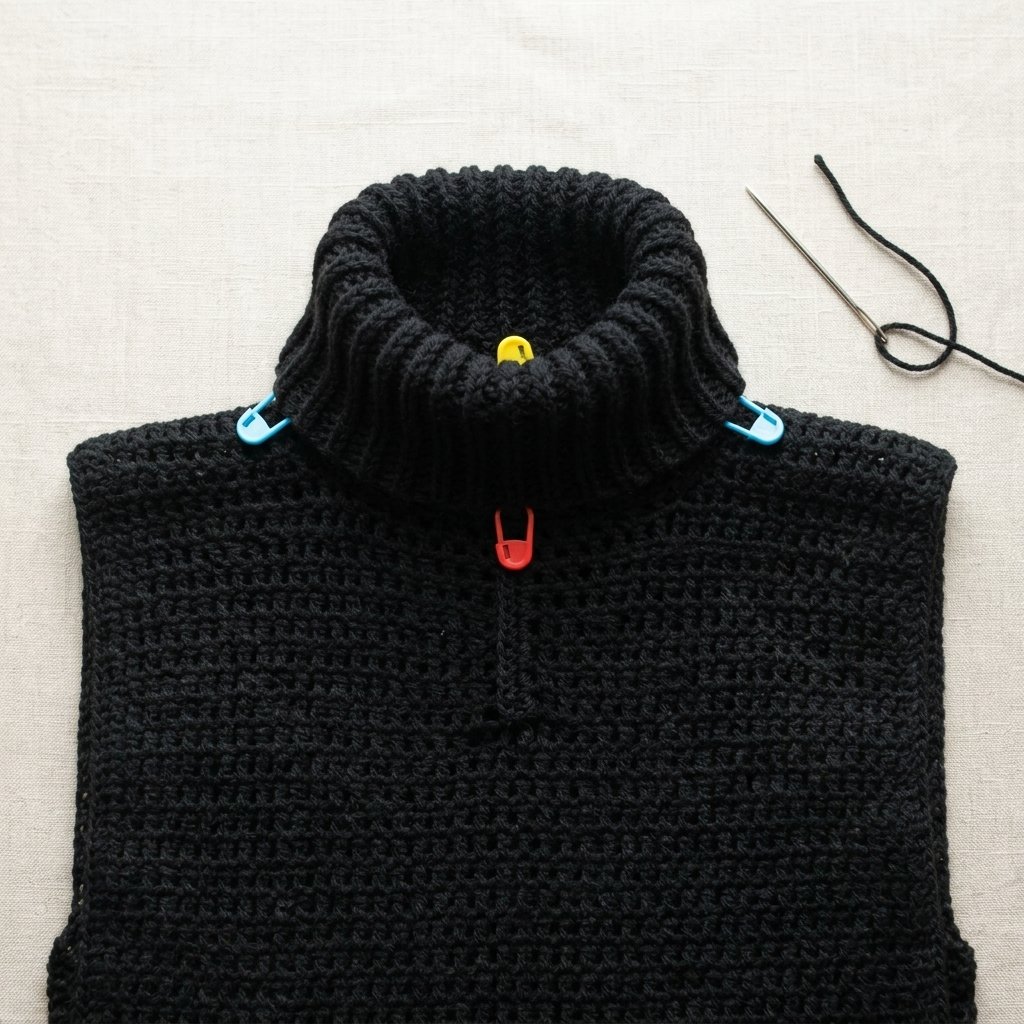
Part 5 — Attach the Collar
Mark the collar’s lower edge into four equal sections. Mark the poncho neckline at the center front, center back, and the two shoulder seams.
Match the collar seam to the center back. Align the other quarter markers with the corresponding neckline markers.
Sew the collar to the neckline one section at a time. Distribute the collar row ends evenly across the neckline stitches and spaces, stretching the ribbing gently as needed.
The untrimmed neckline is wider than the relaxed collar. Ease it in smoothly rather than creating large folds.
Try the poncho on before securing the final sewing tail. The collar and attachment seam must both stretch comfortably over the head.
Part 6 — Outer Edging
With the 5 mm hook, join black yarn at a lower corner.
Work one round of single crochet around the entire outside perimeter of the assembled poncho. Along the lower foundation edges, work 1 sc into each stitch position. Along the side edges, begin with approximately 2 sc per double crochet row end.
Work 3 sc at each of the four lower corners. Continue over each outer shoulder seam without adding corner stitches there.
Join to the first sc with a sl st and fasten off.
Lay the edging flat as you work. If it ripples, use fewer stitches along the affected side edge. If it pulls inward, add stitches evenly. Match the treatment on opposite sides.
Part 7 — Cream Skull Base
Use cream yarn and the 4 mm hook. Work from the top of the skull toward the chin. Chain 25.
Row 1: Sc in the second chain from the hook and across. 24 sts.
Row 2: Ch 1, turn. Inc in the first st, sc in the next 22 sts, inc in the last st. 26 sts.
Row 3: Ch 1, turn. Inc in the first st, sc across to the last st, inc in the last st. 28 sts.
Row 4: Repeat Row 3. 30 sts.
Row 5: Repeat Row 3. 32 sts.
Rows 6–16: Ch 1, turn. Sc across. 32 sts in each row.
Row 17: Ch 1, turn. Sc2tog, sc across to the last 2 sts, sc2tog. 30 sts.
Row 18: Ch 1, turn. Sc across. 30 sts.
Rows 19–23: Repeat Row 17, decreasing 2 stitches per row. Counts are 28, 26, 24, 22, and 20 sts.
Rows 24–28: Ch 1, turn. Sc across. 20 sts in each row.
Rows 29–33: Repeat Row 17, decreasing 2 stitches per row. Counts are 18, 16, 14, 12, and 10 sts.
Do not fasten off. Chain 1 and work a single crochet edging around the skull: approximately 1 sc per row end along the sides and 1 sc per stitch across the top and chin.
Add an extra stitch at a turn only if needed to keep the edge flat. Join with a sl st and fasten off, leaving a long tail for attachment.
The skull should measure approximately 7–7.5 inches wide and 6.5–7 inches tall after edging.
Part 8 — Eye Patches
Make two with black yarn and the 4 mm hook.
Round 1: Ch 2, then work 6 sc in the second chain from the hook. 6 sts.
Continue in a spiral, marking the first stitch.
Round 2: Inc in every st. 12 sts.
Round 3: (Sc in the next st, inc) 6 times. 18 sts.
Round 4: (Sc in the next 2 sts, inc) 6 times. 24 sts.
Sl st in the next st and fasten off with a sewing tail.
Position the eyes on the wide upper skull, with their centers approximately over Row 12 and an even gap between them. Sew around each patch without pulling the cream fabric inward.
Part 9 — Nose and Teeth
With black yarn, embroider a small downward-pointing triangle at the center of the face, approximately across Rows 19–21. Outline it with short backstitches, then fill it with closely placed stitches.
For the mouth, backstitch a horizontal line across the center 14 stitches of Row 26.
Add five evenly spaced short vertical lines crossing the mouth line, extending approximately from Row 24 to Row 28. These divide the cream area into stylized teeth.
Keep the embroidery flat and secure all tails on the back of the skull.
Part 10 — Attach the Skull
Lay the front panel flat without stretching it. Center the skull horizontally, with its top approximately 3–4 inches below the collar attachment.
Temporarily secure it with loose yarn tacking stitches. Lift the garment to check placement before sewing permanently.
Using cream yarn, sew around the applique edge, catching nearby mesh posts or chains at regular intervals. Do not pull across open spaces so tightly that the mesh bunches.
Add a few discreet anchoring stitches through the back of the applique near its center, catching mesh intersections underneath. Remove the temporary tacking stitches.
Part 11 — Fringe
Wrap black yarn around the 5-inch cardboard and cut along one edge to make strands approximately 10 inches long.
Use two strands for each fringe group. Fold them together in half, pull the fold through a lower edging stitch, pass the four ends through the loop, and tighten gently.
Add a group approximately every third edging stitch along the front and back lower hems. Do not fringe the neckline or side edges.
Lay the poncho flat and trim the fringe to approximately 4 inches below the attachment knots.
Finishing
Weave in all ends, paying particular attention to the shoulder seams, collar seam, and applique attachment.
Wash or damp-block according to the yarn label. Support the wet garment, arrange it flat, and smooth the mesh into shape without pulling it beyond the intended measurements.
Let it dry fully before making the final fringe trim. Fold the collar down if you prefer a shorter neckline.
Finished Size
The finished panel width is approximately 30.25 (34.25, 38.25, 42.25) inches, or 77 (87, 97, 107) cm.
The shoulder-to-hem length is approximately 22 (24, 26, 28) inches, or 56 (61, 66, 71) cm, before edging and fringe.
The collar is approximately 5 inches (12.7 cm) tall. Fringe adds approximately 4 inches (10 cm) to the lower edges.
Tips and Customization
- Adjust the length: Add or remove 2 mesh rows from both panels for approximately 1 inch of length.
- Make a shorter collar: Chain 16 instead of 26 and work 15 sc per row. Keep the collar length fitted to your head.
- Skip the fringe: Finish with the single crochet edging for a simpler silhouette.
- Change the contrast: Try charcoal and ivory, black and silver gray, or dark plum and cream.
- Keep the mesh visible: Wear the poncho over a solid-color layer.
- Use good lighting: A pale cloth beneath black yarn makes the stitches easier to distinguish.
Frequently Asked Questions
Is this crochet skull poncho pattern suitable for beginners?
The mesh panels are repetitive and approachable. The collar fitting, applique embroidery, and assembly make the complete project better suited to an adventurous beginner.
Is the skull worked directly into the mesh?
No. This version uses a separate cream skull applique with black eye patches and embroidered details. It is sewn to the front after the poncho is assembled.
Does this pattern create a circular cape?
No. Two rectangular panels create a straight-edged poncho with open sides. The fabric drapes over the shoulders when worn.
Can I use thinner yarn?
Thinner yarn changes both the size and drape. Use it only if you can match the stated gauge with a fabric you like, or recalculate the pattern for your new gauge.
What if the collar will not fit over my head?
Add collar rows before joining the strip into a ring. Also check that the neckline attachment seam stretches; a tight sewing seam can restrict an otherwise flexible collar.
How should I store the poncho?
Fold it with the fringe lying smoothly. Avoid storing it where the open mesh can catch on hooks or sharp hardware.
Save This Gothic Crochet Project
Save this pattern to your Halloween crochet or handmade wardrobe board on Pinterest so you can return to it when you are ready to make a statement layer.
Looking for Your Next Crochet Project?
Love this project? Explore Cute Stitch Studio’s premium crochet patterns for more cute, cozy, gift-worthy, and beginner-friendly handmade ideas.