


Free Bat Dragon Crochet Pattern for Halloween
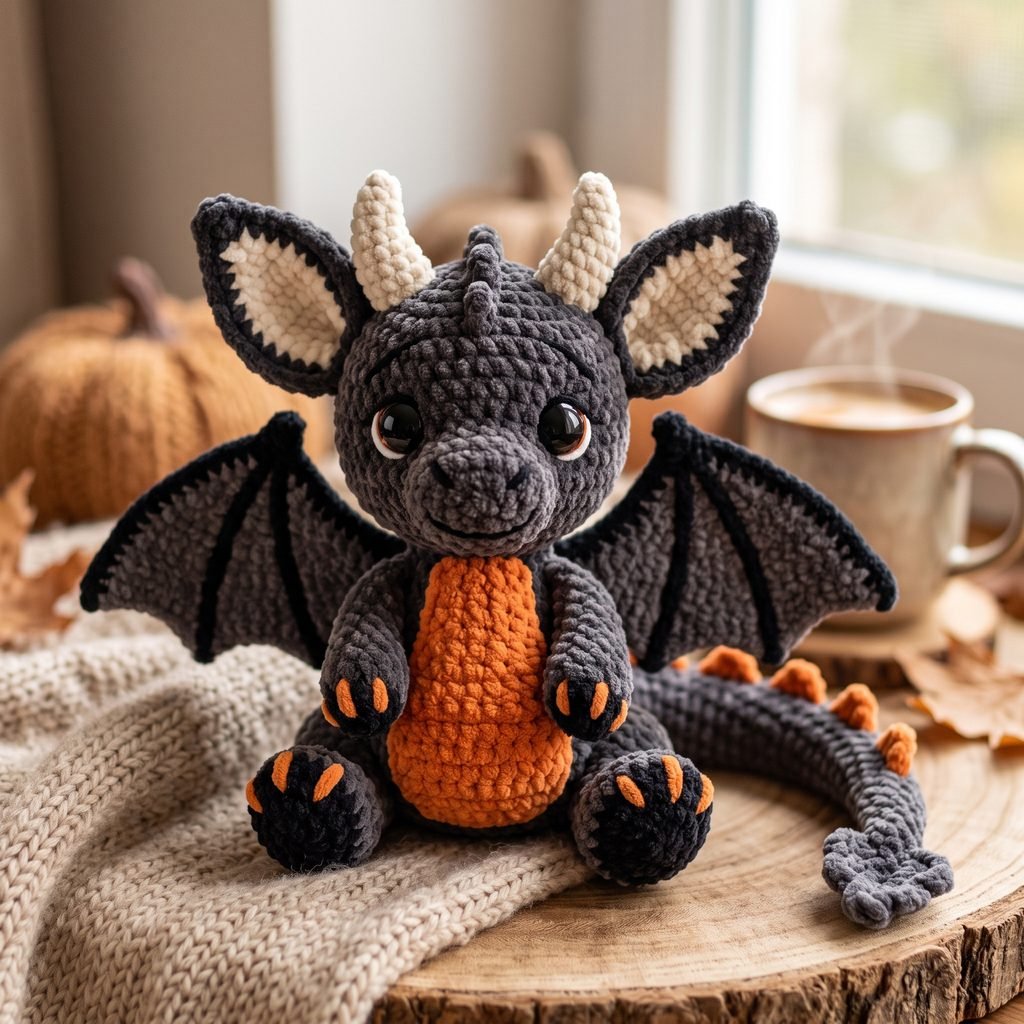
If you love spooky-cute plushies, this bat dragon crochet pattern is a fun Halloween project to make. This cuddly little creature combines dragon features and bat wings into one adorable amigurumi with oversized ears, tiny horns, a curved tail, and a cozy fall color palette.
This project is ideal for advanced beginners who already know the basics of amigurumi, including working in rounds, increasing, decreasing, sewing pieces together, and using plush yarn. The finished bat dragon makes a sweet Halloween decoration, a handmade gift, or a cozy addition to your fall crochet collection.
Project Details
- Skill Level: Advanced Beginner
- Estimated Time: 5–7 hours
- Finished Size: Approximately 10–12 inches tall when sitting
- Crochet Terminology: US terms
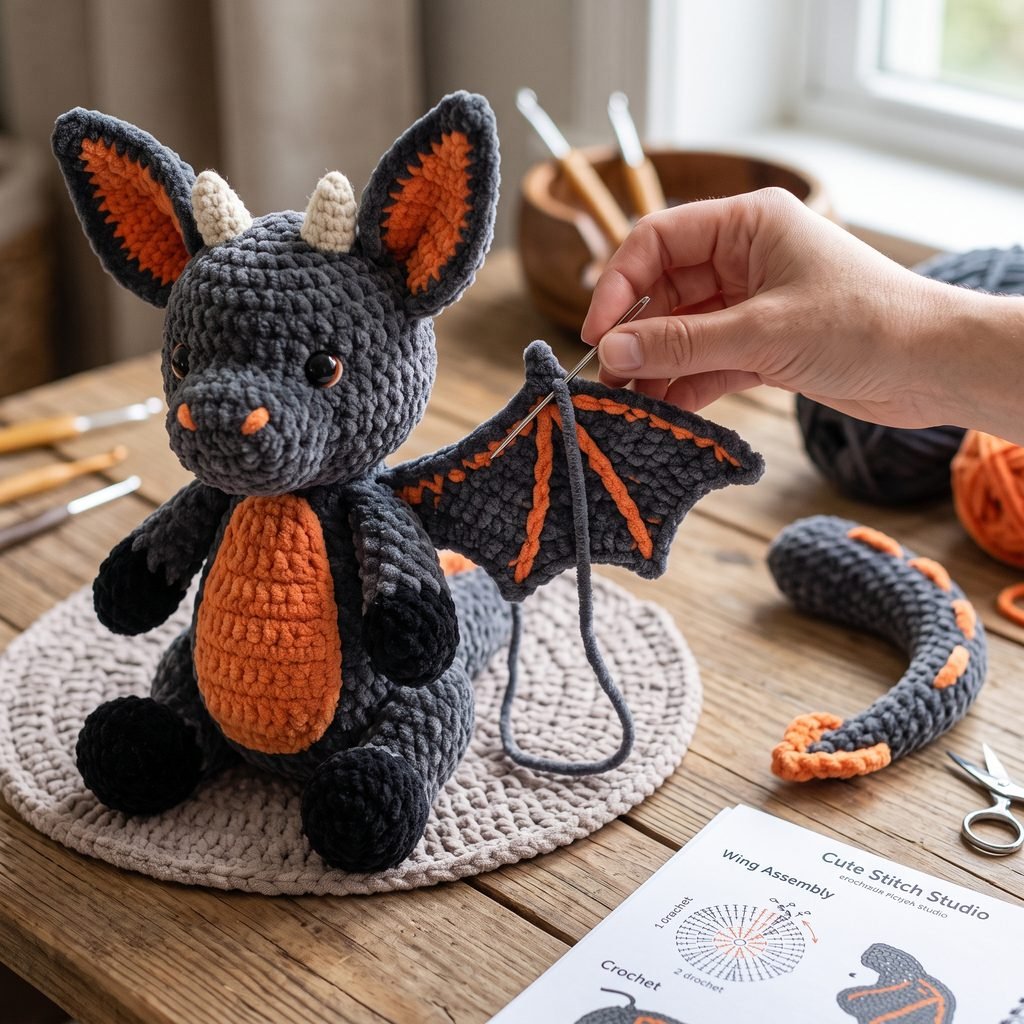
- Construction: The body and head are crocheted as one piece. The legs, arms, ears, horns, wings, belly patch, and tail are made separately and sewn on.
Materials

- Super bulky #6 plush or chenille yarn in charcoal gray
- Super bulky #6 plush or chenille yarn in orange
- Small amount of cream or ivory plush yarn for the horns
- 5 mm crochet hook
- Polyester fiberfill stuffing
- 2 safety eyes, 14 mm or 16 mm
- Yarn needle
- Scissors
- Stitch marker
- Pink embroidery thread or blush yarn for cheeks, optional
Hook Size
Use a 5 mm crochet hook.
If your plush yarn feels loose or gappy, go down to a 4.5 mm hook. If your tension is very tight, a 5.5 mm hook may feel more comfortable.
Yarn
This pattern works best with super bulky #6 plush or chenille yarn to create a soft, cuddly bat dragon.
Approximate yarn amounts:
- Charcoal gray: 180–220 yards
- Orange: 70–100 yards
- Cream or ivory: Less than 20 yards
You can use dark gray and orange for a classic Halloween look, but purple, black, red, or moss green would also create a fun fantasy version.
Abbreviations
- MR = magic ring
- ch = chain
- sc = single crochet
- sl st = slip stitch
- st(s) = stitch(es)
- inc = increase, work 2 sc in the same stitch
- dec = invisible single crochet decrease
Before You Start / Pattern Notes
This pattern is worked mostly in continuous spiral rounds. Use a stitch marker to mark the first stitch of each round.
Because plush yarn can make stitches harder to see, count carefully at the end of each round.
Insert the safety eyes before fully stuffing and closing the head.
Stuff the body and head firmly, but keep the arms, wings, and tail slightly softer.
Free Bat Dragon Crochet Pattern Instructions

Part 1 — Body and Head
Using charcoal gray yarn:
Round 1: 6 sc into MR. (6 sts)
Round 2: Inc around. (12 sts)
Round 3: *Sc in next st, inc.* Repeat around. (18 sts)
Round 4: *Sc in next 2 sts, inc.* Repeat around. (24 sts)
Round 5: *Sc in next 3 sts, inc.* Repeat around. (30 sts)
Round 6: *Sc in next 4 sts, inc.* Repeat around. (36 sts)
Round 7: *Sc in next 5 sts, inc.* Repeat around. (42 sts)
Rounds 8–13: Sc in each st around. (42 sts)
Round 14: *Sc in next 5 sts, dec.* Repeat around. (36 sts)
Round 15: Sc around. (36 sts)
Round 16: *Sc in next 4 sts, dec.* Repeat around. (30 sts)
Round 17: Sc around. (30 sts)
Round 18: *Sc in next 3 sts, dec.* Repeat around. (24 sts)
This forms the neck area.
Round 19: *Sc in next 3 sts, inc.* Repeat around. (30 sts)
Round 20: *Sc in next 4 sts, inc.* Repeat around. (36 sts)
Round 21: *Sc in next 5 sts, inc.* Repeat around. (42 sts)
Round 22: *Sc in next 6 sts, inc.* Repeat around. (48 sts)
Rounds 23–29: Sc in each st around. (48 sts)
Insert the safety eyes between Rounds 26 and 27, spacing them about 9 stitches apart. If you want a sweeter expression, place them slightly lower and closer together.
Start stuffing the body and neck, then continue stuffing the head firmly as you go.
Round 30: *Sc in next 6 sts, dec.* Repeat around. (42 sts)
Round 31: *Sc in next 5 sts, dec.* Repeat around. (36 sts)
Round 32: *Sc in next 4 sts, dec.* Repeat around. (30 sts)
Round 33: *Sc in next 3 sts, dec.* Repeat around. (24 sts)
Round 34: *Sc in next 2 sts, dec.* Repeat around. (18 sts)
Round 35: *Sc in next st, dec.* Repeat around. (12 sts)
Finish stuffing the head.
Round 36: Dec around. (6 sts)
Fasten off and close the opening.
Part 2 — Belly Patch
Using orange yarn, ch 7.
Round 1: Starting in the 2nd chain from the hook, sc 5, 3 sc in the last chain. Continue on the opposite side of the chain, sc 4, inc in the final stitch. (14 sts)
Round 2: Inc, sc 4, inc 3 times, sc 4, inc 2 times. (20 sts)
Round 3: Sc around. (20 sts)
Fasten off, leaving a long tail for sewing.
Sew the belly patch to the front center of the body, leaving a smooth even border around the edge.
Part 3 — Legs (Make 2)
Using charcoal gray yarn:
Round 1: 6 sc into MR. (6 sts)
Round 2: Inc around. (12 sts)
Round 3: *Sc in next st, inc.* Repeat around. (18 sts)
Rounds 4–5: Sc around. (18 sts)
Round 6: *Sc in next st, dec.* Repeat around. (12 sts)
Rounds 7–8: Sc around. (12 sts)
Stuff firmly, especially in the lower rounded foot.
Fasten off, leaving a long tail for sewing.
Optional claw detail: Use orange yarn to add 3 small satin-stitch claws across the front of each foot.
Part 4 — Arms (Make 2)
Using charcoal gray yarn:
Round 1: 6 sc into MR. (6 sts)
Round 2: Inc around. (12 sts)
Rounds 3–5: Sc around. (12 sts)
Round 6: *Sc in next st, dec.* Repeat around. (8 sts)
Rounds 7–8: Sc around. (8 sts)
Stuff lightly.
Flatten the opening and sew closed.
Fasten off, leaving a long tail for sewing.
Optional claw detail: Add 2 or 3 small orange claw stitches at the end of each hand.
Part 5 — Outer Ears (Make 2)
Using charcoal gray yarn, ch 2.
Row 1: Work 3 sc into the 2nd ch from hook. Turn. (3 sts)
Row 2: Ch 1, inc, sc, inc. Turn. (5 sts)
Row 3: Ch 1, sc across. Turn. (5 sts)
Row 4: Ch 1, inc, sc 3, inc. Turn. (7 sts)
Row 5: Ch 1, sc across. Turn. (7 sts)
Row 6: Ch 1, inc, sc 5, inc. Turn. (9 sts)
Row 7: Ch 1, sc across. Turn. (9 sts)
Fasten off, leaving a sewing tail.
Part 6 — Inner Ears (Make 2)
Using orange yarn, ch 2.
Row 1: Work 3 sc into the 2nd ch from hook. Turn. (3 sts)
Row 2: Ch 1, inc, sc, inc. Turn. (5 sts)
Row 3: Ch 1, sc across. Turn. (5 sts)
Row 4: Ch 1, inc, sc 3, inc. Turn. (7 sts)
Row 5: Ch 1, sc across. Turn. (7 sts)
Fasten off, leaving a long tail.
Sew each orange inner ear panel onto one gray outer ear, centering it neatly and leaving a small gray border around the edge.
Part 7 — Horns (Make 2)
Using cream or ivory yarn:
Round 1: 4 sc into MR. (4 sts)
Round 2: Sc around. (4 sts)
Round 3: *Sc in next st, inc.* Repeat around. (6 sts)
Rounds 4–5: Sc around. (6 sts)
Lightly stuff if needed.
Fasten off, leaving a tail for sewing.
Part 8 — Wings (Make 2)
Using charcoal gray yarn, ch 2.
Row 1: Work 2 sc into the 2nd ch from hook. Turn. (2 sts)
Row 2: Ch 1, inc in first st, sc in last st. Turn. (3 sts)
Row 3: Ch 1, sc across. Turn. (3 sts)
Row 4: Ch 1, inc, sc 1, inc. Turn. (5 sts)
Row 5: Ch 1, sc across. Turn. (5 sts)
Row 6: Ch 1, inc, sc 3, inc. Turn. (7 sts)
Row 7: Ch 1, sc across. Turn. (7 sts)
Row 8: Ch 1, inc, sc 5, inc. Turn. (9 sts)
Row 9: Ch 1, sc across. Turn. (9 sts)
Row 10: Ch 1, inc, sc 7, inc. Turn. (11 sts)
Row 11: Ch 1, sc across. Turn. (11 sts)
Row 12: Ch 1, inc, sc 9, inc. Turn. (13 sts)
Fasten off.
To create a wing with a more bat-like shape, fold the lower edge slightly into 3 gentle sections when sewing. This gives the illusion of wing points.
Optional wing detail: Use orange yarn to surface-slip-stitch or embroider 3 simple lines from the wing base outward to create the wing bones.
Part 9 — Tail
Using charcoal gray yarn, ch 26.
Row 1: Starting in the 2nd chain from the hook, sc across. (25 sts)
Row 2: Ch 1, sc across. (25 sts)
Fasten off, leaving a long tail for sewing.
For extra shape, gently twist or curve the tail while sewing it to the back of the body.
Part 10 — Tail Tip (Make 2)
Using orange yarn, ch 5.
Starting in the 2nd chain from the hook, work: sl st, sc, hdc, 3 hdc in the final chain, then continue down the opposite side of the foundation chain with hdc, sc, sl st.
Fasten off.
Make 2 identical pieces and sew them to opposite sides of the tail end to create a dragon-style tail tip.
Assembly
Sew the belly patch to the front of the body if you have not already done so.
Attach the legs to the lower front of the body so the bat dragon can sit upright. Place them slightly apart for a cute chubby seated pose.
Sew the arms to the sides of the upper body, a little below the head.
Attach the ears to the top sides of the head. Angle them outward slightly for a playful look.
Sew the horns between the ears, spacing them evenly.
Attach the wings to the upper back. Position them so they angle outward slightly rather than sticking straight up.
Sew the tail to the lower back center of the body and curve it gently around the side or behind the bat dragon.
Add optional pink cheek stitches or a tiny embroidered smile if desired.
Finishing

Weave in all remaining yarn ends carefully.
Gently shape the ears, wings, and tail with your hands.
Massage the stuffing slightly if you need to even out the body shape.
If the wings feel too floppy, add one or two small anchoring stitches from the wing base to the back.
Blocking is usually unnecessary for plush chenille amigurumi.
Finished Size
Using super bulky #6 plush yarn and a 5 mm hook, the finished bat dragon measures approximately:
- Height: 10–12 inches (25–30 cm) sitting
- Wing Span: About 11–13 inches (28–33 cm)
- Body Width: About 5–6 inches (13–15 cm)
Your final measurements may vary depending on yarn brand, tension, stuffing, and assembly.
Tips and Customization Ideas
Try Different Halloween Colors
Use black and purple, deep plum and lime green, or dark brown and rust orange for a different spooky-season look.
Add More Dragon Personality
Embroider tiny nostrils or a small smile for extra character.
Use Smaller Yarn for a Mini Version
Switch to worsted weight yarn and a smaller hook for a smaller display-sized bat dragon.
Make the Wings More Dramatic
Add extra embroidered wing lines or lightly stiffen the wings if you want a more structured shape.
Turn It Into a Gift
This bat dragon makes a sweet handmade gift for Halloween lovers, fantasy fans, and anyone who loves cozy plush crochet creatures.
Where to Display Your Bat Dragon
This spooky-cute plush looks adorable on a shelf, mantel, reading nook, nursery shelf, Halloween display, or cozy fall centerpiece. It also works beautifully as a seasonal handmade gift.
Looking for Your Next Crochet Project?
Love this project? Explore Cute Stitch Studio’s premium crochet patterns for more cute, cozy, seasonal, and gift-worthy handmade ideas.


